Configuring IEEE DOT1X VOS Local Authentication
by Tamilvanan S
In this article, we will understand what dot1x authentication control protocol is and how can a corporate network be protected from unauthorized access using Versa Secure SD-WAN VOS local authentication.
Overview
EEE 802.1X is a port-based network access control (PNAC) protocol that authenticates devices before they can connect to the network and gain access to network resources. IEEE 802.1X can be configured to prevent unauthorized network devices from accessing the network and to allow known devices to connect to the network without requiring authentication. IEEE 802.1X has three required components:
- Supplicant—A client that runs on the endpoint and submits credentials for authentication. A Versa Operating SystemTM (VOSTM) interface always acts as an authenticator. When a RADIUS server is the authenticating server, the VOS interface acts only as an authenticator and sends information about the supplicant to the authenticating server. With local authentication (that is, you do not use a RADIUS server or an identity provider server), the VOS interface acts as both the authenticator and the authenticating server. In this document, we are going to implement local authentication.
- Authenticator—A network access device that facilitates the authentication process by relaying the credentials of the supplicant to the authentication server. The authenticator enforces both the locally configured network access policy and the dynamically assigned network access policy returned by the authentication server.
- Authentication server—A server that validates the credentials sent by the supplicant and determines what level of network access the end user or device should receive. VOS supports a RADIUS server and a local authentication as the authentication server. This document focuses on VOS as local authentication server.
In Versa, the machine state of 802.1x is depicted below:
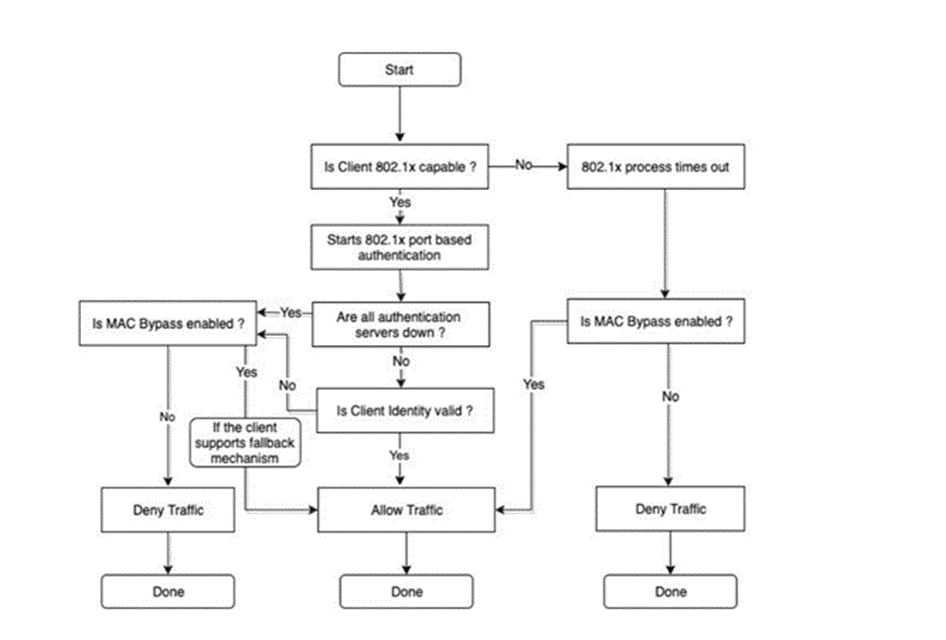
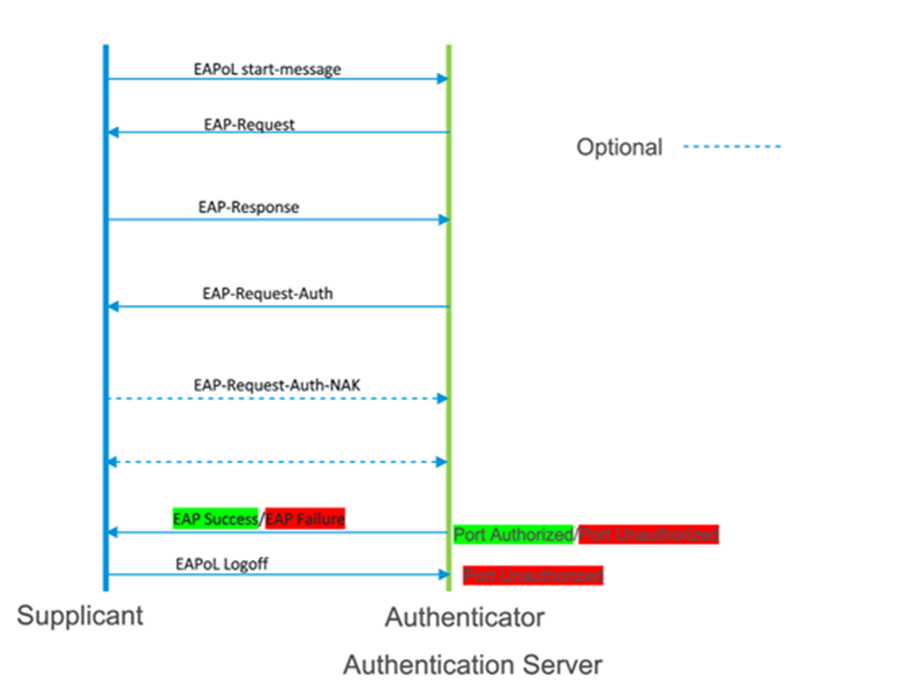
802.1x uses the Extensible Authentication Protocol [EAP] to exchange messages during the authentication process. Before authentication, the identity is unknown and all traffic is blocked except EAP messages in order to prevent unauthorized devices to gain access to network resources. EAP Over LAN (EAPoL) frames have ether type of 0x888e and use the destination multicast MAC address 01:80:c2:00:00:03. EAP messages are exchanged between Supplicant and authenticator and Radius messages are exchanged between Authenticator and Authentication server. Various EAP message types are: PEAP, EAP-TLS, PEAP-MSCHAPv2, EAP-MD5, etc… Below is the flowchart of EAP messages for local authentication:
 a
High-Level Topology
a
High-Level Topology
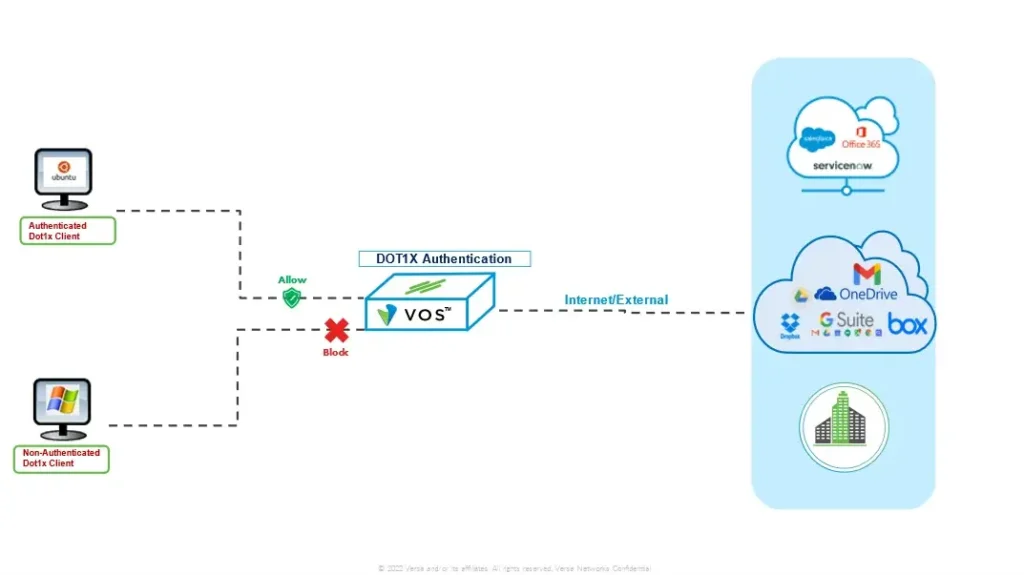
The topology is made of 01 dot1x-client and 01 non-dot1x-client to simulate a sd-wan network with DIA. The supplicant mode used is Single and VOS with IP 172.16.14.254/24 is used as both authenticator and authentication server.
Configuration
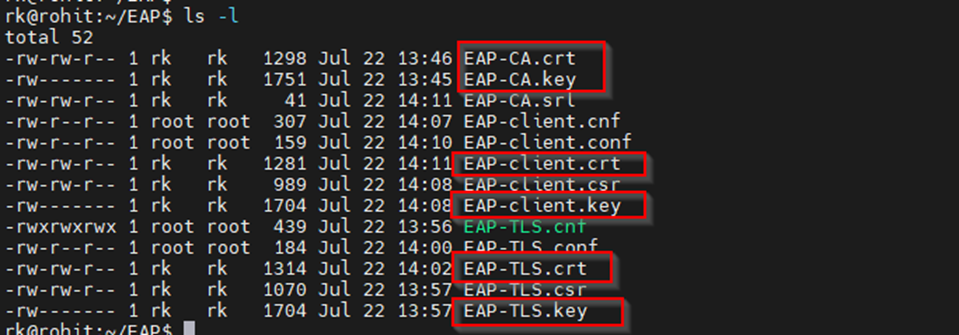
VOS 802.1x local authentication supports certificate authentication based on EAP-TLS. There are different ways to generate certificate. In the example below, we used openssl to generate client and server certificate signed by self-signed CA.
NOTE: Private key should be password protected otherwise Ubuntu will throw an error during 802.1x configuration on the interface. In the example below, server and client private key was not password protected initially so we used openssl to add pass-phrase to existing private key.
openssl rsa -aes256 -in your.key -out your.encrypted.key -------------> to add pass-phrase to private key
mv your.encrypted.key your.key --------------------> rename the new private key
chmod 600 your.key ----------------->change permissions
Generate client and server Certificate
1 Create a self signed CA certificate
openssl genrsa -des3 -out EAP-CA.key 2048 >>> generate CA private key
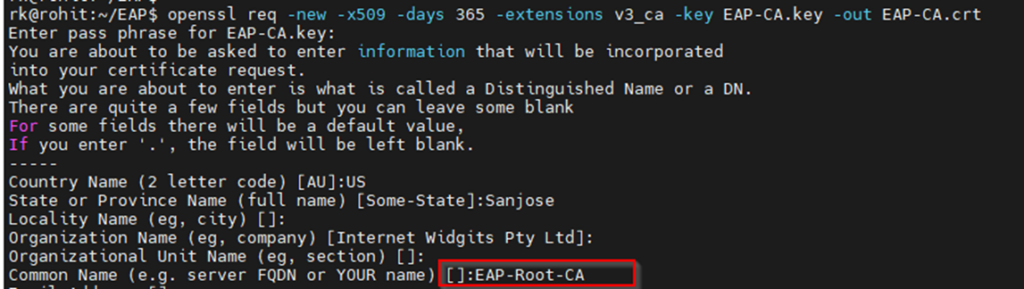
 openssl req -new -x509 -days 365 -extensions v3_ca -key EAP-CA.key -out EAP-CA.crt >>>>>> generate self signed CA certificate
2. Generate server certificate signed by self signed CA
To create a Certificate using the Subject Alternative Name field you need to create an OpenSSL configuration file that allows creating certificates with this attribute.
Create an empty text file. Name it EAP-TLS.cnf. The cnf extention is important.
Add the following lines to the file.
EAP-TLS.cnf
[ req ]
default_bits = 2048
distinguished_name = req_distinguished_name
req_extensions = req_ext
prompt = no
[ req_distinguished_name ]
countryName = US
stateOrProvinceName = California
localityName = Sanjose
organizationName = Versa Networks
commonName = EAP-TLS-Server
[ req_ext ]
subjectAltName = @alt_names
[alt_names]
DNS.1 = EAP-TLS-Server
IP = 192.168.1.1
Generate CSR and private key
openssl req -newkey rsa:2048 -nodes -sha256 -keyout EAP-TLS.key -out EAP-TLS.csr -config EAP-TLS.cnf


Once CSR is generated successfully, CSR file EAP-TLS.csr must be shared with CA to get it signed.
For demonstration purpose, we will get it signed from a Self signed Certifying Authority (CA).
Sign the certificate (CSR) using the CA key created previously.
It’s a 2-steps process. Unfortunately x509 command doesn’t take SAN options in a single line, so we will have to create a config file first.
Create a file called EAP-TLS.conf:
EAP-TLS.conf
[versa_sign]
basicConstraints = CA:false
keyUsage = nonRepudiation, digitalSignature, keyEncipherment
extendedKeyUsage = serverAuth
subjectAltName = DNS:EAP-TLS-Server, IP:192.168.1.1
Now, let’s use a newly created config file to sign a CSR and make a Certificate out of it.
openssl x509 -req -CA EAP-CA.crt -CAkey EAP-CA.key -CAcreateserial -days 365 -in EAP-TLS.csr -out EAP-TLS.crt -extfile EAP-TLS.conf -extensions versa_sign


3. Generate client certificate
Follow the same steps to generate client certificate except extendedkey usage = clientAuth instead of ServerAuth
EAP-client.cnf
[ req ]
default_bits = 2048
distinguished_name = req_distinguished_name
prompt = no
[ req_distinguished_name ]
countryName = US
stateOrProvinceName = California
localityName = Sanjose
organizationName = Versa Networks
commonName = Rohit
openssl req -newkey rsa:2048 -nodes -sha256 -keyout EAP-client.key -out EAP-client.csr -config EAP-client.cnf

EAP-client.conf
[versa_sign]
basicConstraints = CA:false
keyUsage = nonRepudiation, digitalSignature, keyEncipherment
extendedKeyUsage = clientAuth
subjectAltName = DNS:Rohit

openssl x509 -req -CA EAP-CA.crt -CAkey EAP-CA.key -CAcreateserial -days 365 -in EAP-client.csr -out EAP-client.crt -extfile EAP-client.conf -extensions versa_sign

Now we have certificate and private key for CA, server and client.
Step 2: Configure VOS for 802.1x
In this section, we configure the following: – CA and Self-Signed Server certificates upload in appliance via Versa Director – Authentication profile and dot1x settings for local authentication Certificates generated in previous section (versa-dot1x-ca.pem and server-ee.pem) are used along with associated keys.
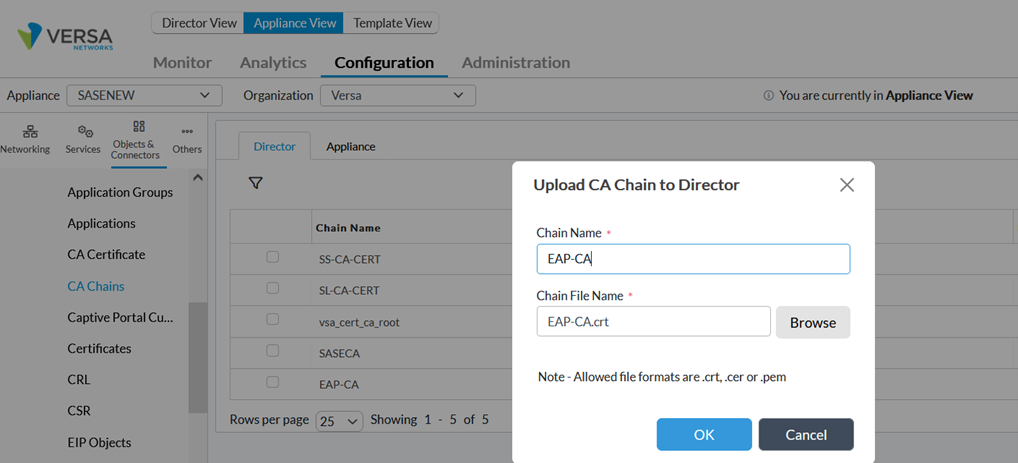
Upload CA Certificates to Versa Director
Go to Objects & Connectors -> Custom Objects -> CA Chains -> Director tab and click on Upload button Provide the certificate chain name and file as below:
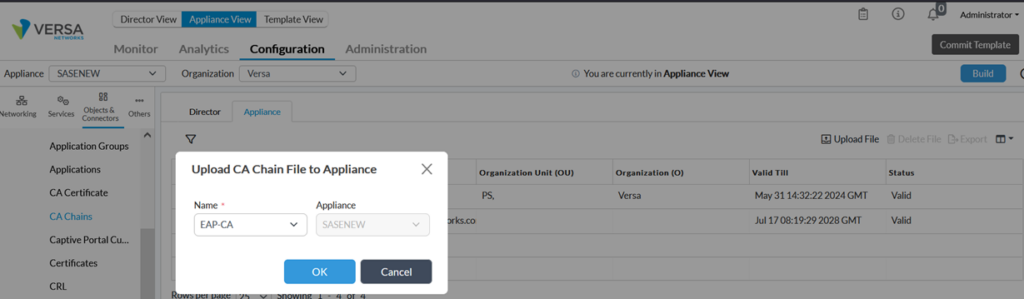
Once uploaded in Director, select the appliance tab and upload the CA certificate to the appliance as indicated below:
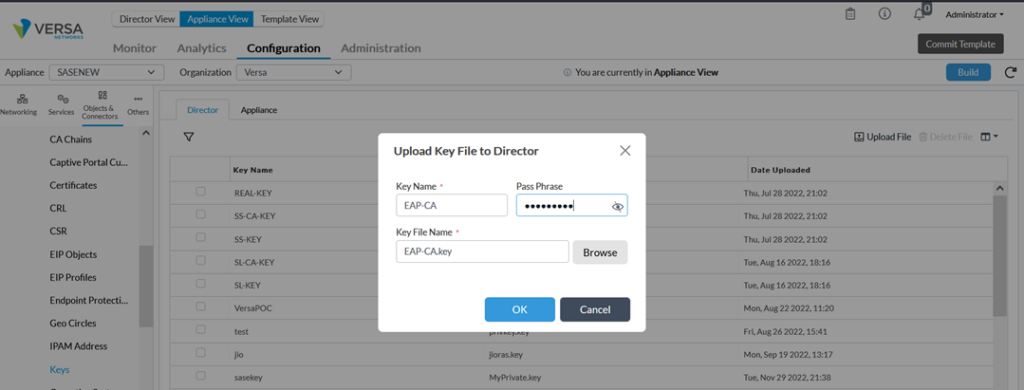
The next step is to upload self-signed certificates used by the VOS to authenticate clients. We have generated this certificate using OpenSSL in previous section.
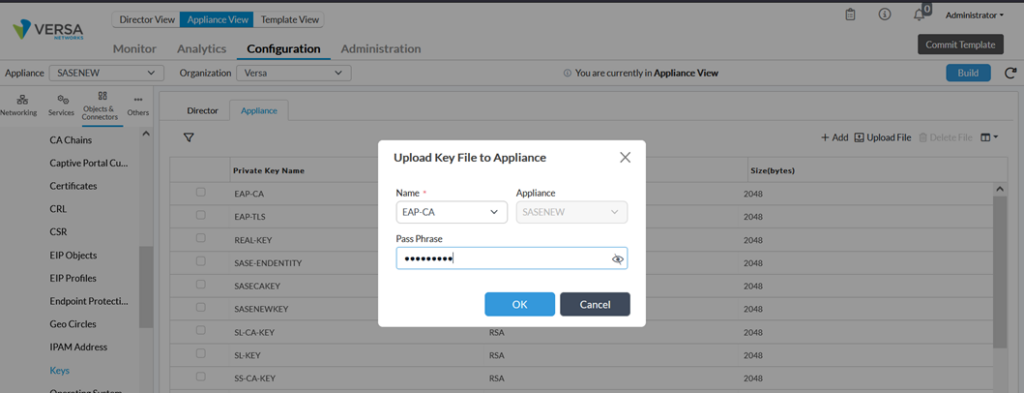
>> We upload keys in Appliance through Director (Objects & Connectors->Custom Objects-> Keys)
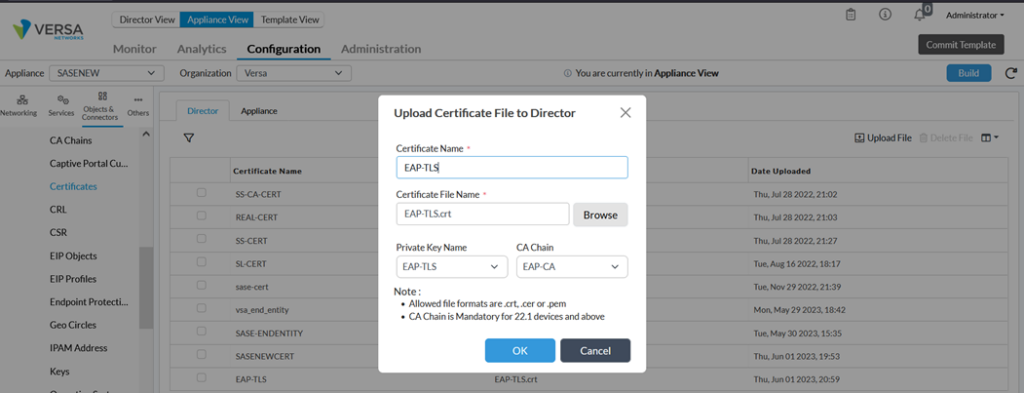
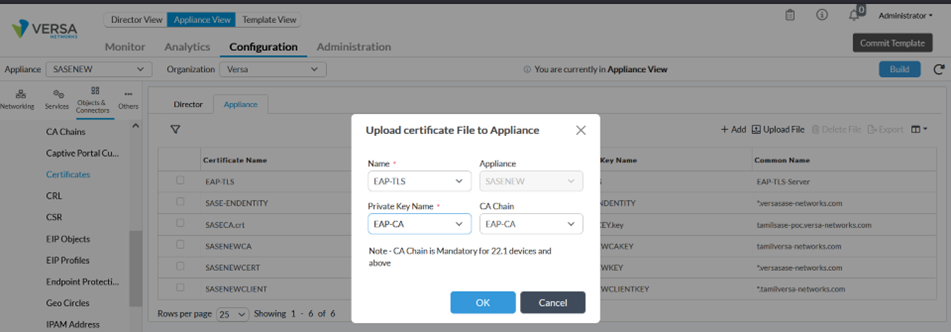
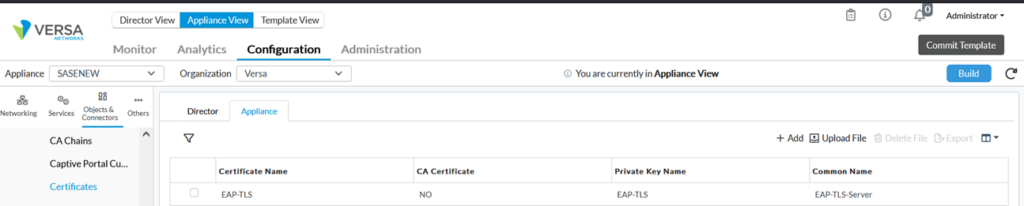
We upload certificate in Appliance through Director (Objects & Connectors->Custom Objects-> Certificates)
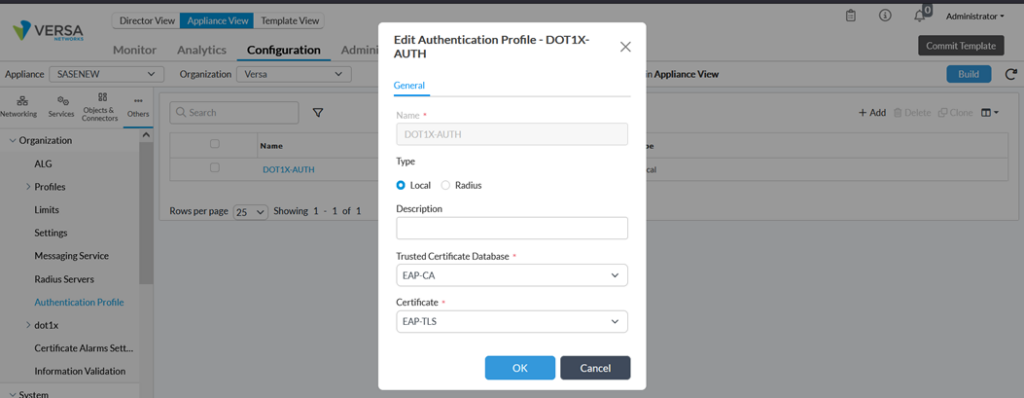
Configure Authentication Profile
Go to Others -> Organization-> Authentication Profile and click on Add button Select the CA certificate previously uploaded as Trusted Certificate Database and Self-Signed Certificate as Server Certificate. This later certificate is used to perform EAP-TLS authentication with the dot1x client.
Configure dot1x Authentication Control
Go to Others -> dot1x -> Authentication Control and define Role and Supplicant.
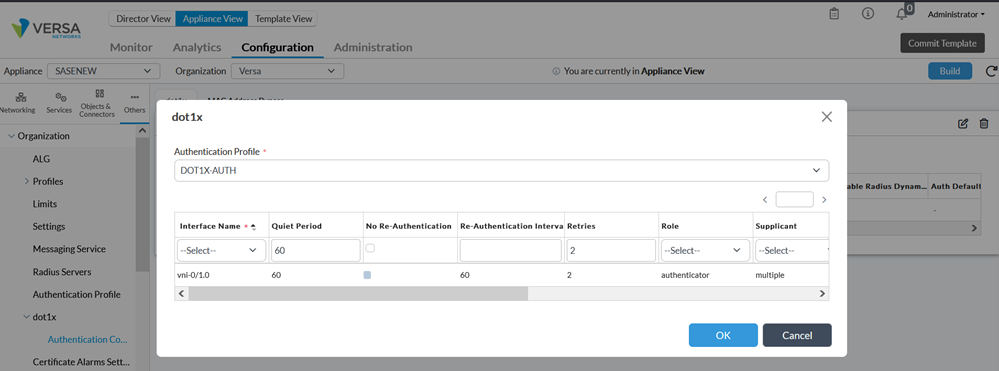
In this demo, we have selected single mode of Supplicant which means that authenticate only the first end device. All other end devices that connect to the port later are allowed access without any further authentication. The subsequent devices effectively piggyback on the first end device’s authentication.
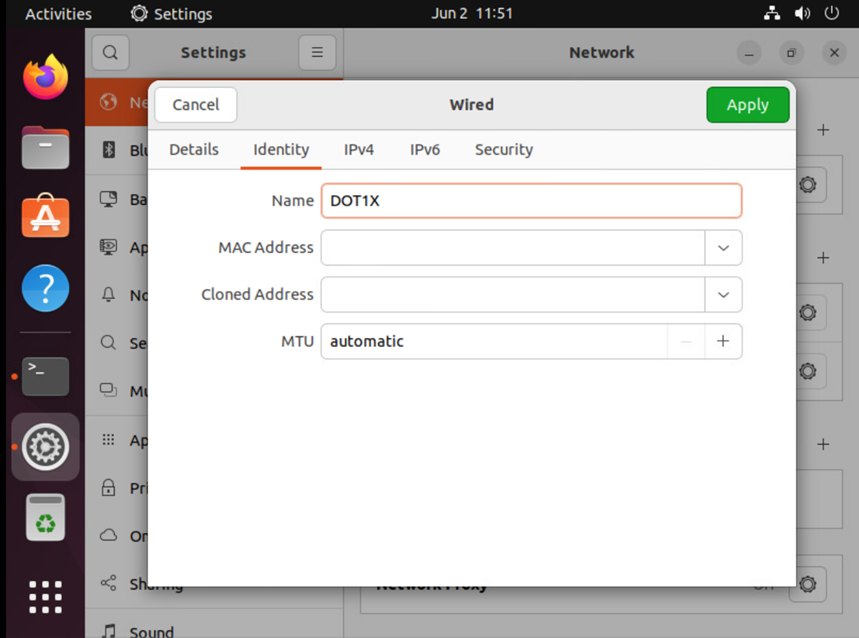
Step 3: Configure dot1x client (Ubuntu)
A new profile called Dot1x is configured with client and CA certificates that have been generated in previous section.
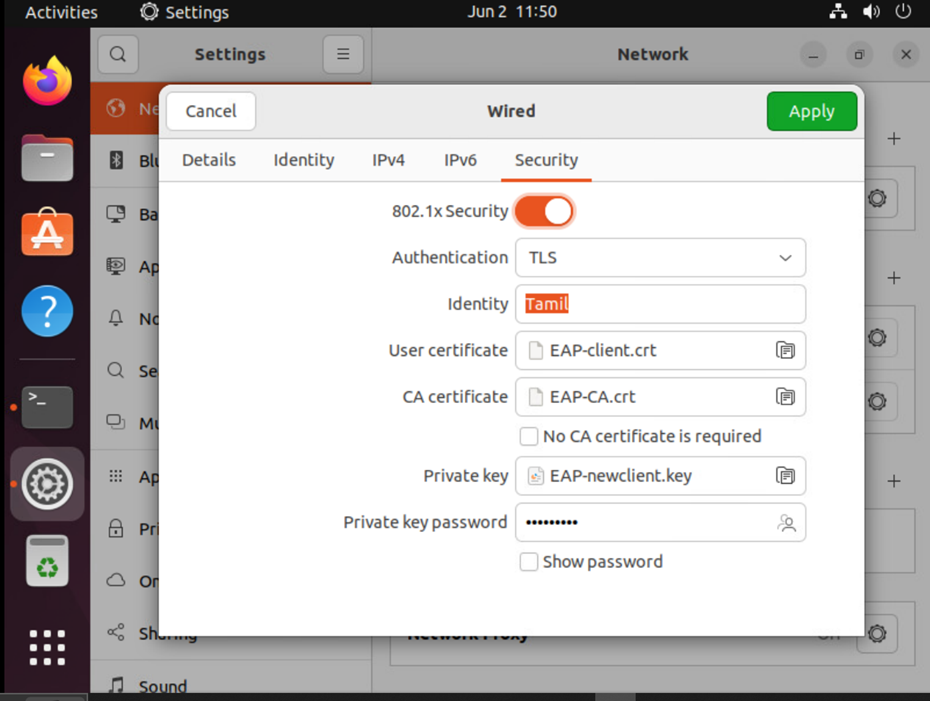
As soon as a new profile is added, the connection is established, and device is authenticated.
Verification
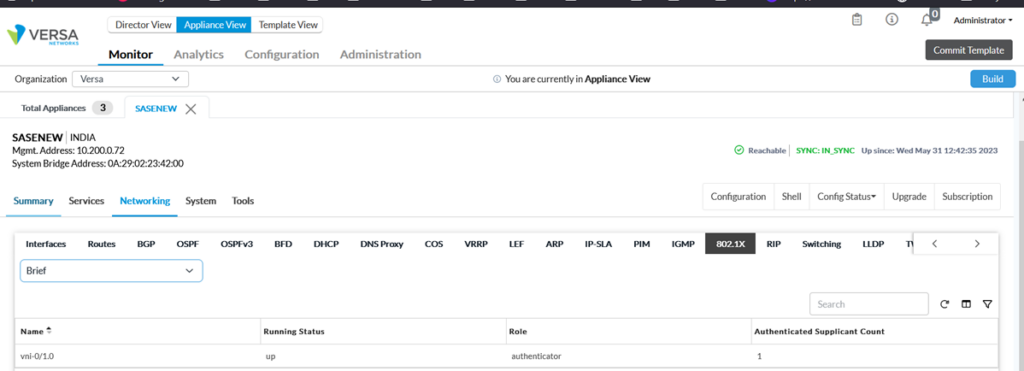
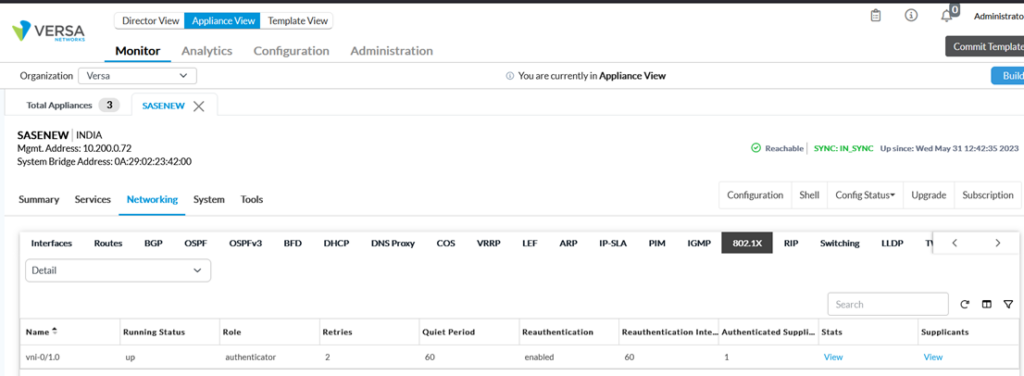
Under monitoring ->dot1x tab, we can see authenticated supplicant count along with various statistics.
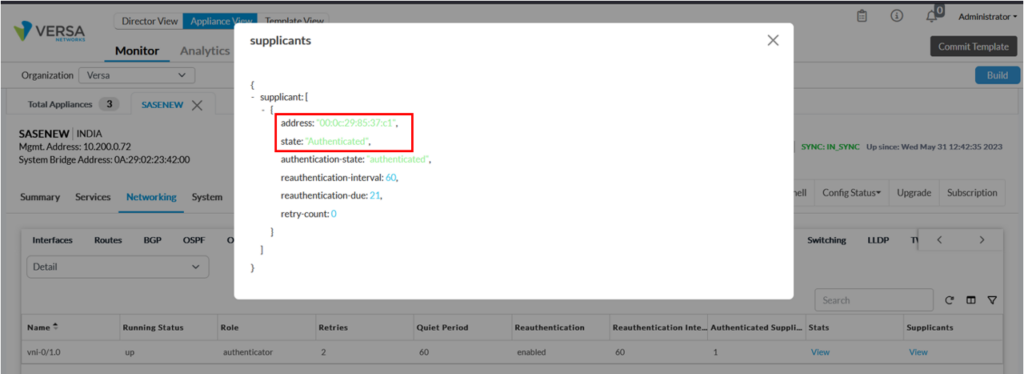
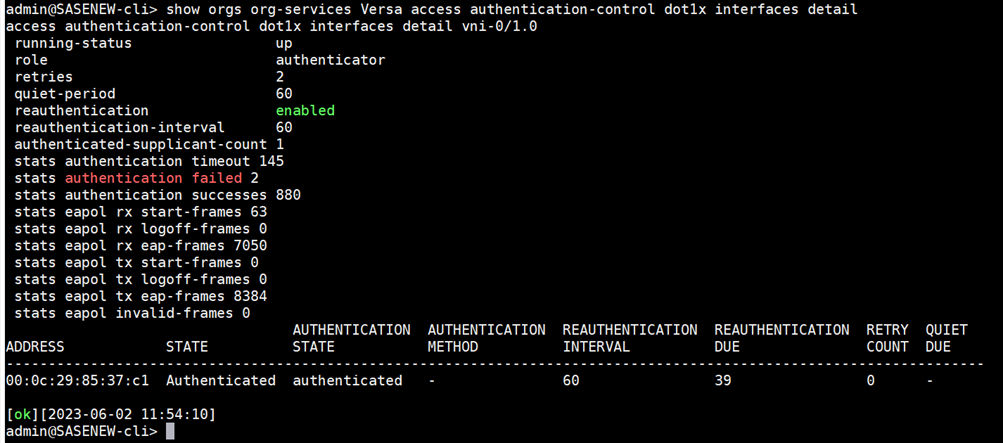
Using CLI, we can verify the service as below: The screenshot below shows that user is dot1x is authenticated as indicated in authentication-state and authenticated-supplicant-count.
admin@Single-CPE3-cli> show orgs org-services DEMO-WEBINAR access authentication-control dot1x interfaces detail
The command below shows the role (authenticator/supplicant) of VOS
admin@Single-CPE3-cli> show orgs org-services DEMO-WEBINAR access authentication-control dot1x interfaces brief

To see authentication statistics, issue the command below

It’s also possible to check the connection status on the client.

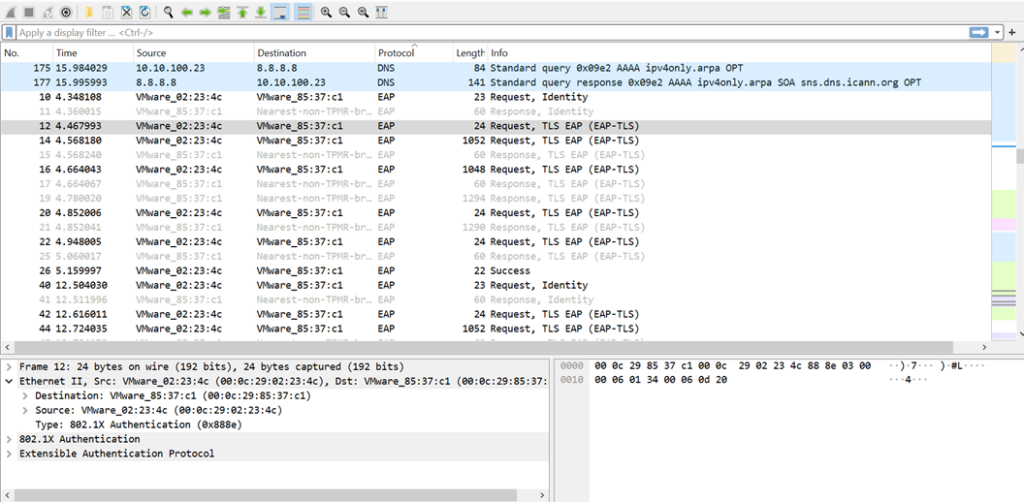
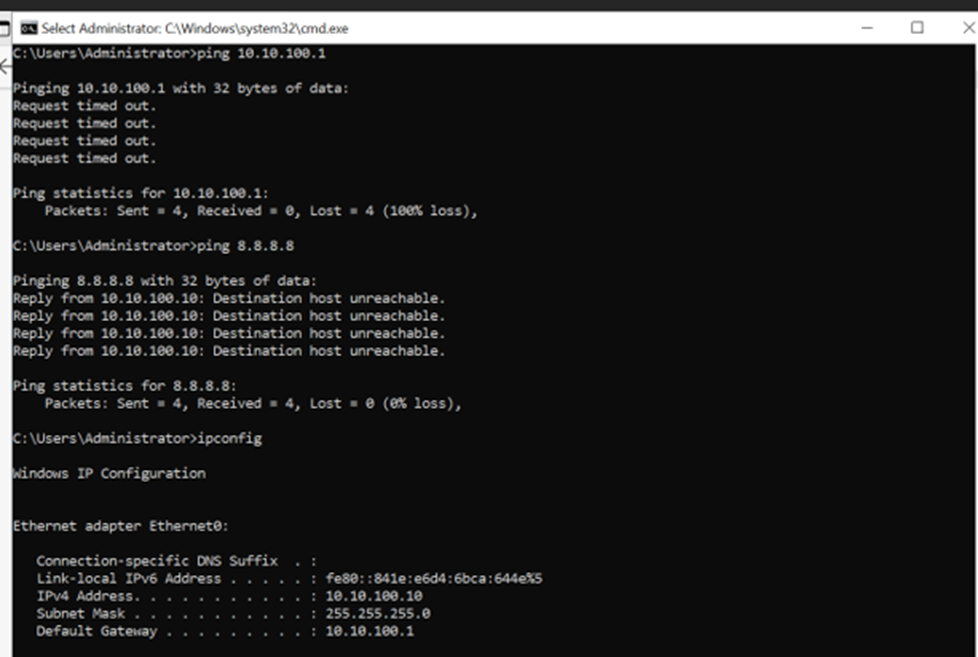
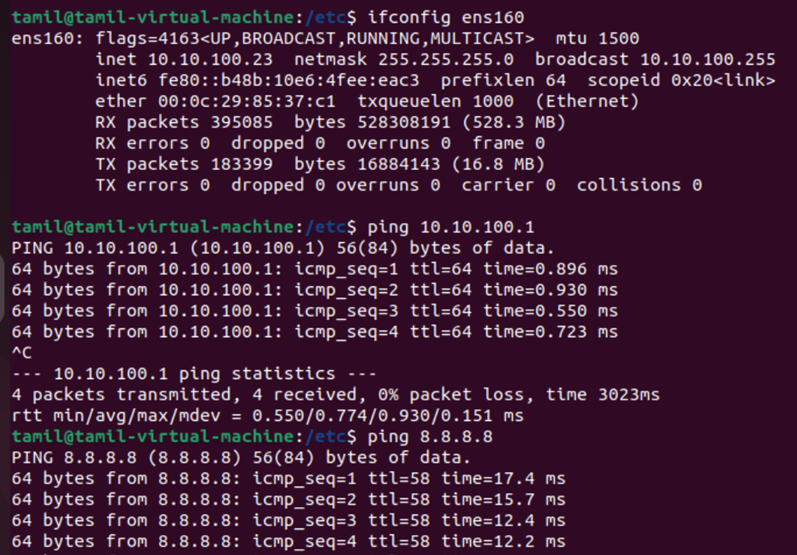
Screenshots below display the connectivity of both dot1x client and non dot1x client to internet and sd-wan remote client after dot1x client authentication.
Non-DOT1X Client
Authenticated Dot1X client
Important notice about single mode supplicant
Before authentication, dot1x client and non-dot1x client PCs don’t have access to network. After authentication of dot1x client, access is granted to both clients as soon as packet is received from dot1x-client. Once dot1x-client is disconnected or logout, both computers (dot1x and non-dot1x clients) will still have access to the network till the expiration of reauthentication x retries interval. Within that interval, dot1x client is still authenticated at VOS.
Summary
In this article, we saw how to enable 802.1x local authentication on the Versa VOS and how to verify the logs on Versa Director. VOS acts as both authenticator and authentication server while the supplicant mode is Single. The next document will be based on 802.1X with radius as authentication server.


