Author: Andrey Bozovkin
1 Introduction
The Versa Operating SystemTM (VOSTM) software multitenancy feature allows tenant organizations to share common access to the software instance, with each tenant having its own specific privileges. In this case system resources and WAN links are shared among tenants but that still retain their own independent configuration.This article provides an overview of measures, which may be additionally applied on VOS device to limit the impact of each tenant on shared resource utilization.
Screenshots and configuration examples in this article are made in Versa Director and VOS 22.1.4.
2 Setting Bandwidth limits
2.1 Limiting ingress rate for the tenant
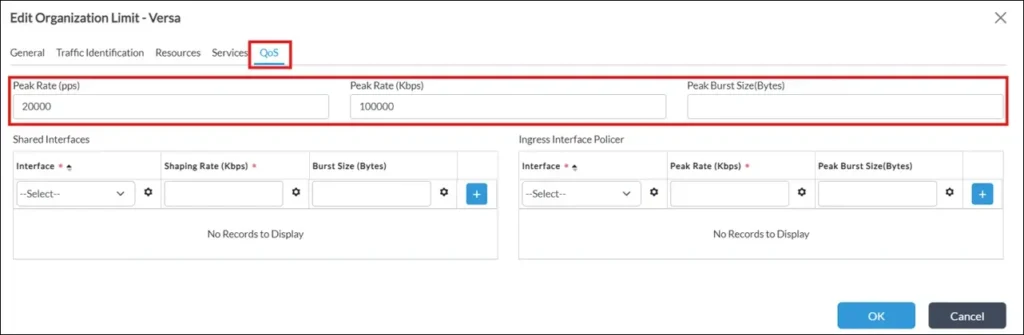
To limit (police) overall ingress traffic for the specific tenant (which may also help to limit a fraction of Device’s licensed bandwidth for this tenant), go to Configuration->Others->Organization->Limits, and select the desired Tenant: Then switch to QoS tab, and set the desired Peak rate (in Kbps and/or in pps), to which tenant’s overall ingress traffic will be policed:
 Additionally or alternatively to this it may be needed to set upload and/or download limits, also specifically to WAN interface – this will be covered in the next chapters of this article.
2.2 Limiting WAN “upload” rate for the tenant
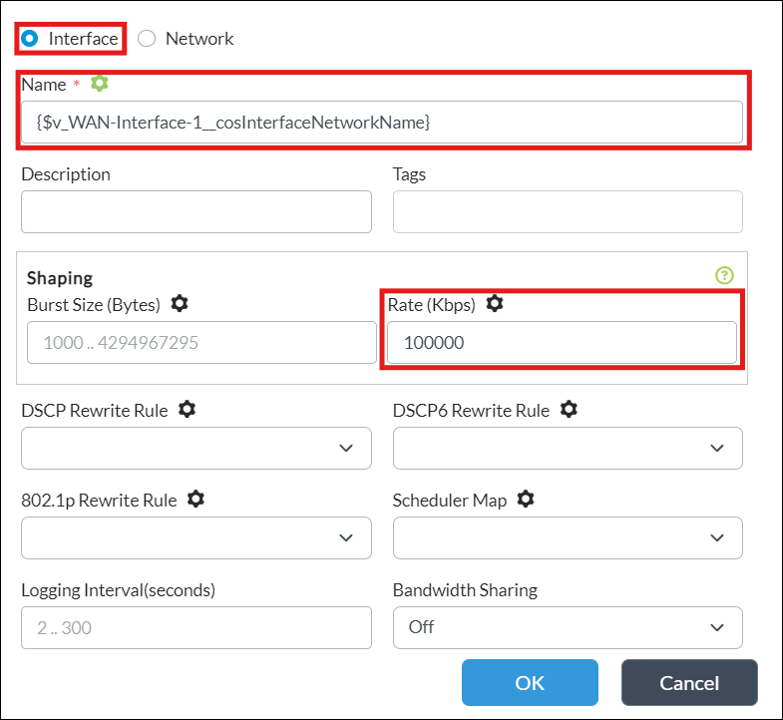
It’s possible to limit (shape) WAN “upload” rate for the specific tenant per each WAN interface. To do this, open QoS section in Organization Limits (see section 2.1 above in this article), and set the desired Shaping rate (in Kbps) for each WAN interface (Interface name and Shaping Rate can be parameterized when doing this in Service/Device Template):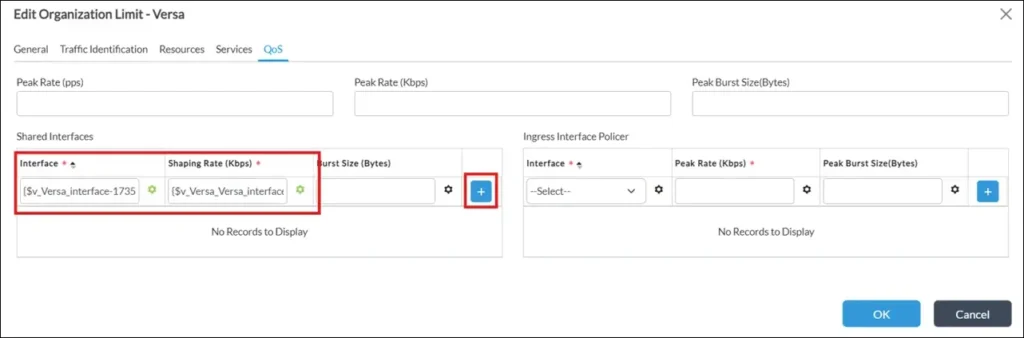 Important note: in order to have possibility to configure per-tenant egress shaper on WAN interface, there should be CoS egress shaper configured on the same physical interface in Provider Organization. To do this, go to Configuration->Networking->Class of Service->’Associate Interface/Network’, select Provider Organization, and add or edit Shaper for the desired physical WAN interface:

 Despite it’s possible to configure CoS Shaper also on Network level, for the purpose of per-tenant egress shaper it’s mandatory to configure it on physical WAN interface in Provider organization – this is the pre-requisite for successful template commit with per-tenant egress shaper config on this WAN interface (otherwise this WAN interface will not even appear in the list of Shared WAN interfaces when looking on Shaping section in Org limit of the Device configuration).
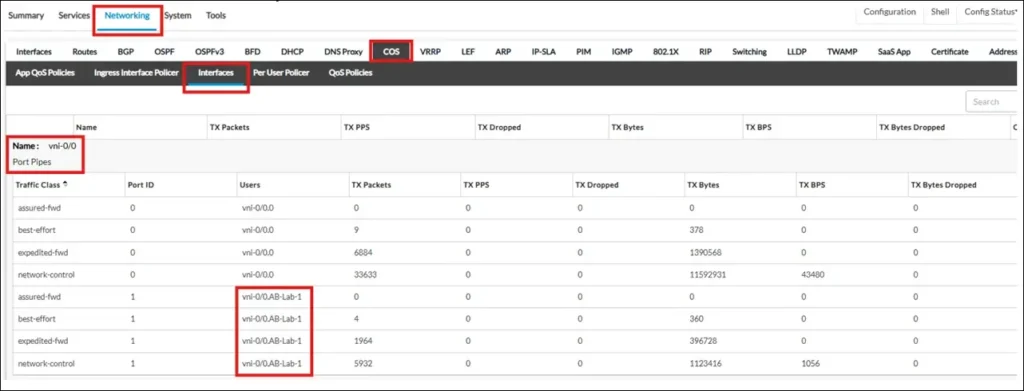
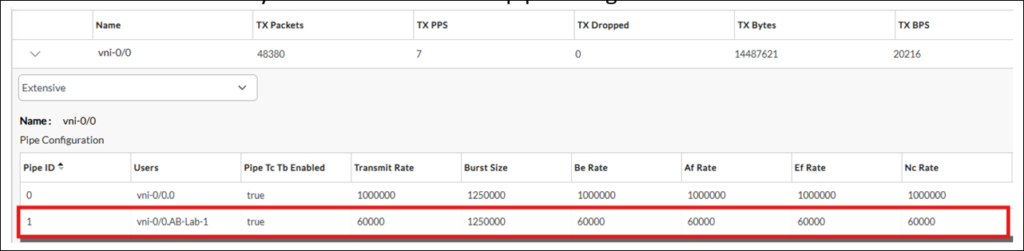
Once configured, subtenant CoS Shaper statistics will be visible with separate Pipe ID in interface Detail or Extensive statistics for WAN Interface(s) in Provider Org, which is available via both – Director Device Monitor Dashboard or VOS cli.
In Director Device Monitor Dashboard it’s needed to navigate to Networking->COS->Interfaces section. Below is the example of “Detail” statistics:
 “Extensive” statistics may also show subtenant’s pipe configuration:
 From VOS cli those are following commands:
show class-of-services interfaces detail <WAN_INTERFACE_NAME>
show class-of-services interfaces extensive <WAN_INTERFACE_NAME>
2.3 Limiting WAN “download” rate for the tenant
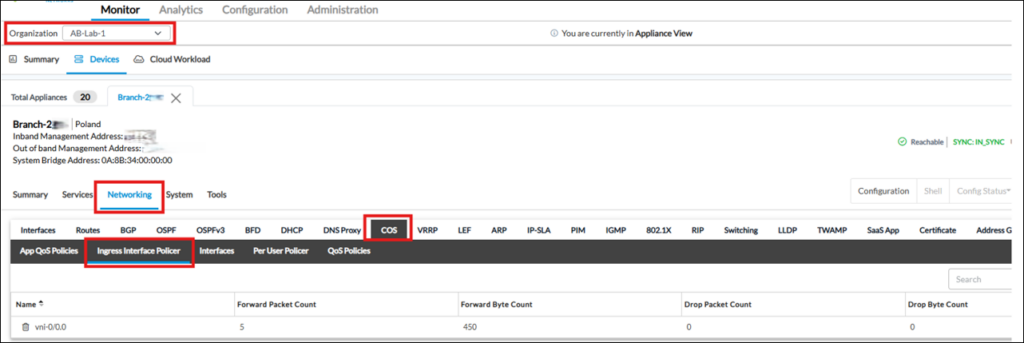
Starting from VOS release 22.1.3, it’s possible to limit (police) WAN “download” rate for the specific tenant per each WAN interface. To do this, open QoS section in Organization Limits (see section 2.1 above in this article), and set the desired Policer Peak rate (in Kbps) for each WAN interface (Interface name and Policer Peak Rate can be parameterized when doing this in Service/Device Template): Once configured, subtenant Ingress Policer statistics will be visible in “Ingress Interface Policer” section for the Tenant in Director Device Monitor Dashboard:
it’s needed to switch to the specific Tenant and navigate to Networking->COS->“Ingress Interface Policer” section:
Once configured, subtenant Ingress Policer statistics will be visible in “Ingress Interface Policer” section for the Tenant in Director Device Monitor Dashboard:
it’s needed to switch to the specific Tenant and navigate to Networking->COS->“Ingress Interface Policer” section:
 Note: if you’re running VOS releases earlier than 22.1.3, ingress per-tenant interface policer feature is not available. As a partial workaround you may consider applying (egress) shaper on LAN interface/network, which may work if tenant has only one LAN interface and there’s only one WAN interface on the device (or it’s acceptable to apply aggregated download limit in case of several WAN interfaces).
3 Limiting device resource usage for the tenant
3.1 Limiting session count for the tenant
Each VOS device has certain maximum number of sessions, which it can handle. This number depends on device RAM:| Total Memory (RAM) | Maximum Number of Sessions |
| 4 GB | 32,000 |
| 8 GB | 100,000 |
| 16 GB | 500,000 |
| 32 GB | 1,000,000 |
| 64 GB | 2,500,000 |
| 96 GB | 4,000,000 |
| > 96 GB | 5,000,000 |
Note: maximum number of sessions is configurable and can be set even to lower values.
When the overall amount of sessions on the device reaches maximum value, new sessions are being dropped, meaning any new connections are not able to be established through this router (while existing connections continue to work). VOS provides possibility to set session limit also for each tenant on multi-tenant devices to prevent tenants affecting each other (so to limit less critical tenants, and avoid situations that one tenant consumes device’s whole session capacity).
Once tenant’s amount of sessions reaches this tenant’s session limit, new sessions will be dropped for this tenant, while sessions in other tenants can still be created within those tenants’ limits and device’s remaining session capacity.
Session limit can be set individually for each tenant, and its default value is 1,000,000 (which is relatively high – just not to limit tenant too much by default). To adjust it, go to Configuration->Others->Organization->Limits, and select the desired Tenant:
 And change Tenant Session Limit on ‘General’ Tab:
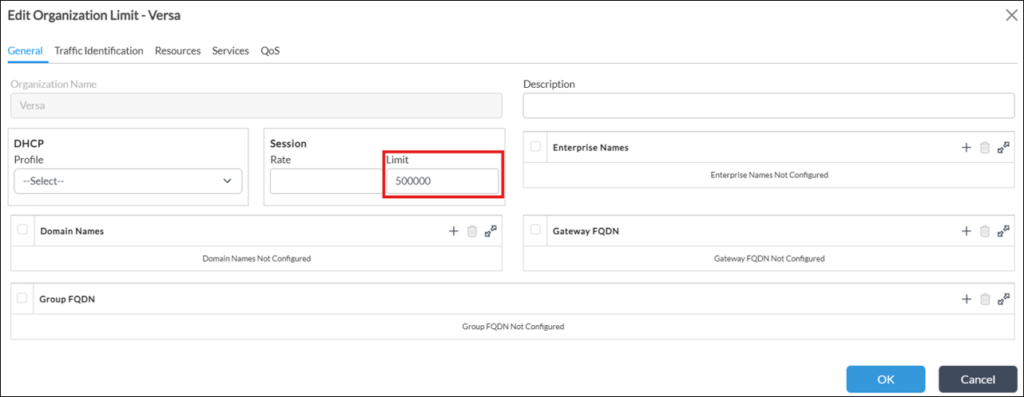 Note: if needed, it’s also possible to limit Tenant Session Rate on the same tab.
Once configured, subtenant Session Limit will be visible together with Session statistics in “Sessions” section for the Tenant in Director Device Monitor Dashboard: it’s needed to switch to the specific Tenant and navigate to Service->Sessions section:
 From VOS cli this is available using the following command:
show orgs org <ORG_NAME> sessions summary
3.2 Protect VOS device from eventual packet floods from Tenant’s LAN
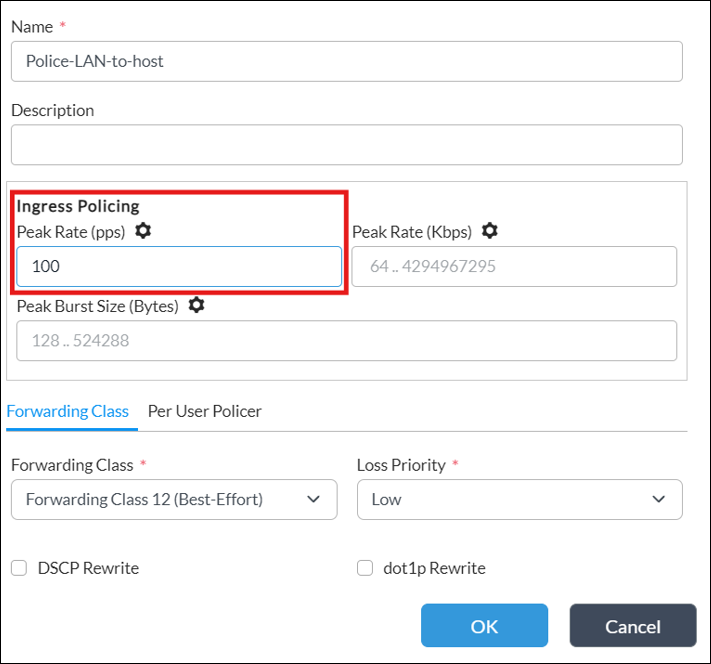
Massive packet floods from Tenant’s LAN targeted to legitimate services on the VOS device itself, such as ICMP or ARP, may cause additional resource usage on VOS device, potentially affecting overall device performance. To protect from such scenarios it’s possible to apply packet rate limit for selected or whole traffic from Tenant’s LAN destined to device itself. This can be done using corresponding Class of Service configuration:1. Navigate to Configuration->Networking->Class of Service->QoS Profiles, select desired Tenant:
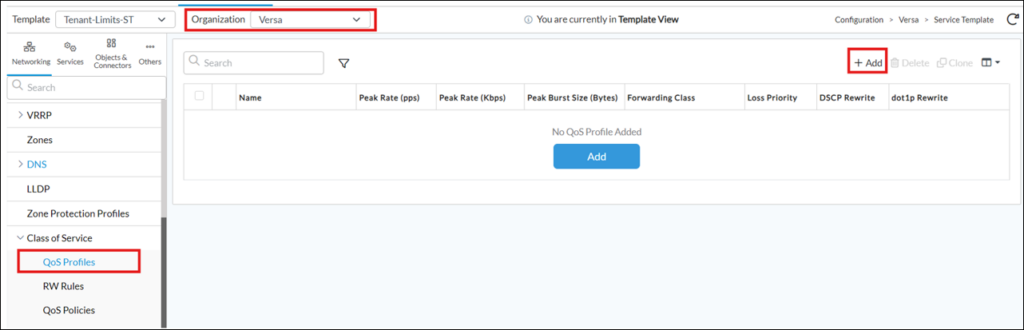 and create a QoS Profile with ‘Peak Rate (pps)’ set:
2. Navigate to ‘QoS Policies’ section of ‘Class of Service’ for the same Tenant, and create a QoS Rule, which will match traffic from Tenant’s LAN zone to ‘host’ zone (this is predefined zone name identifying traffic destined to VOS device itself)
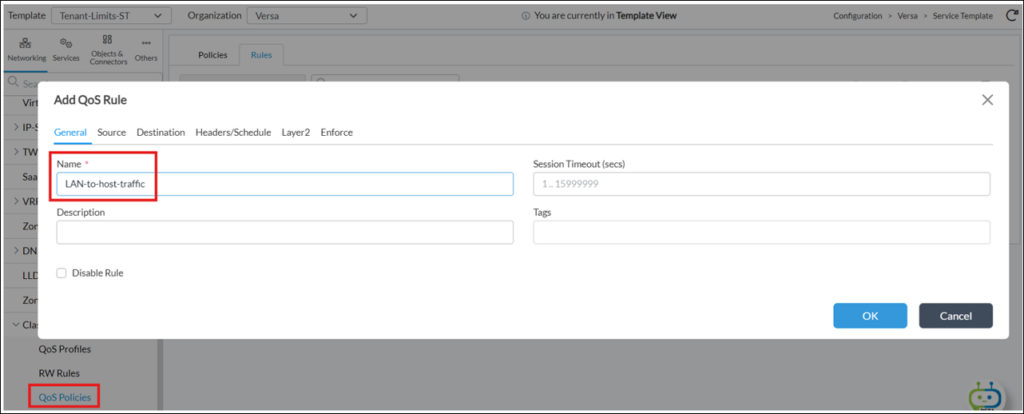
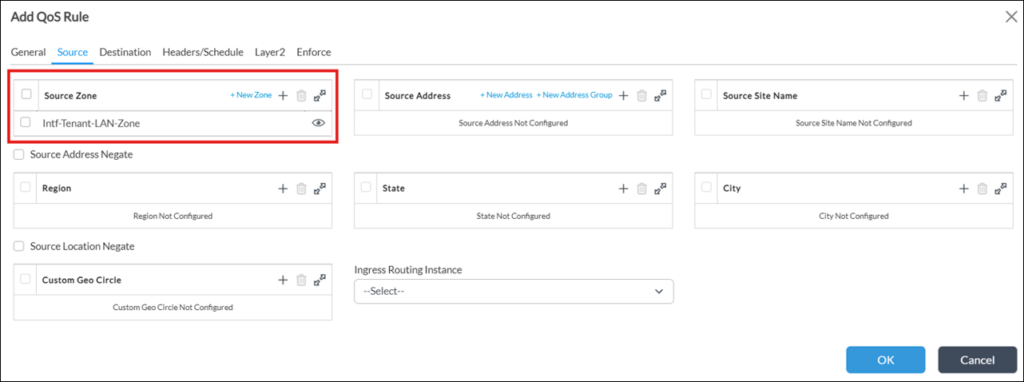
a. Select source zone as Tenant’s LAN zone:
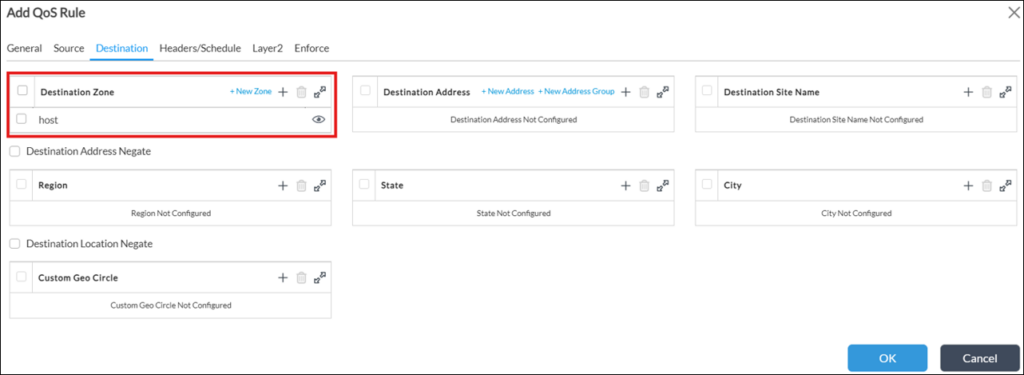
b. Select destination zone as ‘host’:
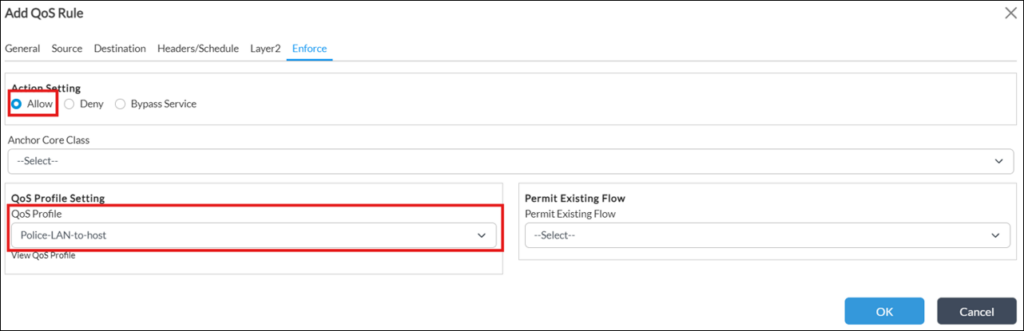
c. On ‘Enforce’ tab select action ‘Allow’ and set QoS Profile, which was created on the previous step:
 3. Optionally it’s possible to create QoS rules for the specific services on the device, so that to apply different policers, for example, for ARP, ICMP, DHCP packets.
Some hints for those example protocols matching:
3. Optionally it’s possible to create QoS rules for the specific services on the device, so that to apply different policers, for example, for ARP, ICMP, DHCP packets.
Some hints for those example protocols matching:
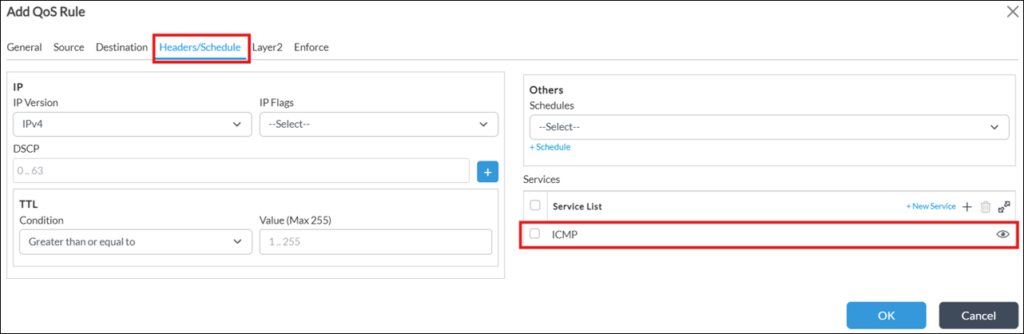
a. ICMP packets can be matched using “ICMP” Service match on Headers/Schedule tab:
b. DHCP packets can be matched using “bootps” Service match on Headers/Schedule tab.
c. ARP packets can be matched using Ether Type “ARP” match on Layer2 tab:


