Versa Titan Device Onboarding
by Paul Christian Ella
Introduction
The Versa Titan Portal application allows cloud management of Versa Secure SD-WAN, making it easier for IT to manage and secure branch services. Titan Portal provides a central dashboard to deploy and monitor networking devices. Versa Titan Portal provides the following features:- Activate Versa appliances using Bluetooth, WiFi, or GZTP
- Corporate and guest WiFi
- Easy Quick Picks option automatically repopulates a configuration area with default values
- Ability to configure appliances in high-availability (HA) pairs
- Ability to configure branches in AWS
- Enterprise-class advanced security for appliance and site, including UTM, NGFW, antivirus, anti-malware, intrusion detection, and DoS prevention
- Traffic conditioning and QoS for SaaS and business applications
- Internet or site-to-site (VPN) connectivity speed test
- Appliance health and status monitoring in real time
- Real-time and historical analysis of network, security policy including URL category and IP reputation, and application bandwidth use
- Access to Versa support through phone, email, chat, online, and the customer support portal
Workflow of CPE Onboarding in Titan
To onboard a CPE in Titan, the following steps are performed :
- Create a Device configuration
- Deploy a Device configuration
- Activate the Appliance
- Verify Device Status
Out of Scope
In this document, we don’t cover Create a Site and Create a Device Configuration. However, below are few best practices to follow:
- When creating a site, it is recommended to choose the site topology type before saving the device configuration. To change the topology after saving, undeploy the configuration, change the topology, and then redeploy the configuration
- Note that user cannot change the license type after creating the site. If you need to correct the license type, you must remove the site and then recreate it.
A. Deploy a Device configuration
Deploying the device configuration copies the configuration information to the Versa Director and informs the Versa Controller that the configuration exists. After the configuration is deployed, any changes you save are automatically copied to the Versa Director. Note that you should configure WAN interfaces before deploying the device configuration. To deploy the device configuration:
1. From the bottom of any configuration window, on the dropdown and Deploy

Figure 1: Deploy site configuration
2. In the Activation popup, select the activation method:- Bluetooth—Activate the appliance using Bluetooth from a mobile phone running the Titan Mobile app
- GZTP—Activate the appliance over the internet using Titan Portal or Titan Mobile
- WiFi—For appliances that support WiFi, use WiFi to activate from a laptop using Titan Portal or from a mobile phone running the Titan Mobile app
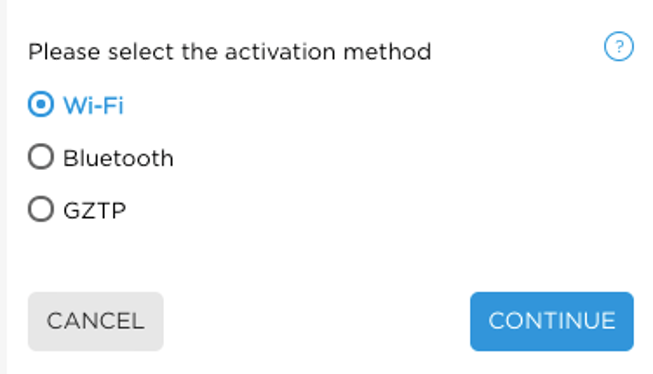
Figure 2: Popup to select activation method
3. For GZTP activation, click the pencil icon then enter the appliances serial number if it is not shown.
Figure 3: Add Appliance Serial Number for GZTP activation setup
4. Click Continue. A confirmation message displays. The diagram below summarizes the actions performed on cloud director when we deploy a site in Titan.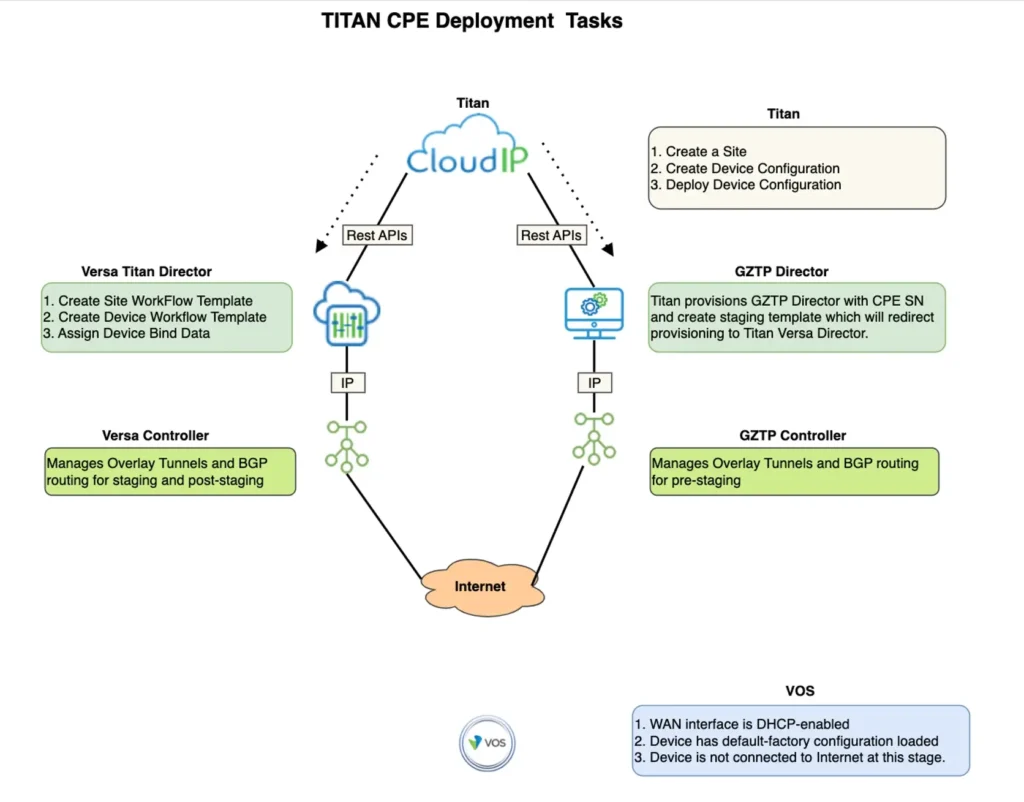
Figure 4: Titan CPE Deployment Tasks
Deploy High Availability
HA ensures a seamless bring-up of the standby Titan device, thus allowing network services to continue with no disruptions. Any settings configured on the primary Titan device automatically extend to the secondary Titan device. The secondary device cannot perform any action until it activates. VRRP is used for HA redundancy. Any changes made to the VRRP interface is synched between both the primary and secondary devices. To configure and activate an HA, follow the steps below:- Each HA device must be deployed and activated separately
- Set up the appliance wiring on two appliances. Wire the configured WAN, HA cross-connect port, and VRRP port, and then configure the site.
Best practices for wiring HA sites:
Install the wiring on the appliances:- Wire the two appliances before you configure them for high availability. When wiring the device for high availability, the ports are divided into three sections. WAN ports are the lower numbered ports on the left. LAN ports are the higher numbered ports on the right. Assign a port in the middle, which is called a cross-connect port. The cross-connect port marks the boundary between the WAN and LAN ports
- Connect the WAN ports. WAN ports must be connected starting with port 0, then port 1, and so on. WAN ports are always the lower port numbers. Attach port 0 on both devices to a WAN
- Determine the cross-connect port number
- If both devices use the same number of ports for WAN connections, assign the next port number after the highest WAN port number as the cross-connect port number. For example, if you use ports 0 and 1 as WAN ports on both devices, then use port 2 as the cross-connect port
- If the devices use an unequal number of WAN connections, use the device with the larger number of WAN connections to determine the cross-connect port number. For example, if the first device uses ports 0 and 1 as WAN ports and the second device uses only port 0 as a WAN port, then use port 2 as the cross-connect port on both devices. In this case, port 1 on the second device is unused
- Connect the cross-connect port on the first device to the cross-connect port on the second device using a Cat6 Ethernet cable. Again, you must use the same port number on both devices for the cross-connect
- Connect the LAN ports. The higher numbered ports are used as LAN ports. Connect the first LAN port (that is, the port immediately to the right of the cross-connect port) to the local LAN. This port is used for Virtual Router Redundancy Protocol (VRRP) communication.
Undeploy Devices:
Undeploying a device removes the configuration from the Versa Director. The saved device configuration is still present in the Titan cloud portal, and you can still change settings and redeploy. Undeploy a device configuration is done from the Inventory dashboard. Note that undeploying preserves the site and configuration information and the device license remains associated with the site, while deactivating a device (removing a site) deletes the device’s configuration information and returns the device license to inventory. For HA sites, undeploying primary device also undeploys secondary device and it’s not possible to undeploy secondary device only. It’s highly recommended to wait for 05 minutes after undeploy a device before redeploy to allow Titan backend services to be synchronized.B- Activate the Appliance
Activation validates the appliance, downloads its configuration, and allows traffic to begin flowing through it. There are three(03) device activation methods : GZTP, WiFi, or Bluetooth.B.1 Activation using GZTP
Before you activate the appliance:- Deploy the device on the Titan Portal dashboard
- On the appliance, make sure that WAN1 Port 0 (vni-0/0), WAN2 Port 1 (vni-0/1), or LTE is connected to the internet
- Keep the power turned off on the device until deployment is completed (described in previous step) so that GZTP Versa Director needs the initial configuration of the device
- If you are planning to use LTE for internet connectivity backup, make sure that the SIM card is inserted in the device.
- After the device is deployed, turn on the power
- Click Configure in the left menu bar to open the Configure dashboard
- In the Configure dashboard, hover over the device to view its options card. Click Click to Activate
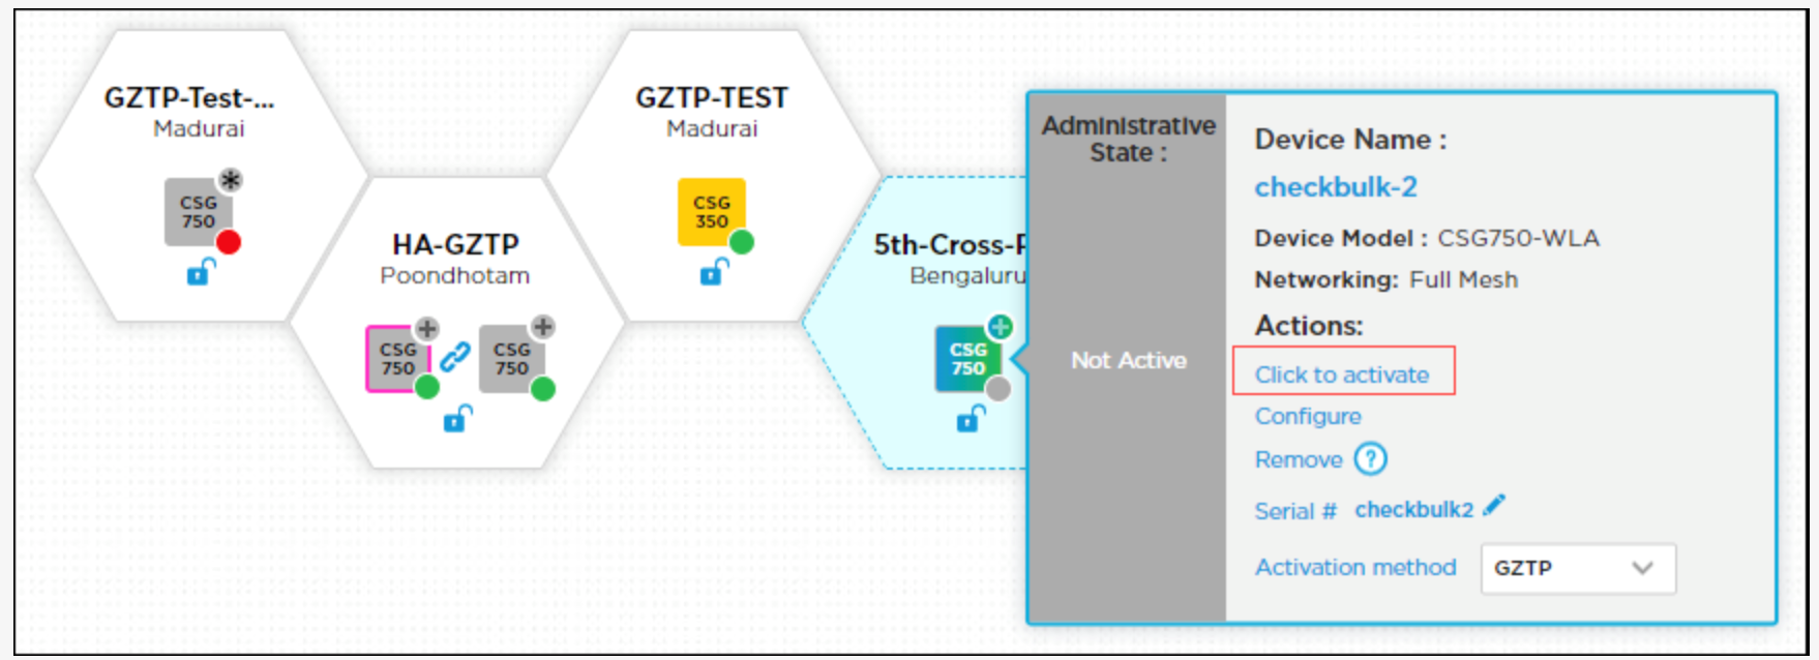
Figure 5: Device Activation link
- In the Activate Device window, click Activate

Figure 6: GZTP activation steps
Wait approximately 30 minutes for the activation to complete. The activation process proceeds through the following stages, which you can track using the messages icon:- Staging Started—In this stage, Titan checks whether the appliance has been created in GZTP Director and fetches the appliance creation task
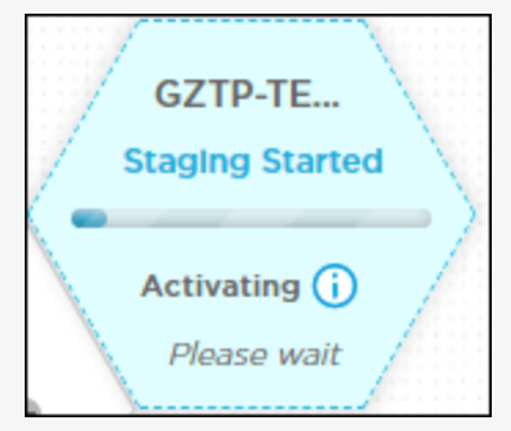
Figure 7: Staging initiated message in Titan
- Post Staging—If create appliance process started in Titan Director, the appliance activation progress bar displays the status Post-Staging
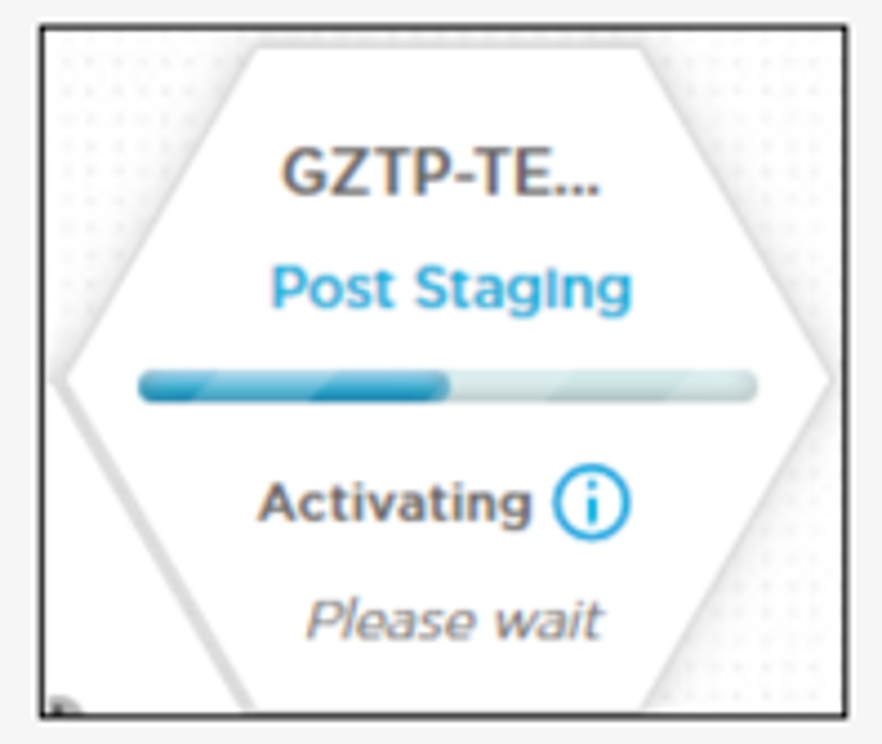
Figure 8: Post-staging progress in Director viewed by Titan
- Rebooting—After the appliance creation is successful, the appliance activation progress bar displays the status Rebooting, because the appliance reboot after it is created in Director
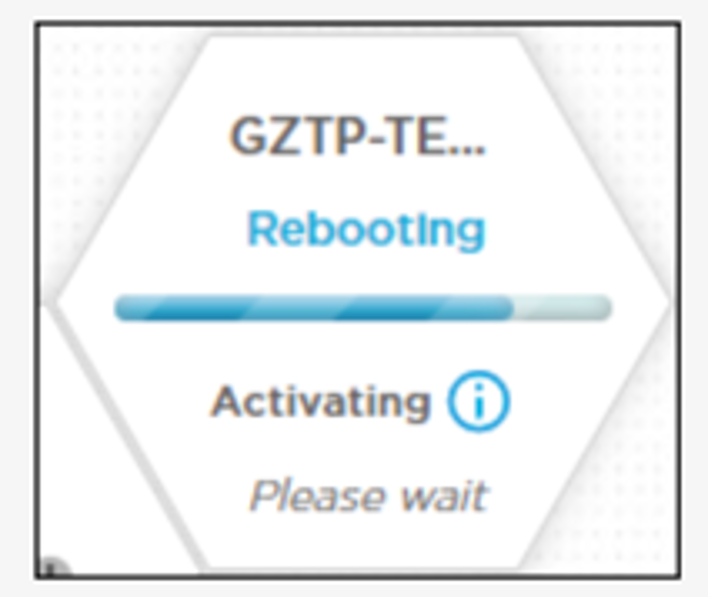
Figure 9: Appliance reboot after successful activation in Director
- Connecting Device—When the appliance is up and the connection established in Versa Director, the appliance activation progress bar displays the status Connecting Device.
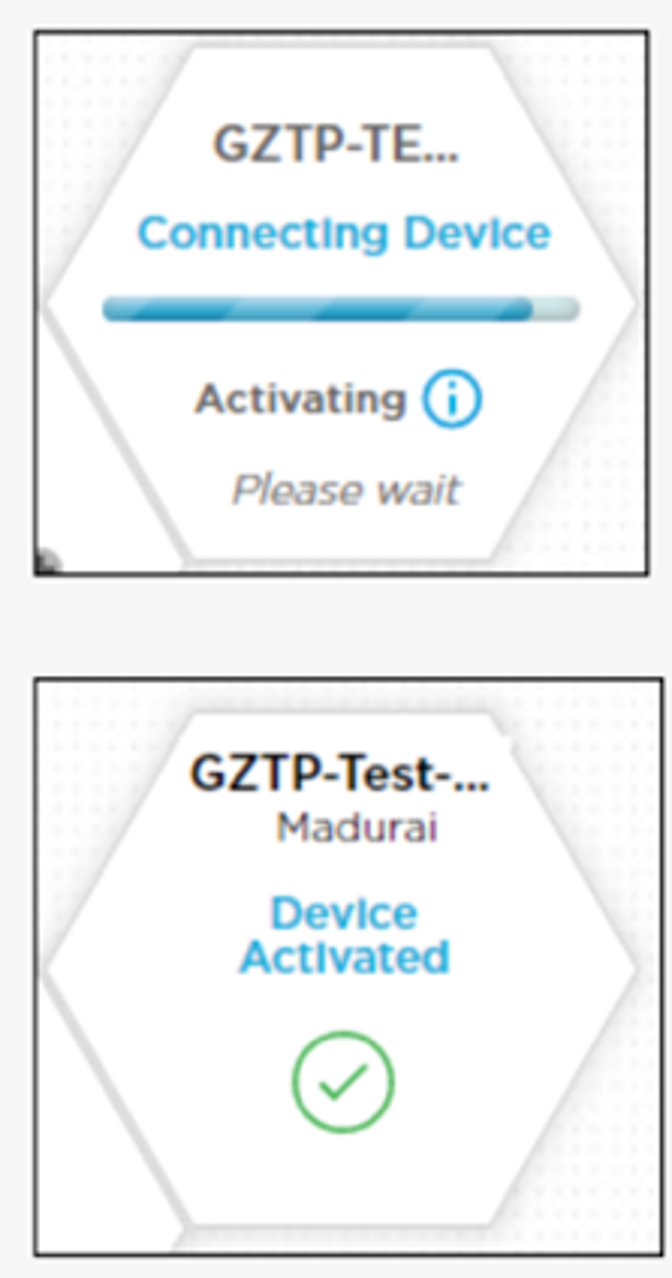
Figure 10: Final steps to sync Device with Titan from Director
- After a device is activated, the device displays a green circle. Hover over the device to view its options card, which indicates the administrative state as activated. To check the appliance’s status, go to the Monitor option in the Titan dashboard.
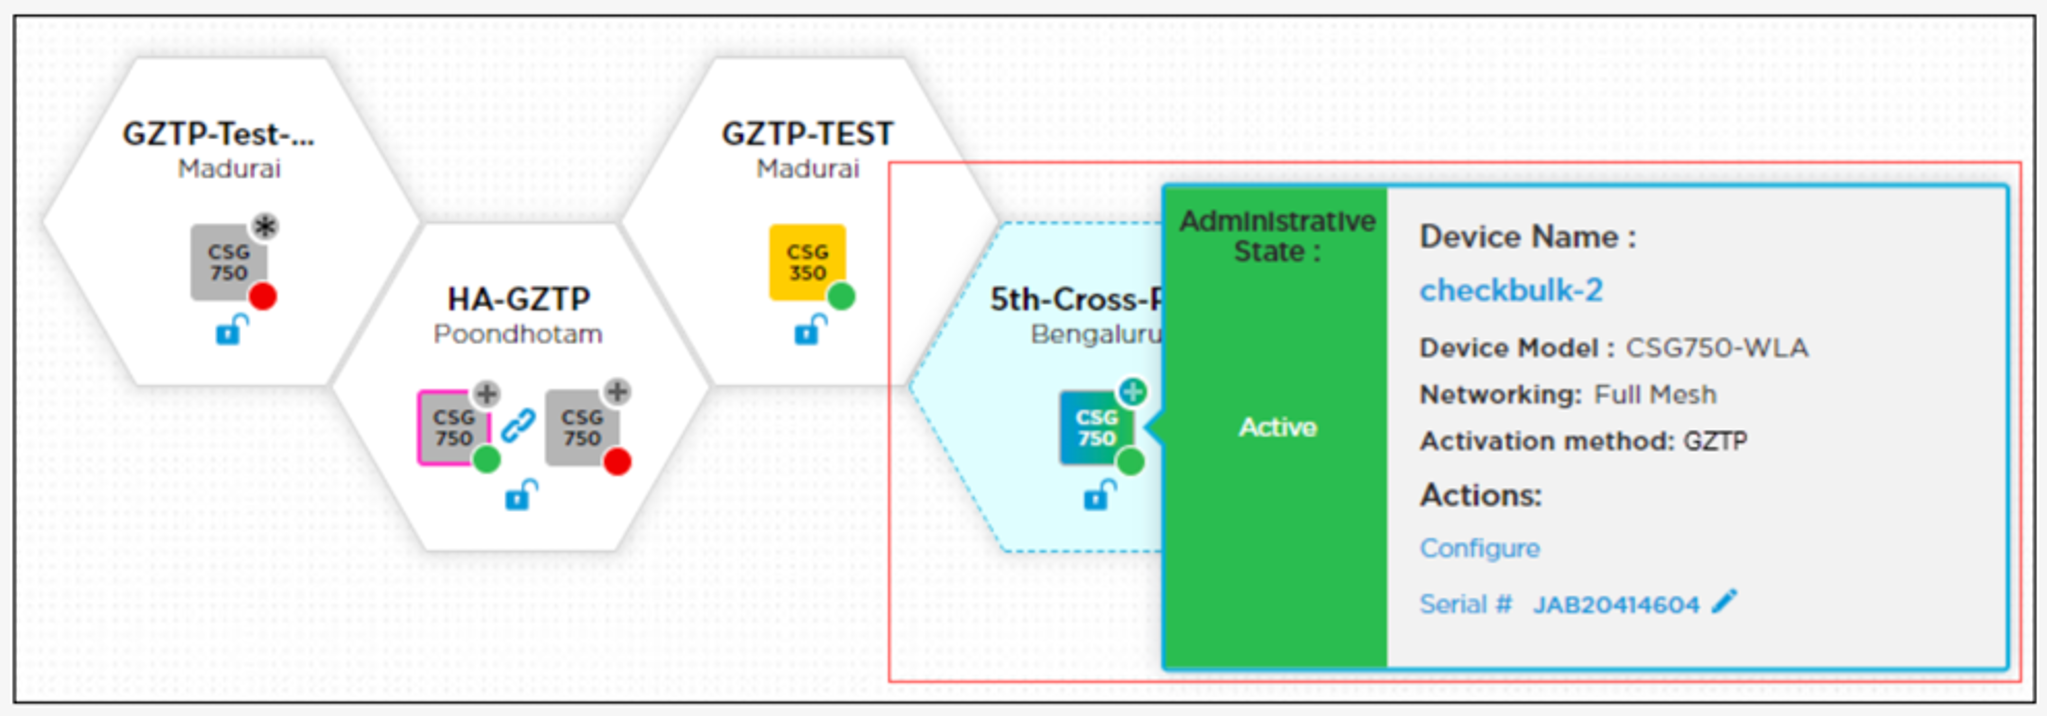
Figure 11: Administrative State view after activation
Below is the diagram representing the pre-staging phase: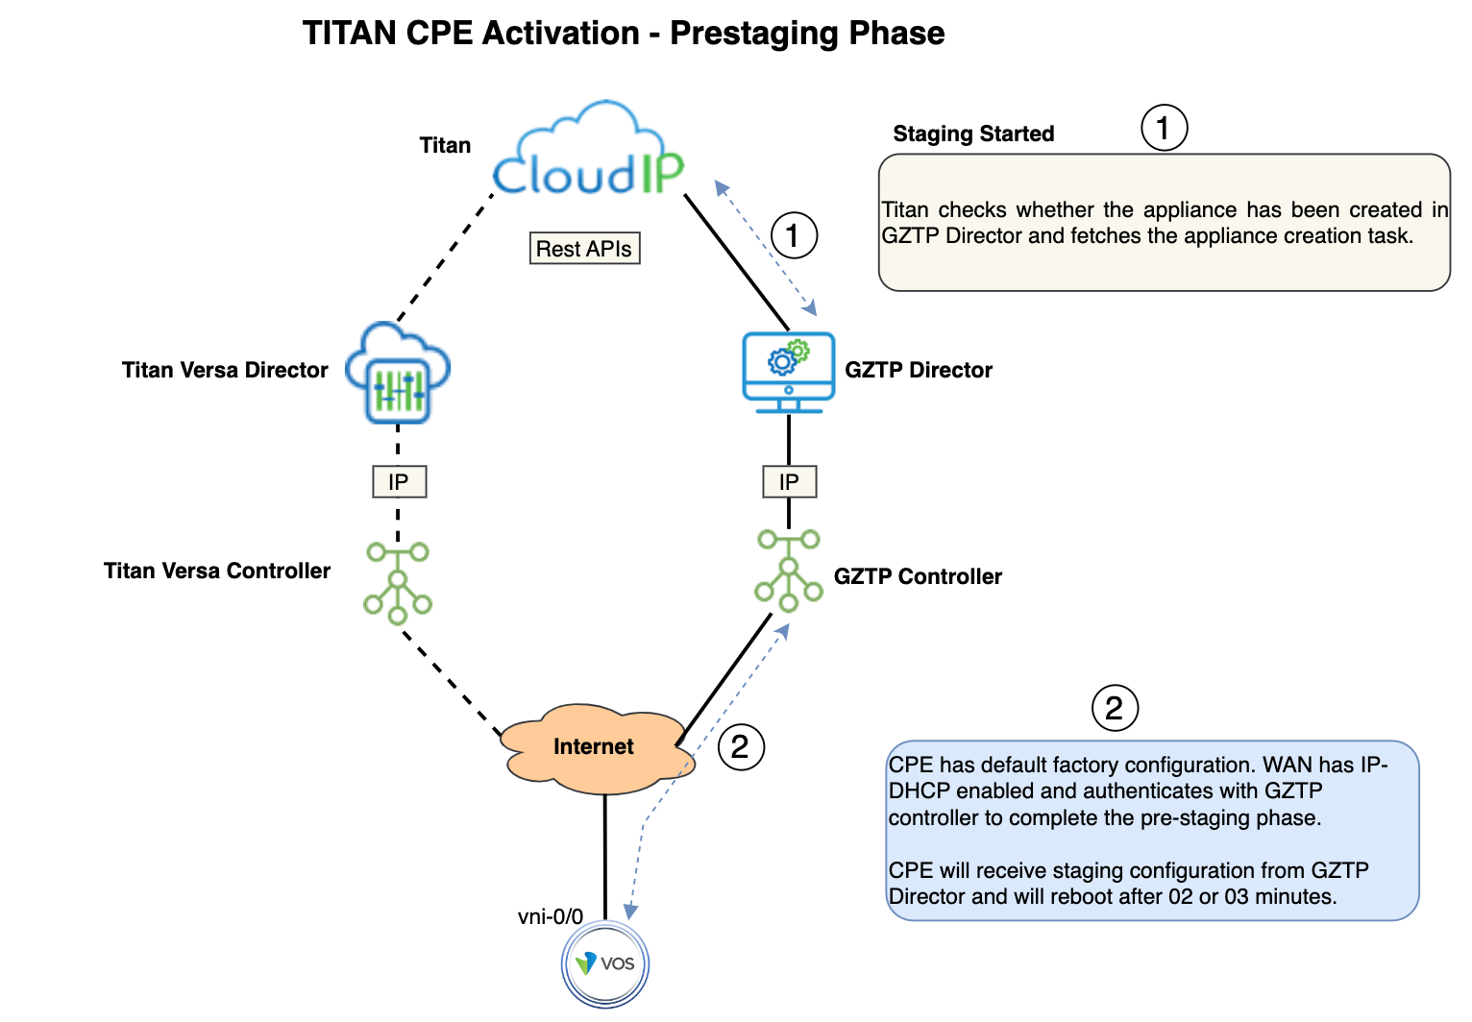
Figure 12: Titan Activation Pre-Staging Phase
Below is the diagram representing the staging and post-staging phases: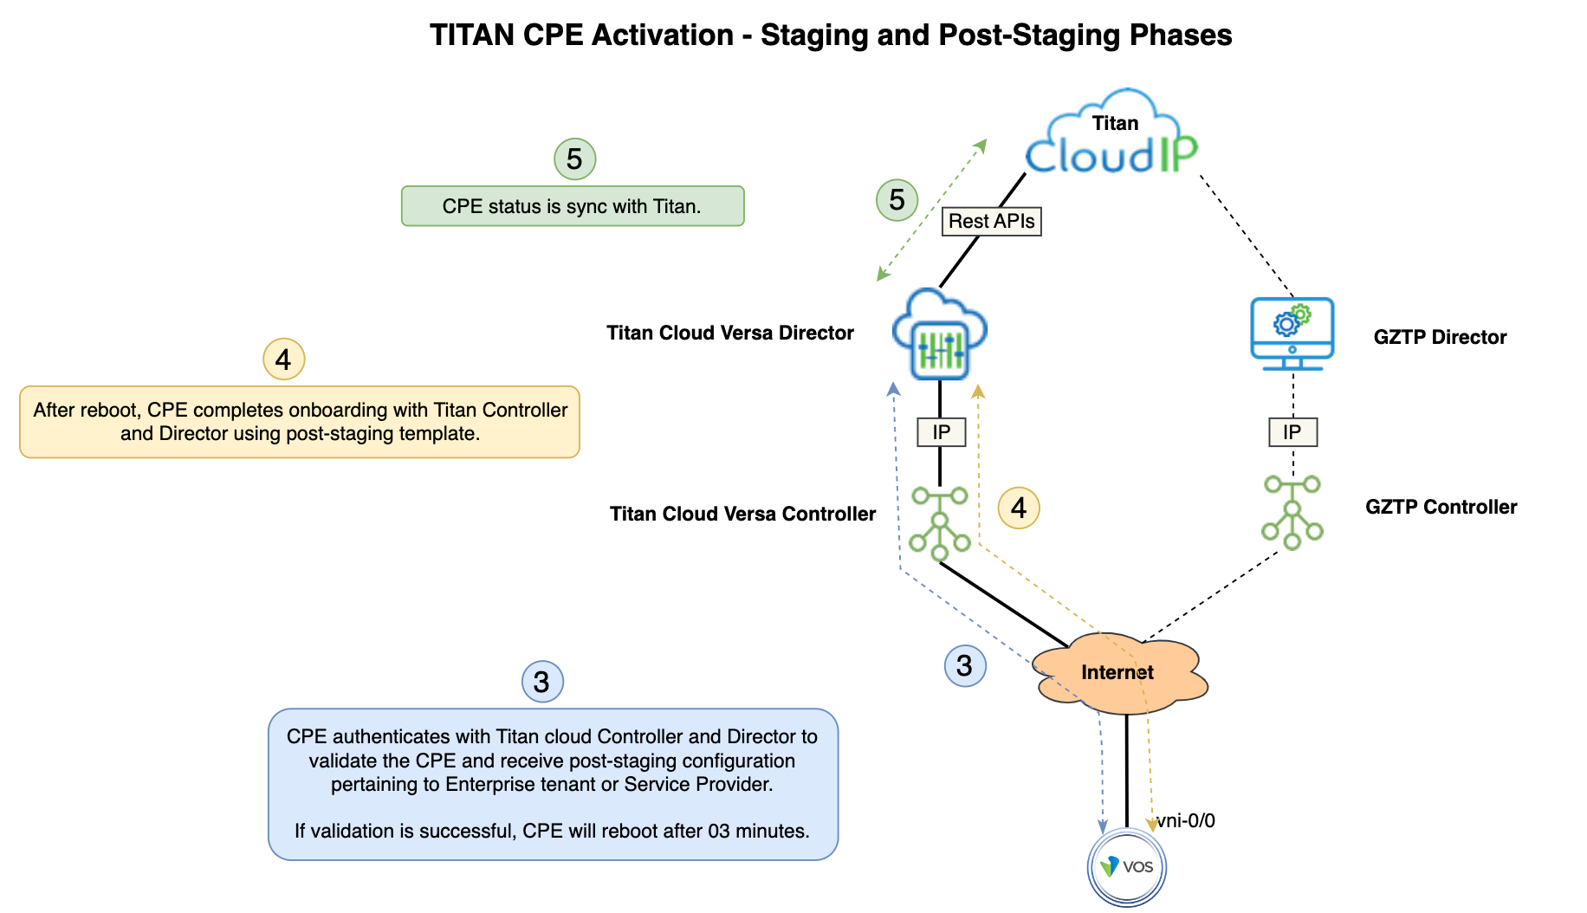
Figure 13: Titan Activation Staging and Post-Staging Phases
Best practices for device activation and few troubleshooting steps-
- Click the message icon to track the activation progress in each stage
- If, after multiple attempts, the activation continues to fail, click Contact Support.\
- After staging step, check in the task if a new software image is being uploaded into the appliance. This may increase the device activation time depending on the Internet WAN speed (especially if activation is done through the LTE). With console port, it’s also possible to monitor the download rate (rx-bps) at WAN interface level using the command show interfaces statistics vni-0/0. rx-stats rx-bps counters will increase and download image at line rate.
[ok][2023-03-17 12:08:23]
admin@versa-flexvnf-cli> show interfaces statistics vni-0/0
interfaces statistics vni-0/0
tenant-id 1
vrf grt
host-inf eth1
rx-stats rx-packets 124454
rx-stats rx-pps 1604
rx-stats rx-bytes 126412741
rx-stats rx-errors 0
rx-stats rx-bps 14319864
tx-stats tx-packets 23782
tx-stats tx-pps 320
tx-stats tx-bytes 7234530
tx-stats tx-errors 1
tx-stats tx-bps 671624

[ok][2023-03-17 12:10:01]
admin@versa-flexvnf-cli> show interfaces statistics vni-0/0
interfaces statistics vni-0/0
tenant-id 1
vrf grt
host-inf eth1
rx-stats rx-packets 137414
rx-stats rx-pps 1473
rx-stats rx-bytes 142127113
rx-stats rx-errors 0
rx-stats rx-bps 13937464
tx-stats tx-packets 26555
tx-stats tx-pps 315
tx-stats tx-bytes 7953454
tx-stats tx-errors 1
tx-stats tx-bps 658768
Software upgrade will start after image download and could be monitored using command tail –f /var/log/versa/upgrade.log.
[admin@versa-flexvnf: scripts] $ tail -f /var/log/versa/upgrade.log
>> /etc/rc0.d/K20versa-recovery -> ../init.d/versa-recovery
>> /etc/rc1.d/K20versa-recovery -> ../init.d/versa-recovery
>> /etc/rc6.d/K20versa-recovery -> ../init.d/versa-recovery
>> /etc/rc2.d/S20versa-recovery -> ../init.d/versa-recovery
>> /etc/rc3.d/S20versa-recovery -> ../init.d/versa-recovery
>> /etc/rc4.d/S20versa-recovery -> ../init.d/versa-recovery
>> /etc/rc5.d/S20versa-recovery -> ../init.d/versa-recovery
2023-03-17 12:19:22.920 INFO Upgrade checkpoint #1: recovery handler installed
2023-03-17 12:19:22.923 INFO [4168] Clear PAM configs if any
2023-03-17 12:19:24.013 INFO [4168] Stopping and removing current package 20.2.3 (VCSN)
2023-03-17 12:19:54.192 INFO Upgrade checkpoint #2: Previous package removed
>>
>> => Purging old kernels
>> (Reading database ... 100632 files and directories currently installed.)
>> Removing linux-headers-4.4.0-142-generic (4.4.0-142.168~14.04.1) ...
>> Removing linux-image-extra-4.4.0-142-generic (4.4.0-142.168~14.04.1) ...
…......
CPE will reboot to complete the software upgrade. It takes 10 minutes to install the new software. Below is the status of interfaces after software upgrade.
admin@versa-flexvnf-cli> show interfaces brief | tab
NAME       MAC                OPER  ADMIN  TENANT  VRF     IP
-----------------------------------------------------------------------------
eth-0/0    0c:fa:d5:4d:00:00  down  up     0       global
tvi-0/1    n/a                up    up     -       -
tvi-0/1.0  n/a                up    up     1       mgmt    10.0.1.131/24
vni-0/0    0c:fa:d5:4d:00:01  up    up     -       -
vni-0/0.0  0c:fa:d5:4d:00:01  up    up     1       grt     10.40.194.176/16
vni-0/1    0c:fa:d5:4d:00:02  down  down   -       -
vni-0/2    0c:fa:d5:4d:00:03  down  down   -       -
vni-0/3    0c:fa:d5:4d:00:04  down  down   -       -
The final stage is the commit by Versa Director of Post-Staging template and happens 10 minutes after the software upgrade. The whole process may take up to 50 minutes depending on your WAN link speed. Notes :
-
- If software upload fails, check your WAN links and make sure internet connectivity is available and reboot your CPE
- If CPE doesn’t receive post-staging configuration (commit from Versa Director) 15 minutes after the software upgrade, please issue the following command in shell mode: $ vsh restart
- Contact Versa Support if CPE activation is not completed after 01 hour
- GZTP is not supported on appliance activated with PPPoE-enabled circuit on the WAN; If the device has a PPPoE WAN circuit and an additional DHCP-enabled WAN or LTE circuit that does not use PPPoE, you use the additional DHCP-enabled WAN circuit to activate and upgrade the branch.The PPPoE WAN circuit can be used after the device activation and upgrade If the device has only a PPPoE WAN circuit, you must have an additional temporary WAN circuit that is not PPPoE-based to use for the device activation and upgrade. The temporary WAN circuit can be DHCP-enabled Ethernet or LTE. If the additional WAN link is not available for activation, contact Versa Networks Customer Support
- Follow the activation troubleshoot steps in case of activation failure.
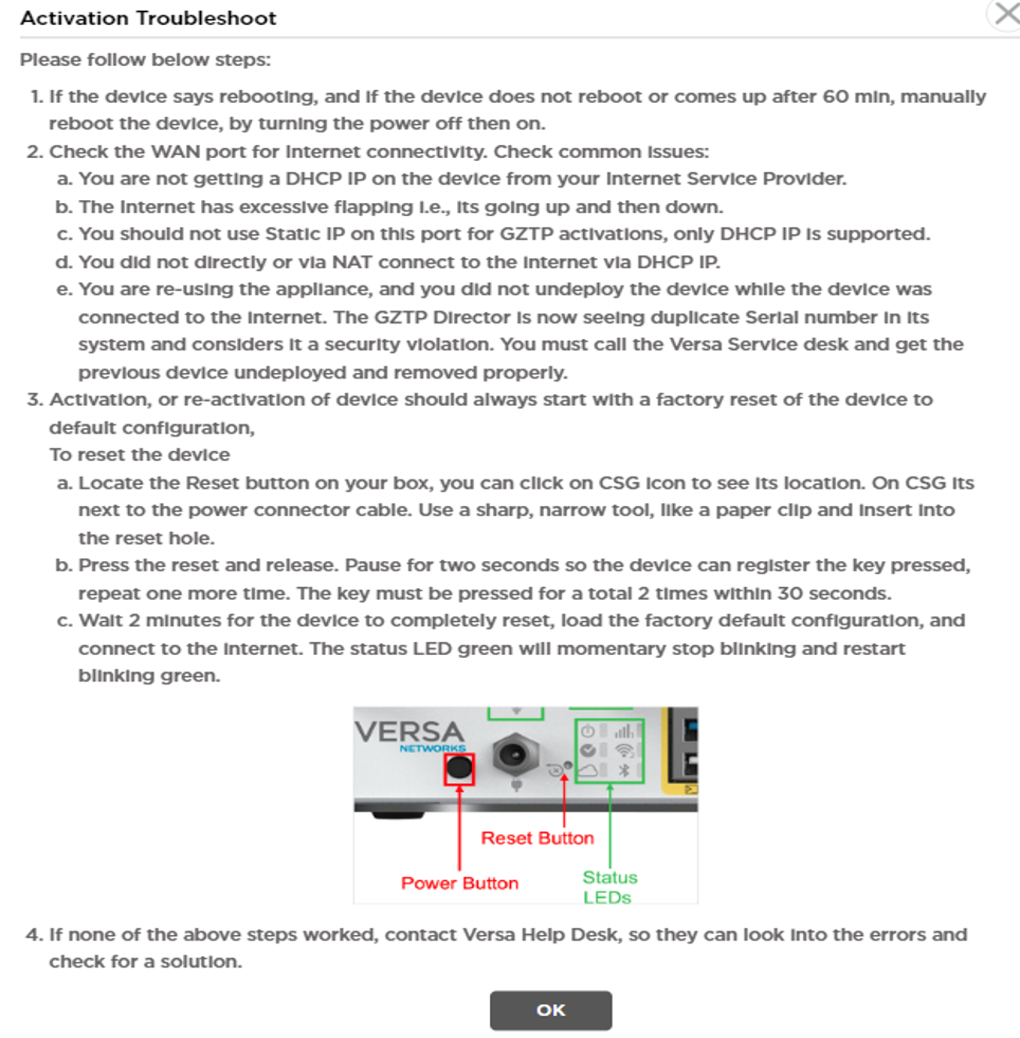
Figure 14: Activation Troubleshooting
B.2 Activation using WiFi
If an appliance model supports WiFi, you can activate it using URL-based ZTP. If an appliance does not support WiFi, connect a LAN cable to Port 2 and connect the other end to a laptop to activate the device. Before you activate an appliance using WiFi with URL-based ZTP:- Ensure that WAN port 0 is connected to the internet and that the power is turned on
- If you are planning to use LTE for internet connectivity backup, ensure that you insert the SIM card in the appliance SIM slot.
- On a laptop, connect to WiFi on the appliance using the following SSID and password: SSID—VERSA-ZTP-WiFi Password—VR00M123
- Click Configure in the left menu bar to open the Configure dashboard
- Hover over the device to view its options card, and then click Click to Activate
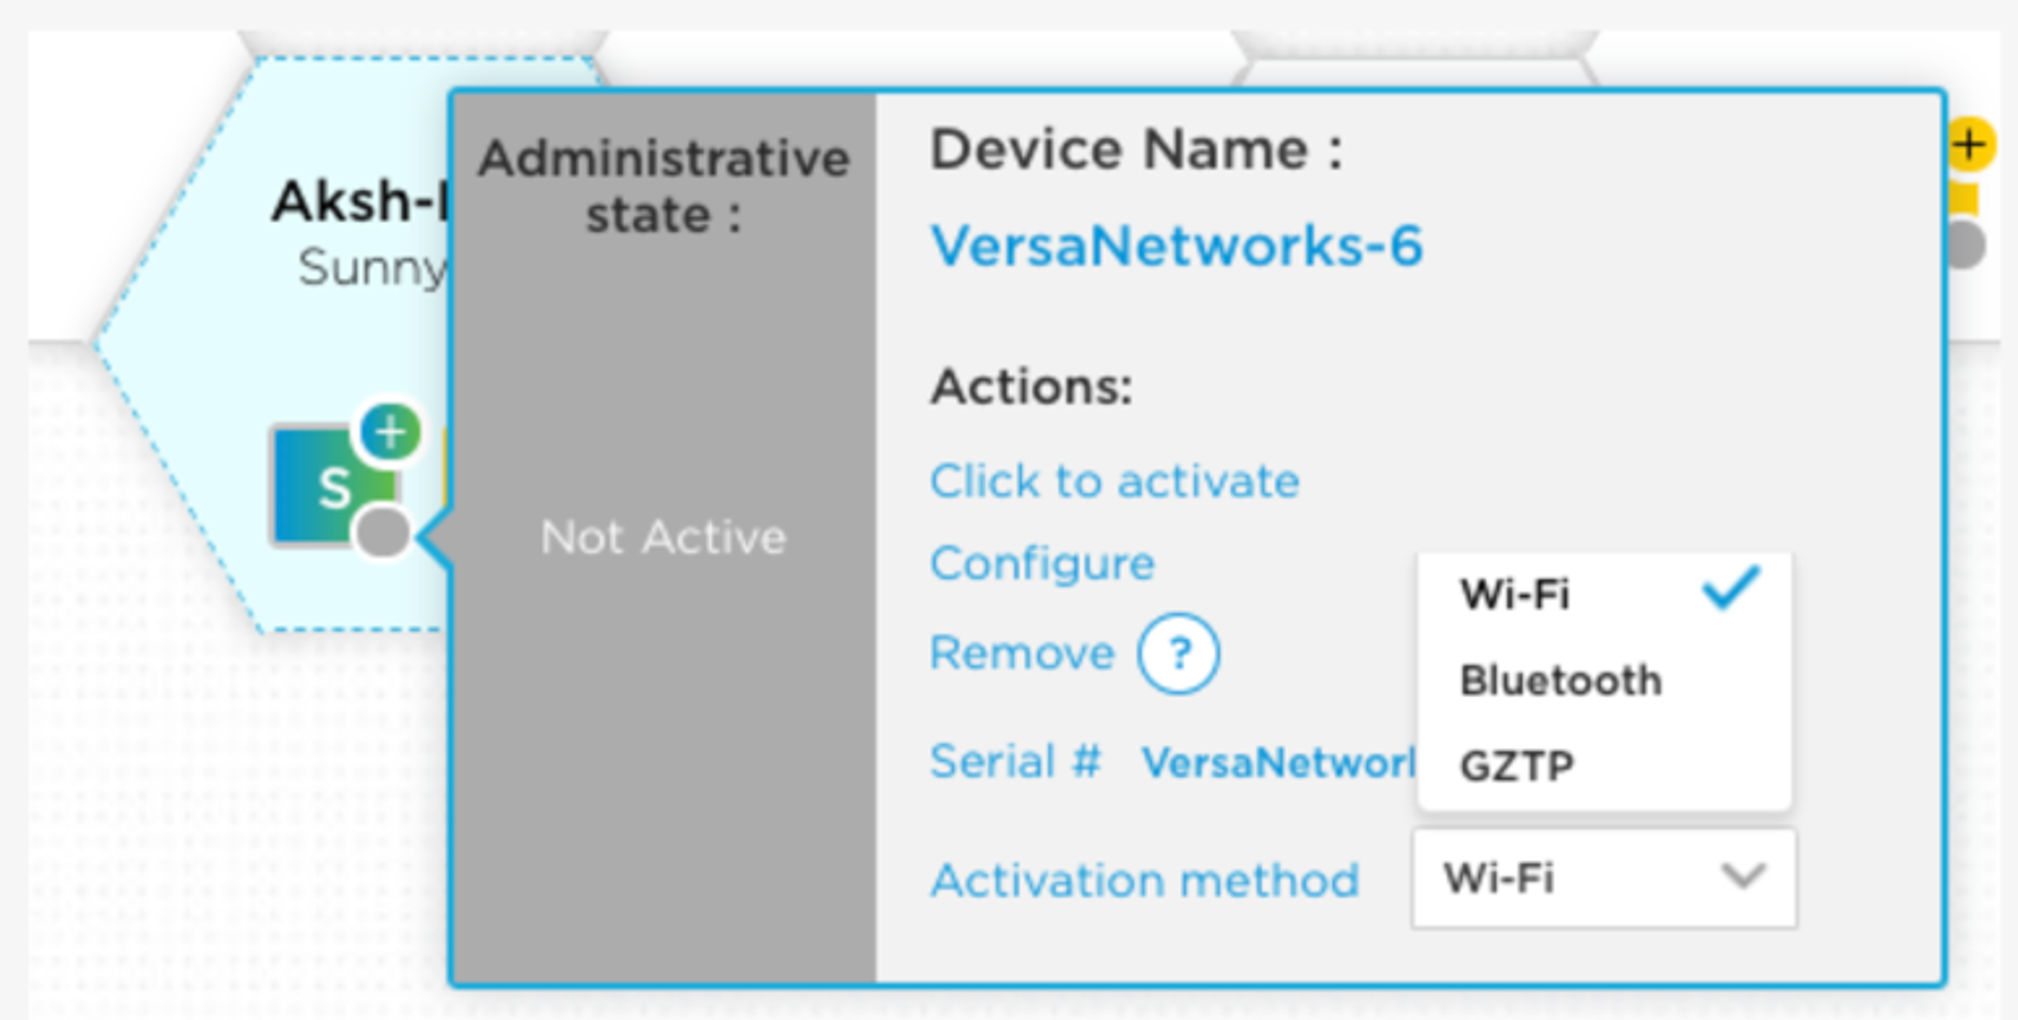
Figure 15: WiFi Activation method selection
- In the Activate Device window, Click on Activate
- The Web-UI Device Management portal displays in a browser tab. Click Start Activation
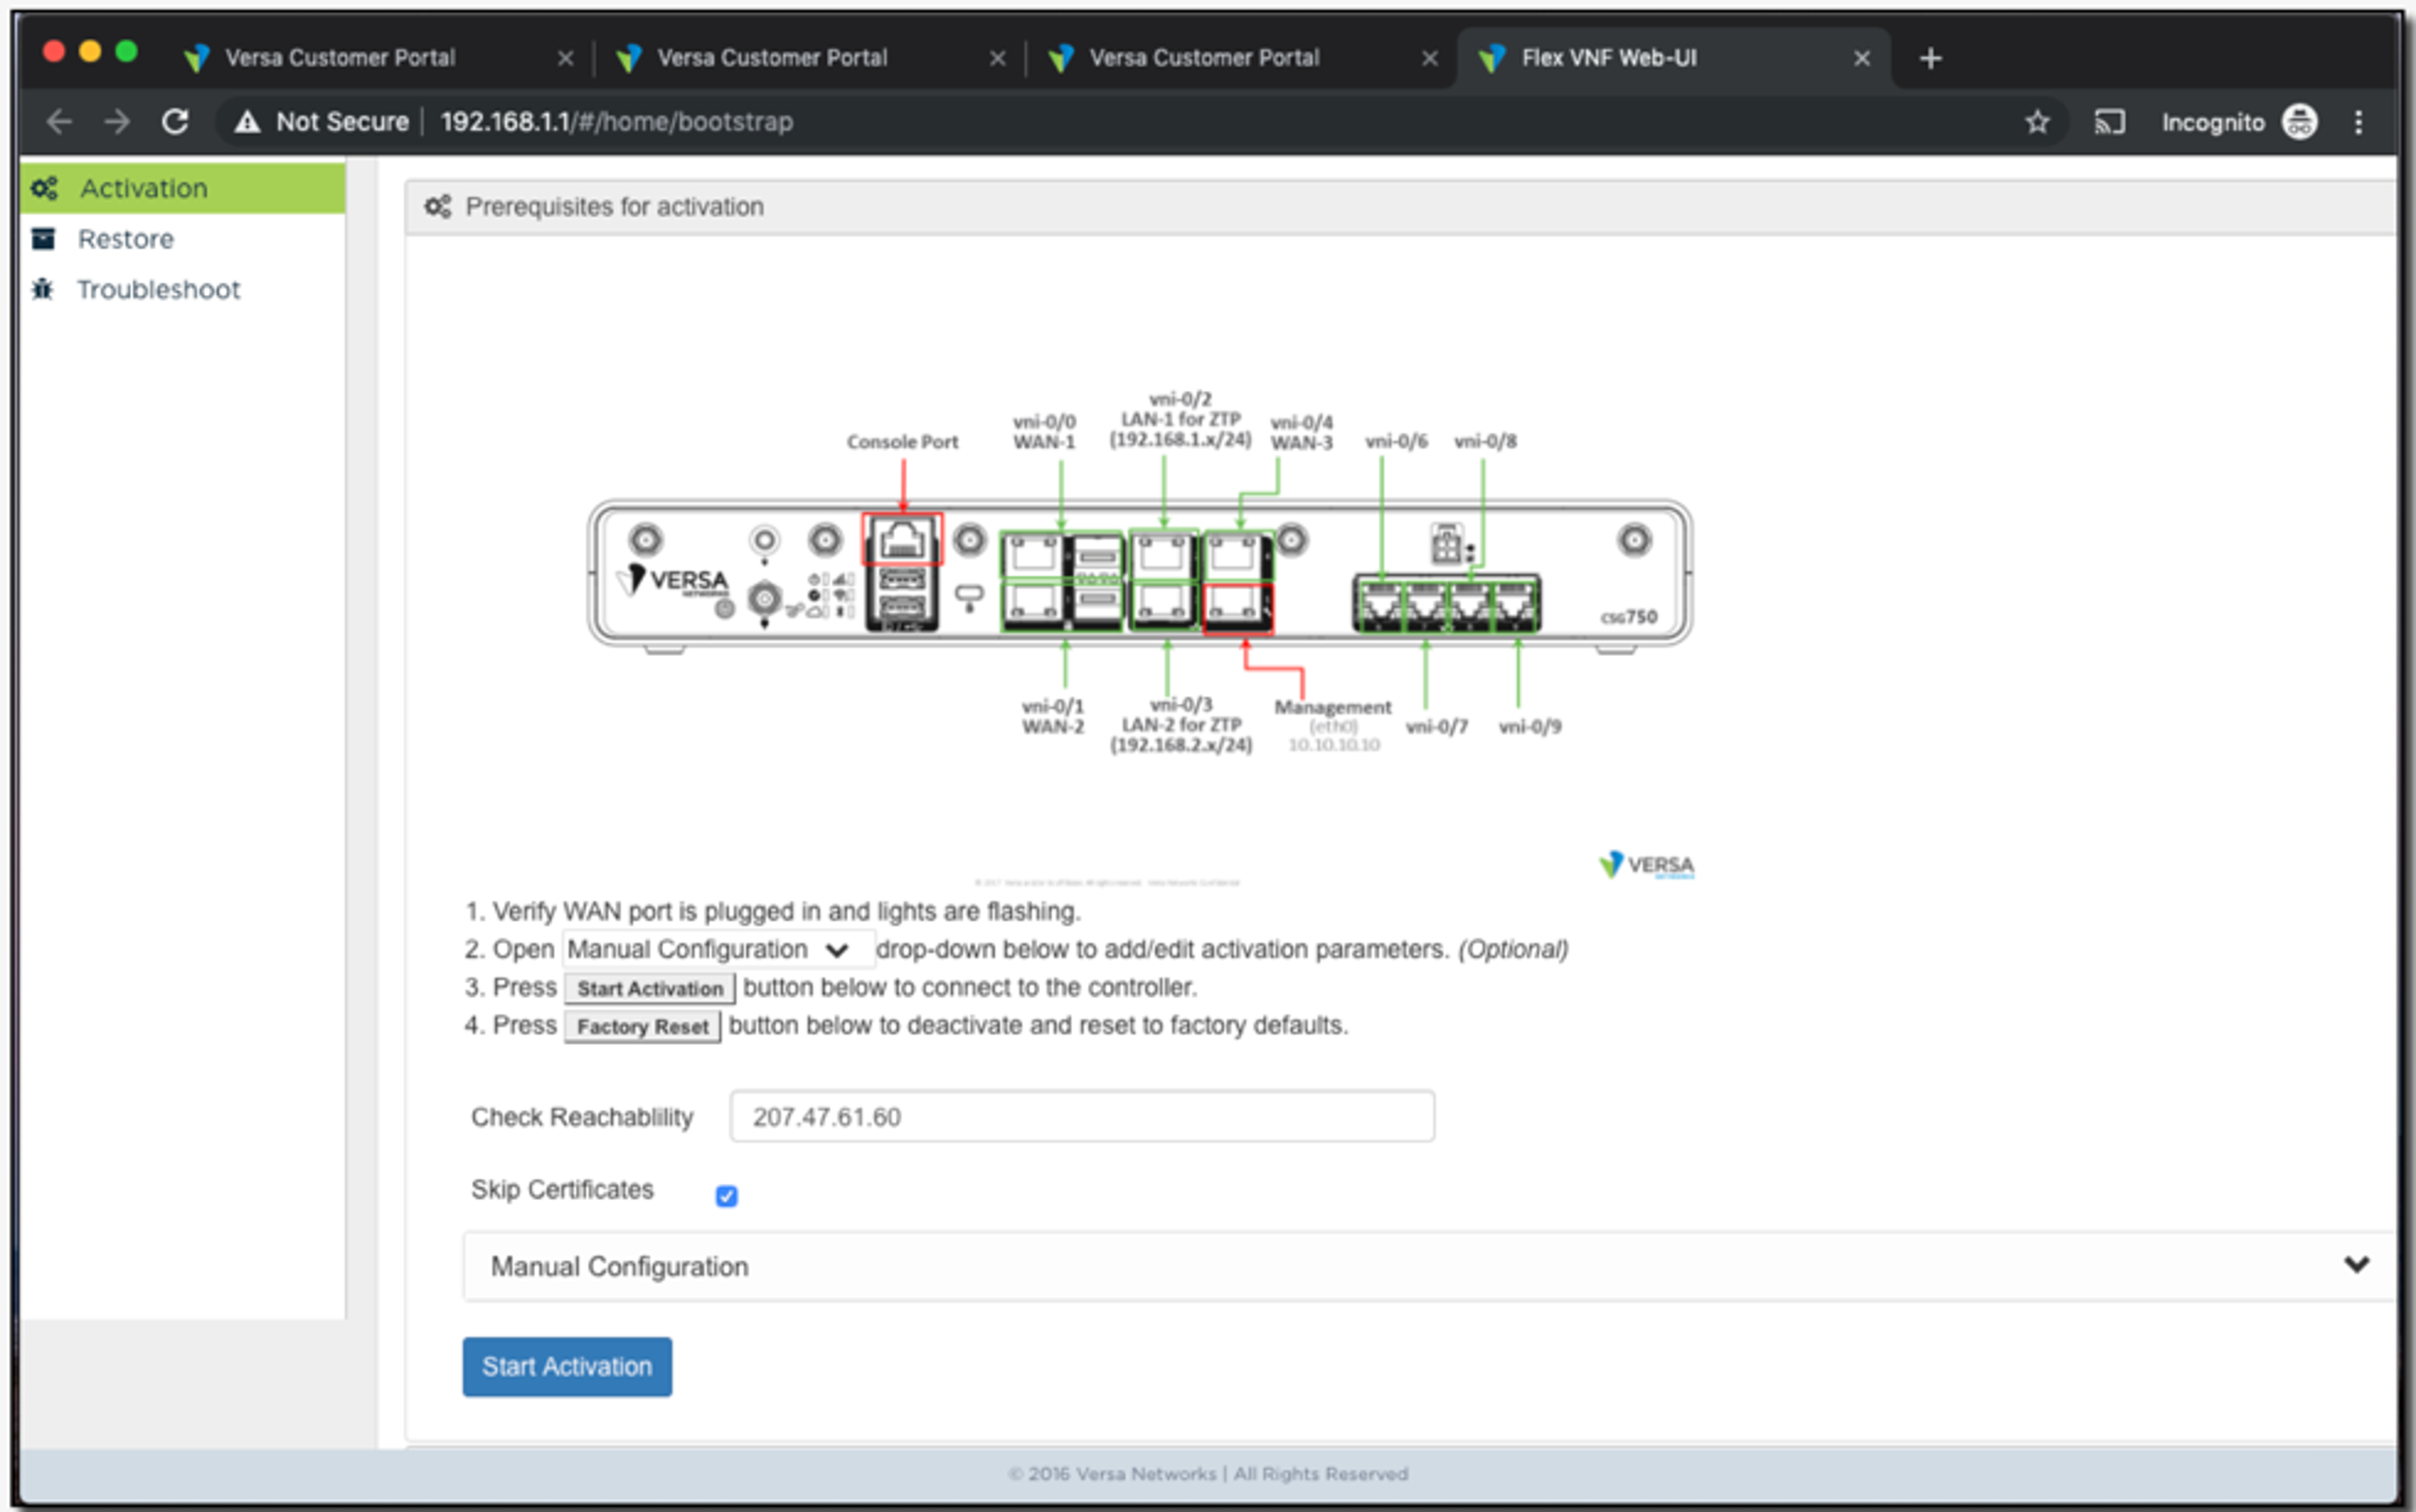
Figure 16: Portal displayed after Click on Activate
- Wait while the system configures the device. You can view the progress in the Web-UI Device Management portal
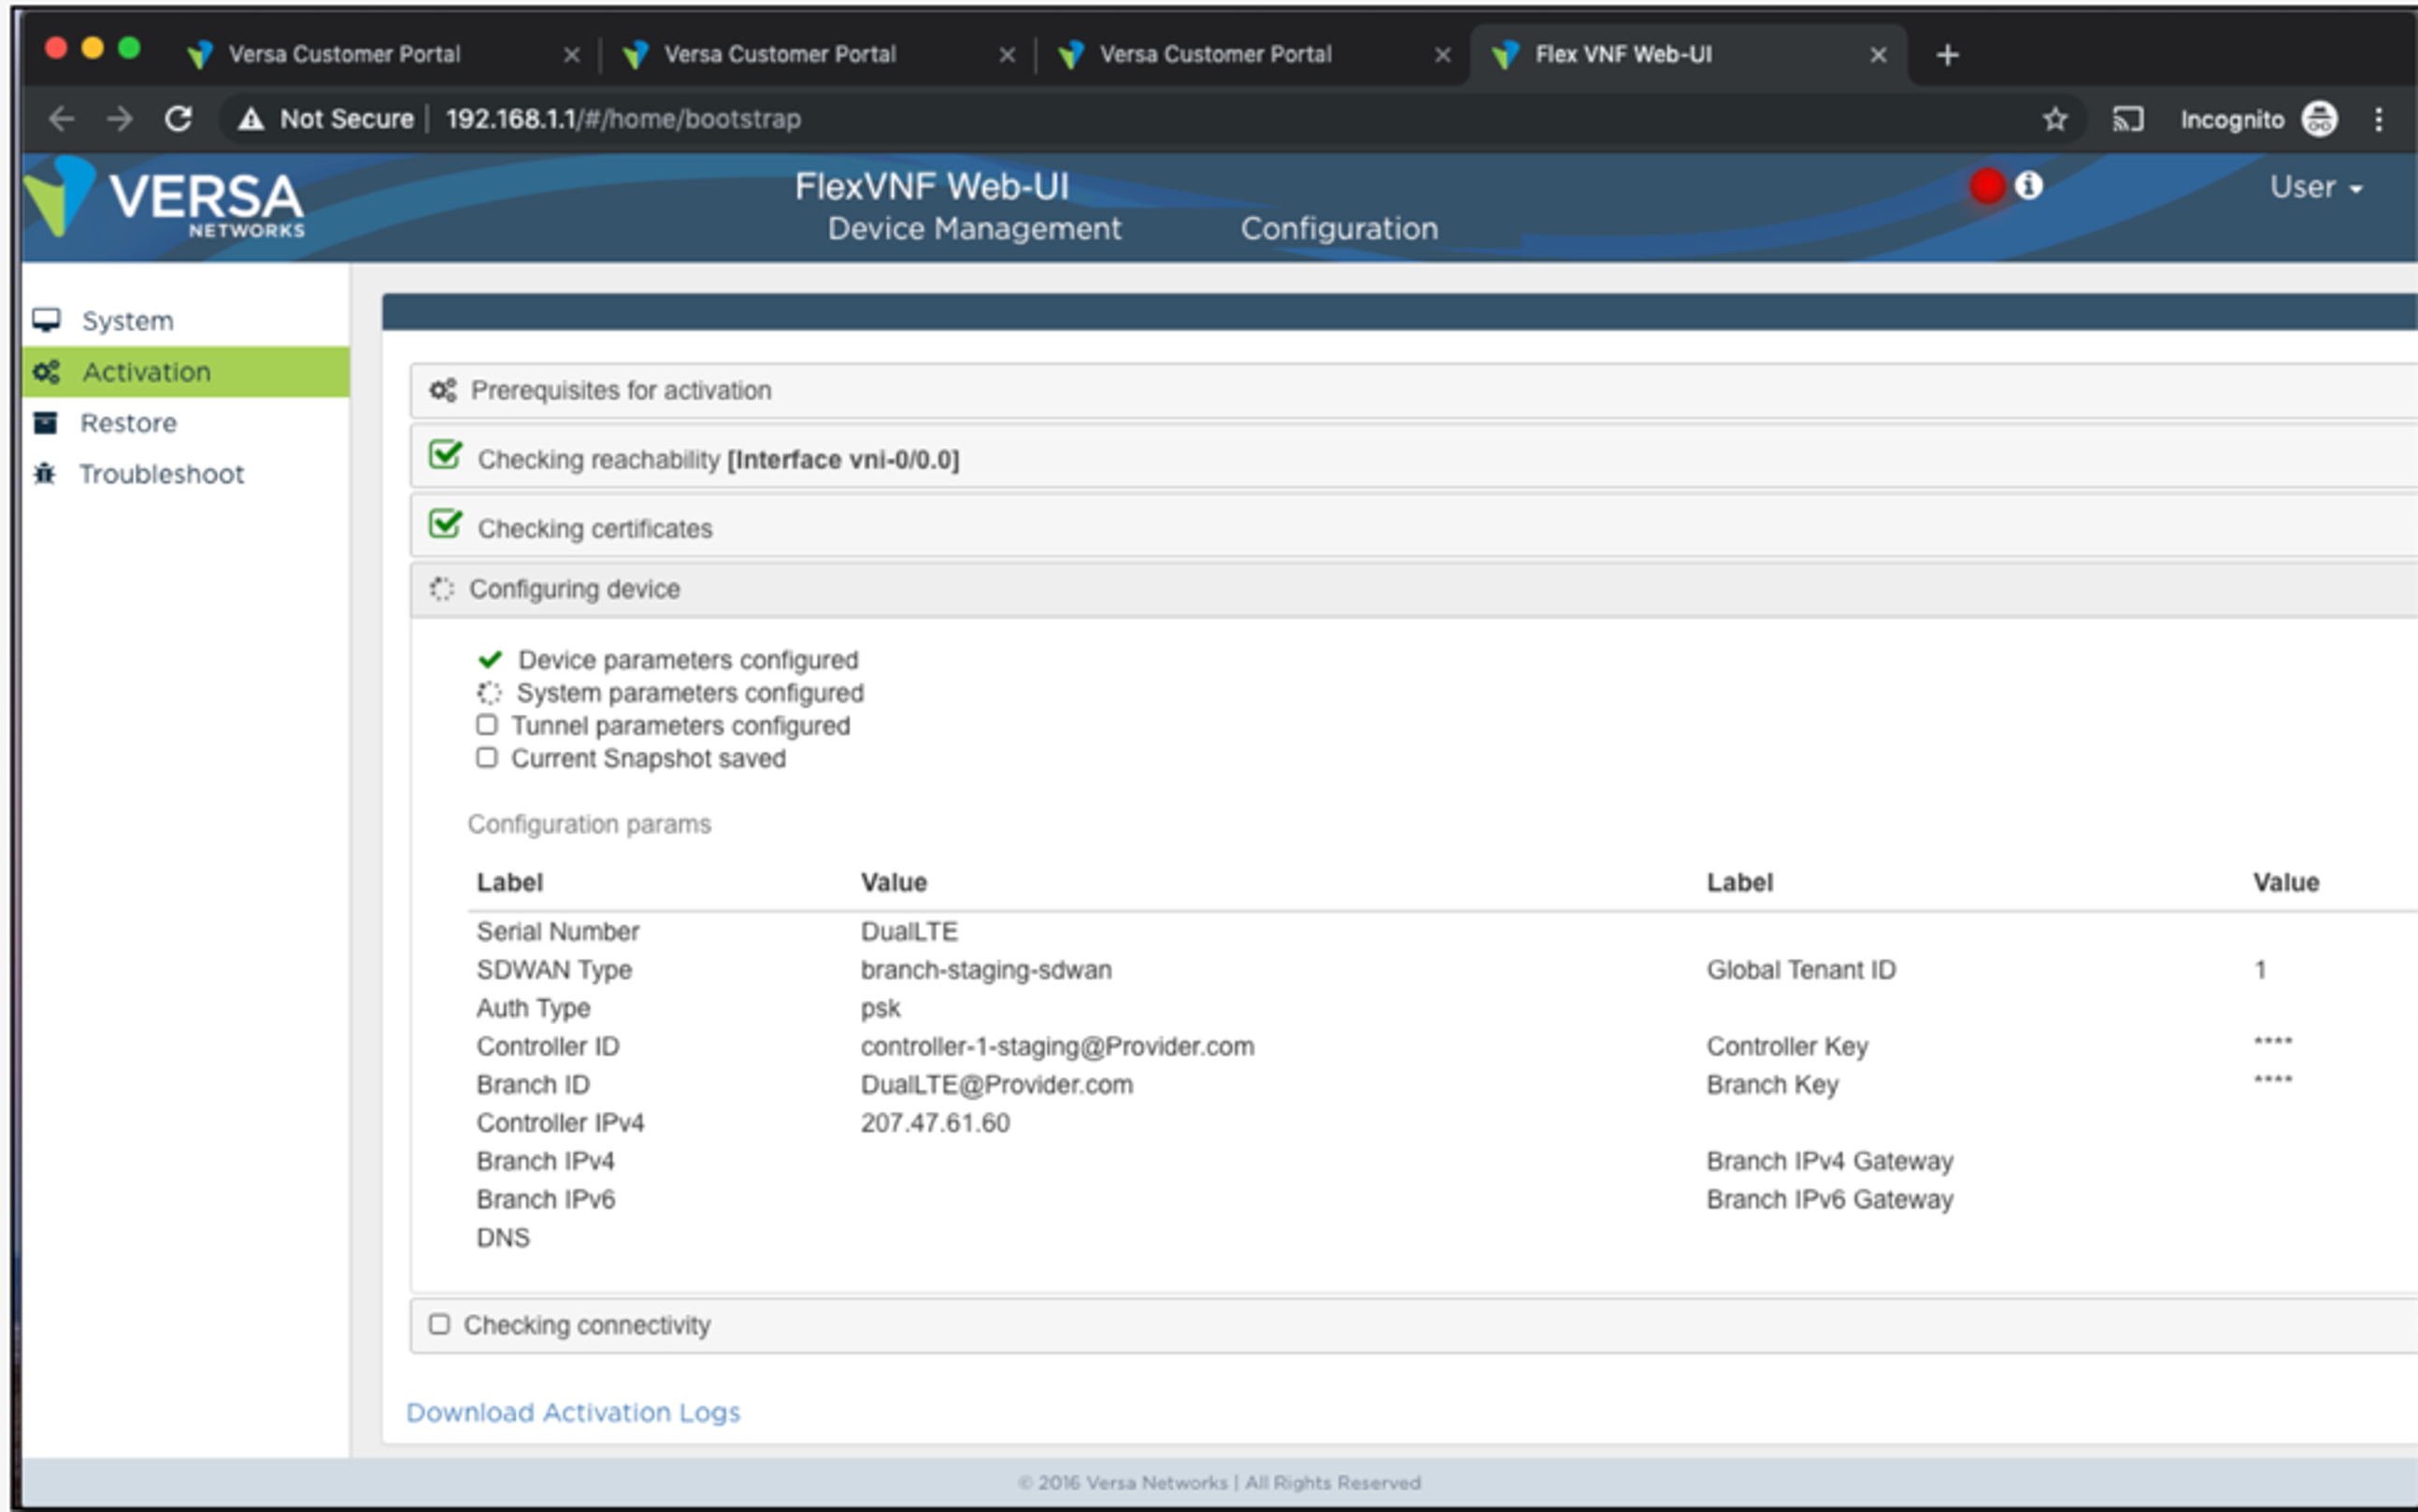
Figure 17: Activation progress
That concludes this document related to sites deployment and activation using GZTP and WiFi. For any comments or suggestion, please reach out to me at pella@versa-networks.com or Contact Versa Support. For more information on deploying and activating sites, please visit : https://www.youtube.com/watch?v=WTz9Bf0N5L4


