IP Filtering using Reputation and Geolocation
When traffic passes through the network there is a huge possibility of certain IP addresses are associated with a bad reputation and may cause a security risk to the Enterprise or Network. IP reputation is a measure of the trustworthiness and quality of an IP address based on its usage and history of spam or abuse reports. Domains that host phishing scams, exploits, and other malicious content on the Internet are considered dangerous & marked with bad reputations. IP filtering based on attributes like IP reputation and Geo-location ensures that the traffic that passes through the security gateway blocks all such traffic.
The Versa Secure SD-WAN provides the capability to enforce filtering of traffic based not only on IP address(blacklists/whitelists) but also based on Reputation and Geolocation. Predefined IP databases are available within VOS for reputation & geolocation lists. These threat intel feeds are updated on regular basis through Versa Security Packages (SPACK updates)
This article explains how to implement IP filtering based on reputation, geographical location, and other known attacks like botnets/phishing/scanners.
1. High Level Topology

We have a branch LAN behind a Versa SDWAN appliance. The VOS software is configured with reputation-based filtering.
For this example, the aim is to block any geo traffic to selective countries & bad reputation traffic (botnets/phishing/spam) originating from LAN network.
2. Configuration
Objectives:
A. Configure IP filtering profile for bad reputation categories and geo-location (traffic to/from certain selected countries)
B. Define security policies to block traffic matching the filtering profile
Before we go into the configuration, we will understand the precedence in the IP filtering methods. The methods in order of preference from highest to lowest are:
| 1 | Blacklist |
| 2 | Whitelist |
| 3 | Geo IP Based Action |
| 4 | Reputation Based Actions |
| 5 | Address Reverse Lookup |
IP filtering can be configured from Services > Security > Profiles > IP Filtering
There are two components to this:
| IP Filtering Rule | Define the IPs and sources that need to be blocked |
| Security Policy | Map the IP Filtering Rule created above in a Security Policy |
We will now look at the step by step configuration of reputation based filtering.
Step 1: Create a new IP Filtering Policy
- Set the default action to 'Allow'
- Choose the LEF Profile as 'Default-Logging-Profile'
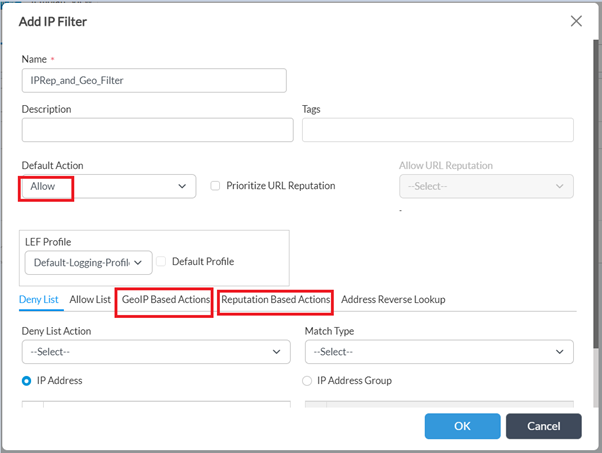
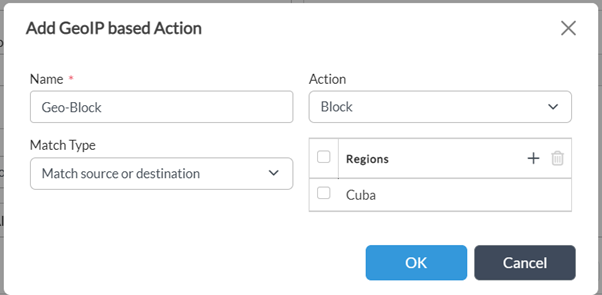
Step 2: Choose 'Geo IP Based Actions'
- create a new Rule to match IPs belonging to the two regions which need to be blocked.
- Since the default action is blank, it will allow all IPs. So a specific 'Action has to be defined inside the rule
Click on OK

NOTE: 'Match Type' can be used for more granular control based on use-case
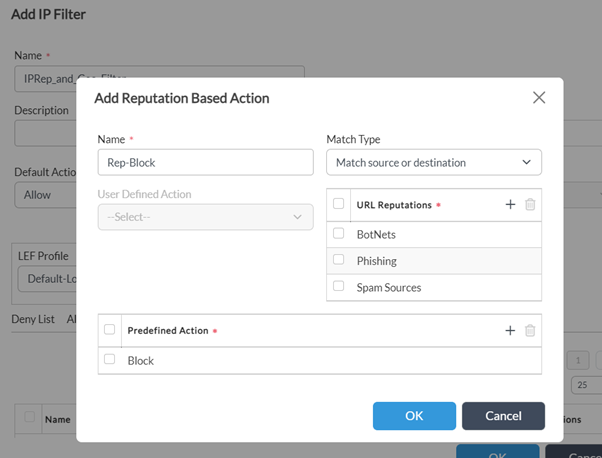
Step 2: Configure 'Reputation Based Actions' and add a rule to block BotNets/Phishing/Spam sources content.

-Define 'Match Type', 'Predefined Action' and click on OK.
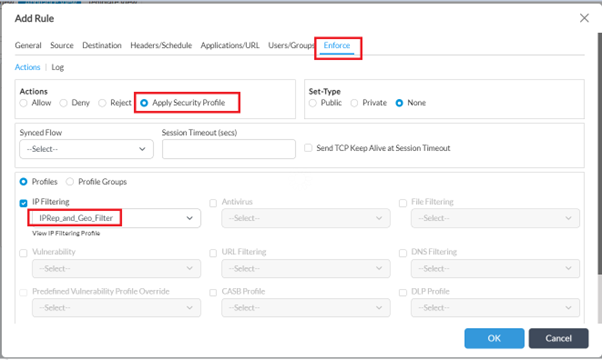
Step 3: Associate the IP Filtering rule created above to a security policy rule.

- Navigate to Services -> Next Gen Firewall -> Security -> Policies -> Rules. Add new rule for LAN Internet traffic or edit existing rule(Rule with Source as LAN).

- Navigate to ‘Enforce’ tab, select 'Apply Security Profile' -> ‘Profiles -> ‘IP Filtering’ and choose the profile created in earlier step

- Enable logging (as desired) & click OK
Verification
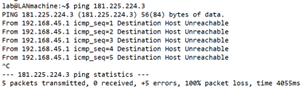
After applying the policy, when the user initiates traffic towards any of the sites in the countries specified in the rule, we see that the traffic is blocked.
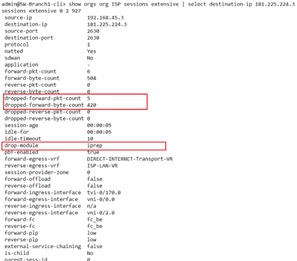
VOS CPE Session detail shows the drop-module as IP Filtering :
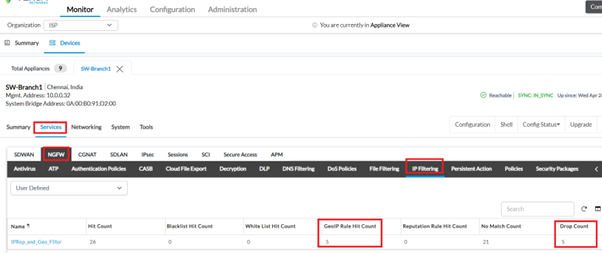
From Monitor tab -> Services -> NGFW -> IP Filtering, details of the rule under which it is getting blocked along with other details is displayed :
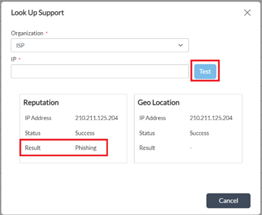
If you need to cross check the reputation/geo-location with the internal IP database, IP address look-up can be done from GUI (from Appliance context in director UI) Objects & Connectors -> Objects -> Predefined -> IP Reputations -> Look Up Support
(or) from device cli using below cmd :

Summary
In this article, we saw how to configure reputation and geo-location-based filtering policies. The policy can be more granularly defined by using the blacklisting, whitelisting options, and tweaking the default action behavior to suit the specific customer needs.


