Approaches for URL Filtering – User-based with Captive Portal Authentication
by Andrey Bazovkin
Introduction
In this article you will learn how to implement different URL Filtering rules based on user/group assignment in VOS (with the scope of Captive Portal user authentication).Following scenario will be used to demonstrate this:
- Grant access to Governmental, Medical and Financial sites for all users in organization without authentication and logging.
- Grant access to URLs from Social Media and Streaming categories with Trustworthy reputation for users from Marketing group with logging to Versa Analytics.
- Grant access to URLs from Social Media and Streaming categories for all authenticated users with required justification with logging to Versa Analytics.
- Block Gambling URLs for all users.
- Grant access to all remaining URLs for all authenticated users.
- Allow SD-WAN traffic to corporate DC untouched.
Following VOS components will be configured to implement the scenario:
- Security Package (SPack) auto-update
- Cloud URL Lookup Profile and SNAT pool
- NGFW Policy
- SSL Decryption policy
- Authentication policy (Local Database is used in this example. This can be extended to External Database/IDP by configuring corresponding authentication connector to LDAP, Kerberos SAML IDP)
- Captive Portal
- CA key/certificate
- URL Filtering profile
Director and VOS release used in this article: 21.2.3
Later in this article each above mentioned component configuration will be described in detail. Majority of described configuration activities are to be done in Device template or Service template, unless specifically mentioned to perform on VOS device itself (those are CA key&certificate import activities).
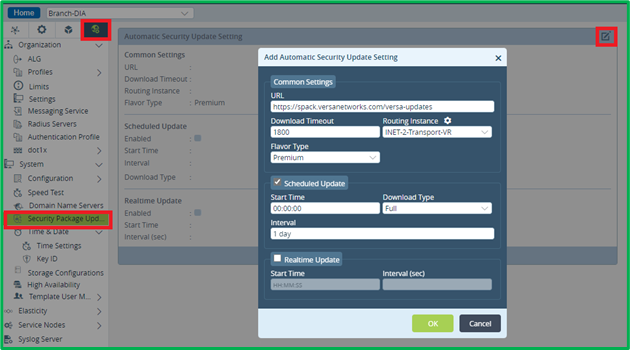
Security Package (SPack) auto-update
Besides other predefined services and objects, Security Packages (SPacks) contain URL categories and URL reputations information, so it’s advisable to have them up-to-date. To accomplish this VOS has SPack auto-update feature. Before enabling it you may need to ensure that Routing Instance, which will be used for SPack updates, has DNS configured in Others->System->Domain Name Servers. In our case Routing Instance will be INET-2-Transport-VR:
SPack auto-update configuration itself is done in the next section – in Others->System->Security Package Updates:
Cloud URL Lookup Profile and SNAT pool configuration
Cloud URL Lookup is a recommended feature, which extends the capacity of embedded URL database () by performing real-time requests to cloud servers for getting category and reputation of URLs, which are not present in embedded URL database. Before configuring Cloud Profile, it’s needed to configure SNAT pool, which will be used for performing requests to cloud servers. This is done in Objects->SNAT Pool section: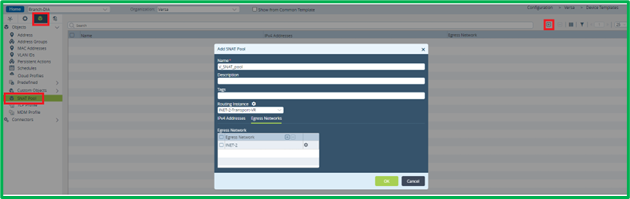 It’s needed to specify Routing Instance and Egress network or IP Addresses, which will be used by this pool.
Cloud Profile configuration is done from Objects->Cloud Profiles section:
It’s needed to specify Routing Instance and Egress network or IP Addresses, which will be used by this pool.
Cloud Profile configuration is done from Objects->Cloud Profiles section:
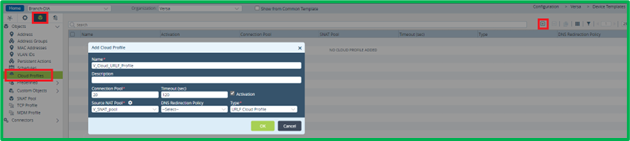 For Cloud Profile it’s needed to specify connection pool (number, usually 10 is enough), SNAT Pool, Type – URLF Cloud Profile, and important – click on “Activation” checkbox in order to enable the Profile.
Configuring SSL Decryption policy
SSL Decryption policy allows VOS to inspect and eventually alter encrypted HTTPS traffic. From the perspective of the scenario, which is being deployed in this article, this is needed for:- Redirection to Captive Portal for Authentication.
- Presenting special action pages from Captive Portal.
CA Key/Certificate import
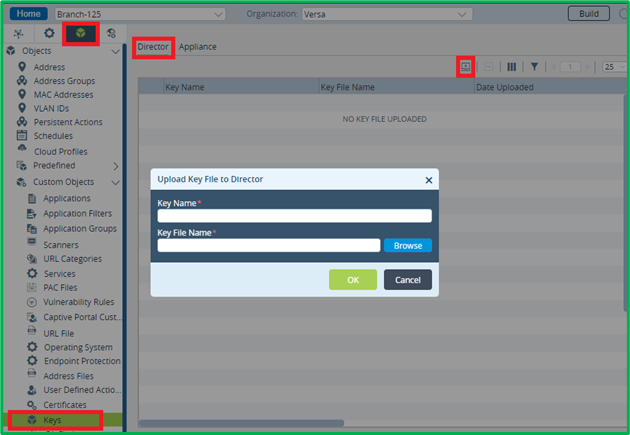
Before configuring Decryption Policy itself it’s needed to create a Decryption Profile, and Decryption Profile itself requires CA Key/Certificate to be installed on VOS device. They will be used to sign certificates, which will be presented to local users instead of original ones. CA Certificate imported on VOS device should be signed by CA trusted on user laptops. You can install same key/certificate on many VOS devices.Key/Certificate import must be done from Device configuration context (not from Device Template) First you need to upload key, and only after that – Certificate. CA Key import is done in Objects&Connectors->Objects-Custom Objects->Keys section. There are 2 tabs: Director and Appliance. First you need to upload key file to Director:
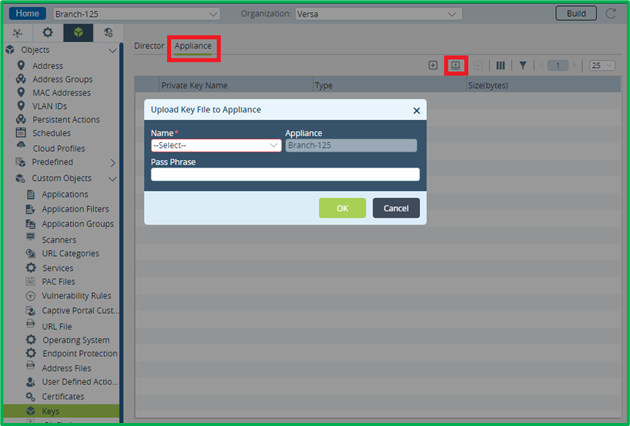
 Then switch to “Appliance” tab and upload recently added key from Director to appliance:
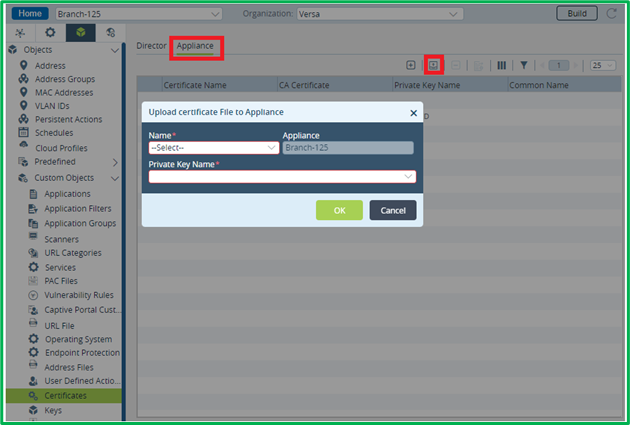
 After this upload CA certificate in Objects&Connectors->Objects-Custom Objects-> Certificates section using similar two-step procedure (first upload file to Director, second – from Director to appliance itself):
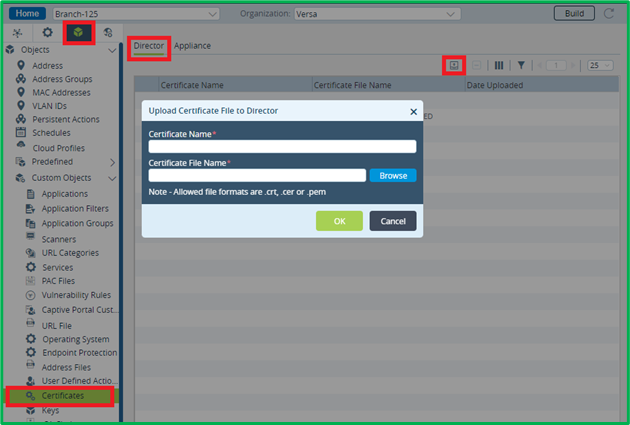 When importing certificate to device, you need also to specify corresponding Key name, which you assigned to the imported Key on the previous step.
 For the testing purposes (not production) you can generate self-signed CA key and certificate on VOS device itself and install it on user laptops as Trusted CA certificate (suitable rather for testing or very small environment).
First generate key on appliance:
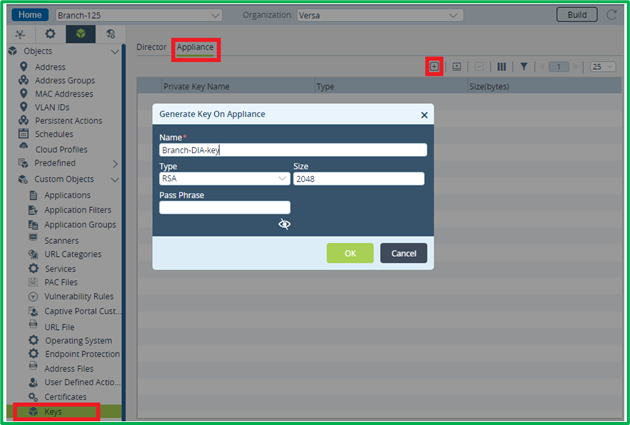 Note: it’s not possible to export key from appliance. So if you would need to replace appliance with locally generated key, you would need to generate a new key/certificate, and upload certificate on user laptops.
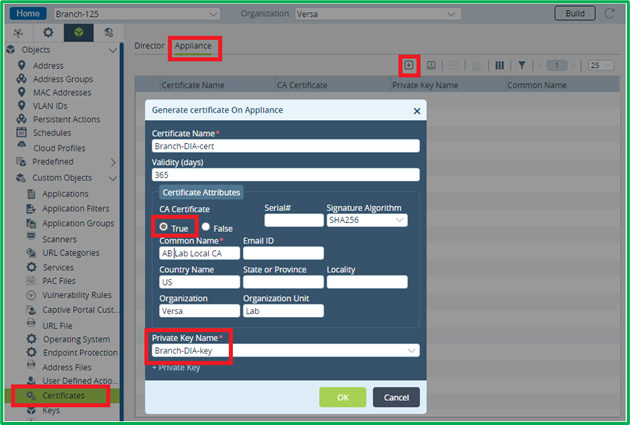
Then generate CA-type certificate for this key:
Note: it’s not possible to export key from appliance. So if you would need to replace appliance with locally generated key, you would need to generate a new key/certificate, and upload certificate on user laptops.
Then generate CA-type certificate for this key:
Decryption Profile creation
Go back to Device template or Service Template – wherever you’re doing this piece of configuration.Go to Services->Next Gen Firewall->Decryption->Proxy Profiles section, and add new Decryption Profile:
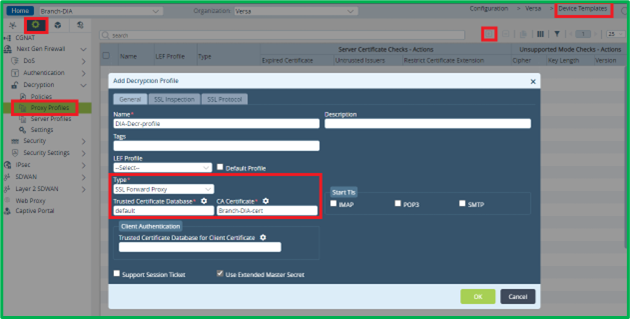 Select “SSL Forward Proxy” as a Type, “default” as Trusted Certificate Database, and CA Certificate name given on the previous step when importing Certificate on appliance. You can leave remaining 2 tabs – “SSL Inspection” and “SSL Protocol” by default, or adjust them if you want to apply additional SSL Inspection policy.
Decryption Policy creation
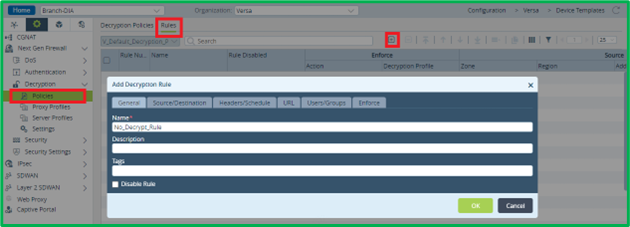
By default, there is no Decryption Policy configured, so first you may need to create it in Services->Next Gen Firewall->Decryption->Policies: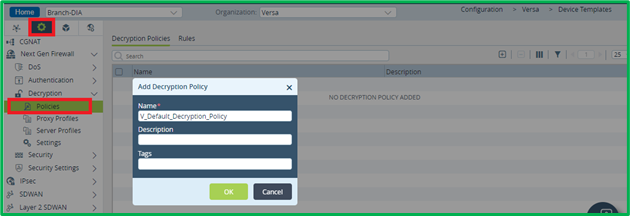 Now it’s possible to add Rules to this policy. As stated in scenario, access to Governmental, Medical and Financial sites shouldn’t be authenticated and subsequently excluded from scope of SSL Decryption. So this would be the first decryption rule to match DIA HTTPS traffic destined to those 3 URL categories, and don’t decrypt it:
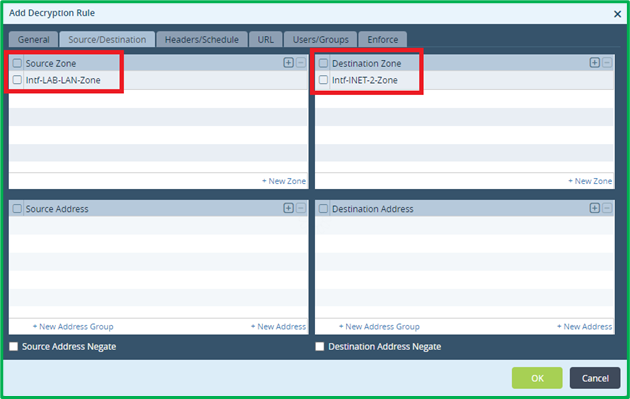
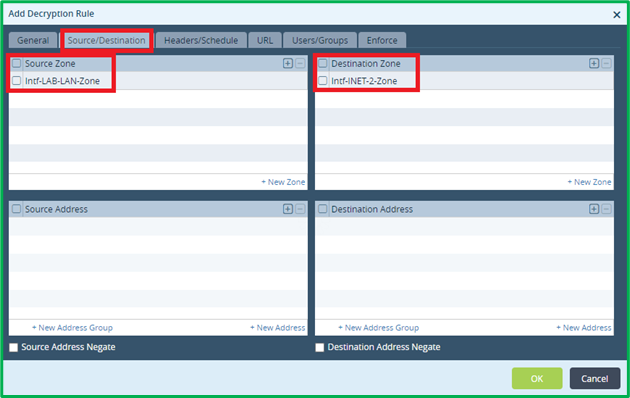
 To match DIA Traffic, specify LAN interface zone as source, and INET interface(s) zone(s) as destination:
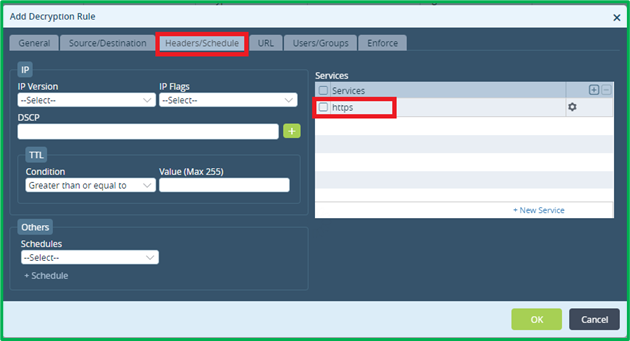
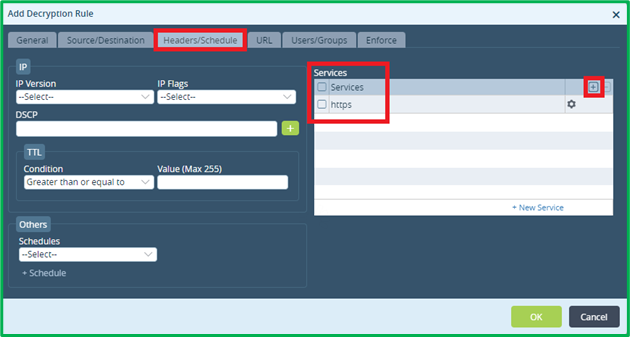
 Match all ports, which are used by https traffic in your organization. In this example, it’ll be tcp/443 only:
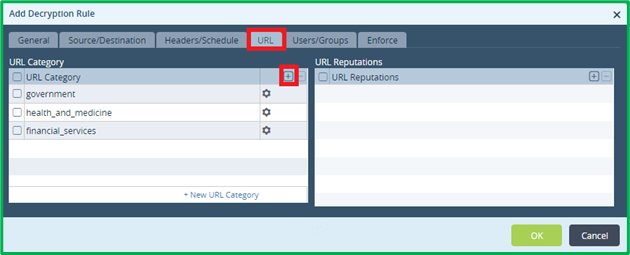
 Select 3 desired URL categories to match:
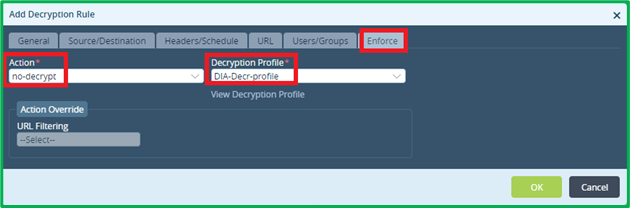
 On “Enforce” tab select action “no-decrypt” and select Decryption profile, which was created on the previous step (it will be used only for eventual SSL Inspection):
 Another Decryption rule would be to match whole remaining DIA HTTPS traffic and decrypt it:

 Match zones for DIA traffic:
 Match HTTPS ports only:
 On “Enforce” tab select action “decrypt” and select Decryption profile, which was created on the previous step:
 You can now commit template to device, and verify Decryption: you should see all DIA sites presented with the certificates from VOS device, except those falling into 3 URL Categories, for which no-decryption exception rule was applied.
Traffic, that will not much Decryption Rules we created, will not be decrypted.
Note: QUIC is a new protocol, alternative to TCP+TLS, supported by newer web browsers, and deployed on some Web servers, which uses UDP as a transport (default port is udp/443). QUIC cannot be decrypted using SSL Decryption policy, and even requested FQDN cannot be revealed with it.. To prevent this, it’s recommended to block QUIC in NGFW policy, so clients/servers will failback to using TCP+TLS. Later in this article we will apply NGFW rule to block QUIC traffic.
Decryption Policy operation verification
Current Decryption statistics can be seen on Device Monitor tab on Versa Director in Services->NGFW->Decryption section: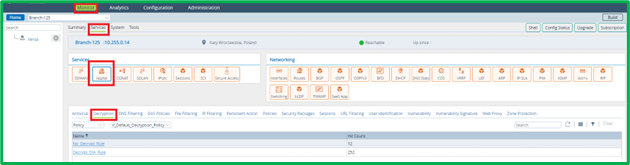 Historical Logs can be seen in Versa Analytics in Logs->SSL Decryption section:

Authentication Policy configuration
Authentication Policy allows user identification by redirecting certain types of traffic from users (based on match criteria in Authentication rules) to Captive Portal. To proceed with Authentication Policy configuration itself, you need to create Authentication Profile and configure Captive Portal.Authentication Profile creation
With VOS releases 21.2.2 and later you can use Local Database (applicable rather for smaller deployments), LDAP, Kerberos, SAML and Certificate as authentication methods. It is defined in Authentication profile which Authentication method to use. In this article we will use Local database as a source for authentication, however you can use other ones by creating corresponding LDAP/Kerberos/SAML profile, and using it in Authentication Profile.Authentication Profile is configured from Objects&Connectors->Connectors->Users/Groups-> Authentication Profiles section:
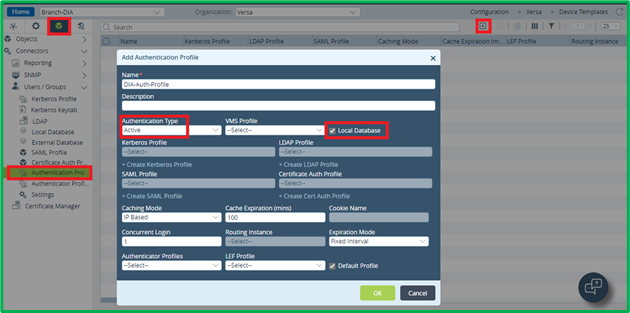 For Captive Portal-based authentication you should select Authentication Type as “Active”. Then select either Local Database or LDAP/Kerberos/SAML/Certificate auth profile, which you want to use.
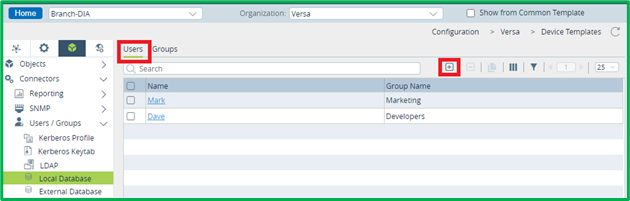
Now we will add some Users and Groups to Local Database in Objects&Connectors->Connectors->Users/Groups-> Local Database section – group ‘Marketing’ with user ‘Mark’ in it, and group ‘Developers’ with user ‘Dave’ in it:

Configure Captive Portal
Captive Portal is configured from Services->Captive Portal section: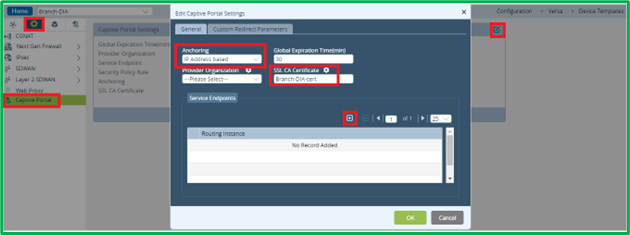 Select IP-based Anchoring (there is also MAC address based and IP+MAC anchoring options), put SSL CA Certificate name, which was earlier imported on device, and click “+” to add Service Endpoint:
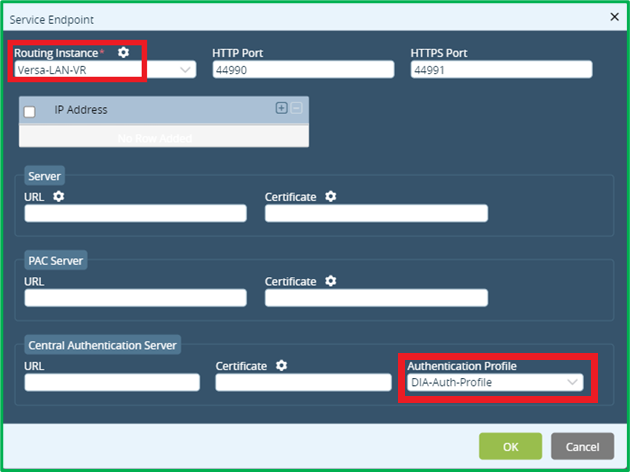 Select your LAN-VR as Routing Instance. Here you can also adjust default ports, which will be used for Captive Portal redirection. Set Authentication Profile to the one, created in a previous chapter (5.1).
Authentication Policy creation
By default, there is no Authentication Policy configured, so first you may need to create it in Services->Next Gen Firewall-> Authentication ->Policies: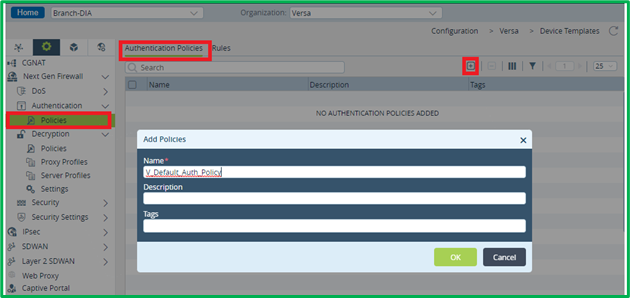 Now it’s possible to add Rules to this policy.
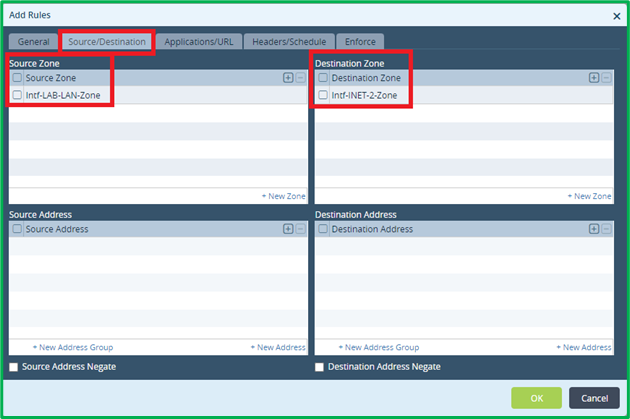
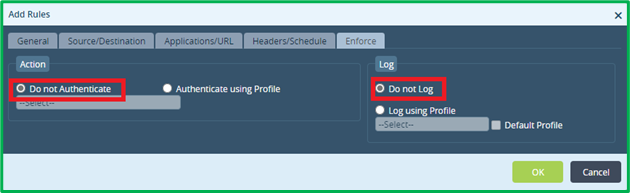
Rule for Authentication exemption
It’s very critical to specify match criteria so, that only expected traffic will be redirected for Captive Portal Authentication, otherwise Authentication Policy may drop some traffic. As stated in scenario, access to Governmental, Medical and Financial sites shouldn’t be authenticated. So this would be the first Authentication rule to match DIA HTTPS traffic destined to those 3 URL categories, and don’t decrypt it: To match DIA Traffic, specify LAN interface zone as source, and INET interface(s) zone(s) as destination:
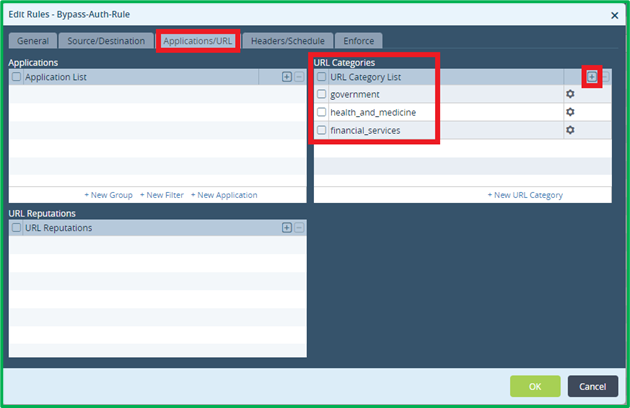
 Select 3 URL categories to match:
 On Enforce tab select “Do not Authenticate” and “Do not Log” (as it was mentioned in the original scenario):
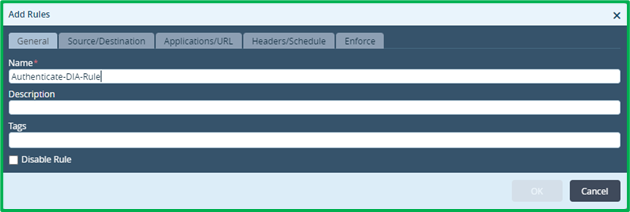
Main Authentication Rule
Now create second rule, which will match whole DIA HTTP and HTTPS traffic and redirect it for Authentication:
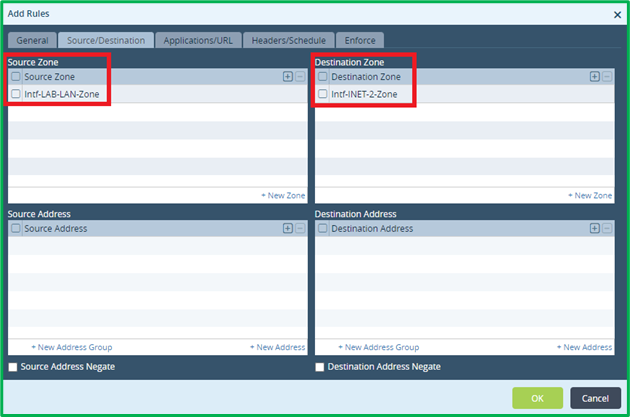
 Match LAN and INET interface zones as source and destination ones:
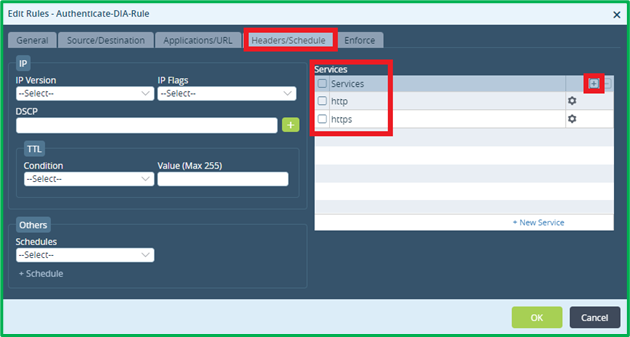
 Match HTTP and HTTPS as Services om Headers/Schedule tab:
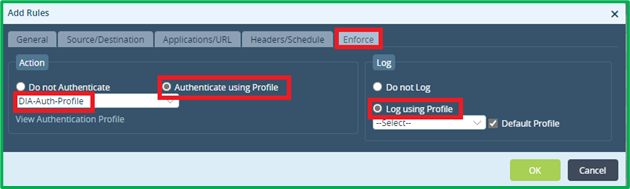
 On “Enforce” Tab select Action to Authenticate using Profile, which we’ve created on the previous step. You can also LOG authenticated traffic using Default Profile (as it was planned in the initial scenario):
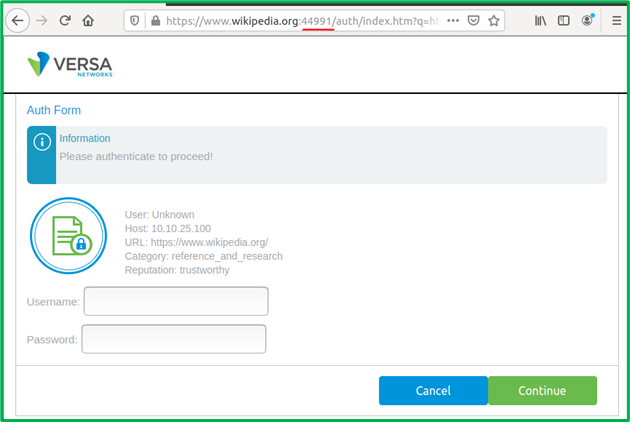
 You can now commit template to device, and verify Authentication: an attempt to visit any DIA site should cause redirection to Captive Portal for Authentication (except those falling into 3 URL Categories, for which Bypass-Authentication exception rule was applied):
Authentication Policy operation verification
Current Authentication statistics can be seen on Device Monitor tab on Versa Director in Services->NGFW-> User Identification section: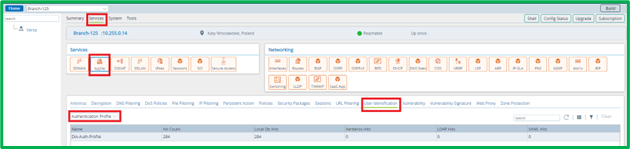

 Historical Logs can be seen in Versa Analytics in Logs-> Authentication section:

NGFW policy and URL Filtering configuration
URL Filtering profile creation
In order to accomplish the goal of the scenario to grant access to block gambling URLs, permit Social Media and Streaming URLs with justify action (except tiktok.com, which should be blocked), and permit all remaining URLs, we need to create URL Filtering profile, which will define those sets of URLs, so that they further can be used in NGFW Access Policies.Note: it’s possible to match URL Category within Access Policy itself, and apply basic actions – Allow/Deny, however in our scenario we have advanced action to apply (justify), so we would need to use URL Filtering profiles.
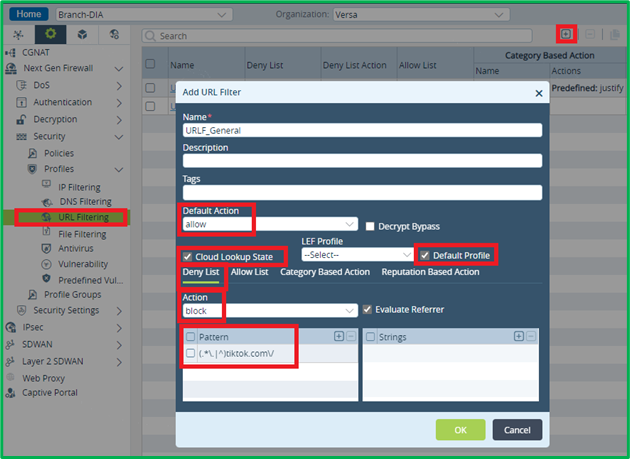
Let’s create URL Filtering profile, which will block gambling URLs for all users, permit Social Media and Streaming URLs with justify action (except tiktok.com, which should be blocked), and permit all remaining URLs.
To create URL Filtering profile itself go to Services->Next Gen Firewall->Security->Profiles->URL Filtering
 In URL Filtering profiles actions are being checked in the following order until the first match:
- Deny List
- Allow List
- (Category-Based Action AND Reputation-Based Action).
So first let’s block tiktok.com domain with all its subdomains in Deny List, so it will be blocked before Category-Based Action doe Social Networks will be applied.
URL Patterns use PCRE (Perl Compatible Regular Expressions) syntax, so to match domain and all its subdomains, you can use (.*\.|^)tiktok.com\/ pattern.
Default action is set to “Allow”, because based on our scenario we want to allow all URLs, which don’t have specific match.
Enabling “Cloud Lookup State” will allow Cloud lookup for URLs, which are not present in embedded database.
“Default profile” for LEF will enable sending logs to Versa Analytics.
Add Category-Based Action to Justify Social networks and Streaming media URLs:
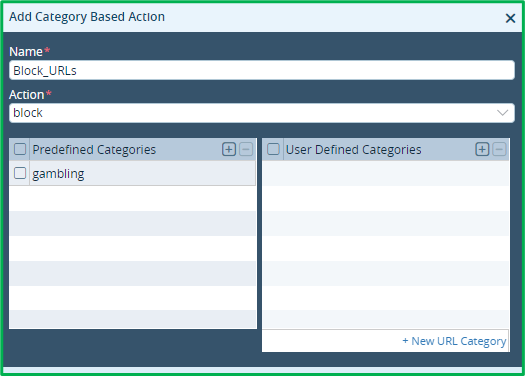
 Add one more Category-Based Action to Block Gambling URLs:
Access policy configuration
NGFW Access policies can be edited in Services->Next Gen Firewall->Security->PoliciesAdjusting default Rules
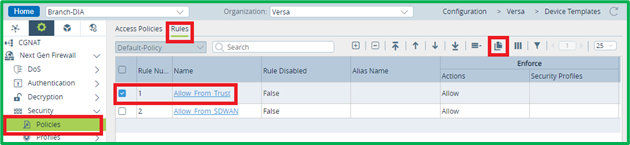
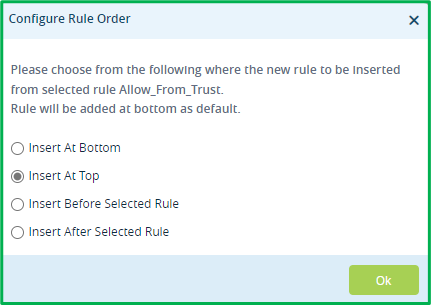
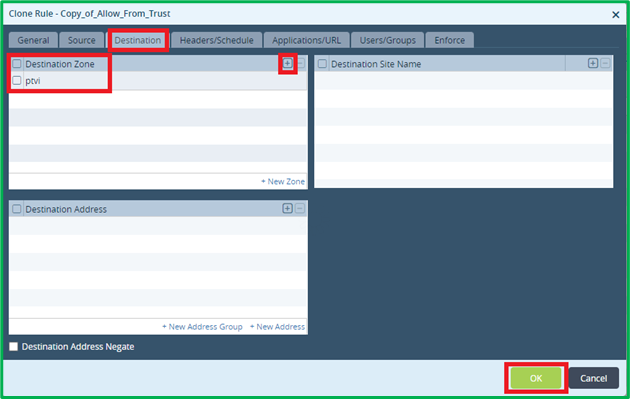
By default, if you have NGFW and Split Tunnel configuration created by workflow, you will have “Allow_From_Trust” rule, which permits traffic from LAN interface zone to both – SD-WAN and DIA. Since we need to apply more granular rules for DIA traffic, we can create separate rule instead, which will permit everything from LAN interface zone to SD-WAN, and then create more granular rules for DIA only.So let’s clone “Allow_From_Trust” rule:
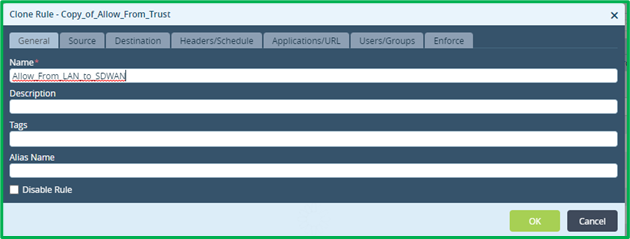 And put destination zone in it as “ptvi” – it’s pre-defined name for SD-WAN zone:
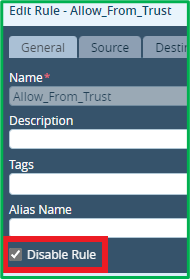
 Now you can disable or delete original “Allow_From_Trust” rule:
 Now we can add rules specific for DIA traffic – we will be adding them one-by-one to the bottom of the list.
Dealing with QUIC protocol
As mentioned earlier in Decryption policy section, there is a new protocol QUIC, alternative to TCP+TLS, supported by newer web browsers, and deployed on some Web servers, which uses UDP as a transport (default port is udp/443). QUIC cannot be decrypted using SSL Decryption policy, and even requested FQDN cannot be revealed with it. To prevent this, we will block QUIC in NGFW policy, so clients/servers will failback to using TCP+TLS. Let’s add rule, which will match whole DIA traffic destined to port udp/443 and block it: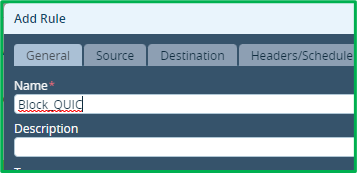 Source – LAN zone:
 Destination – INET intf zone (one used for DIA):
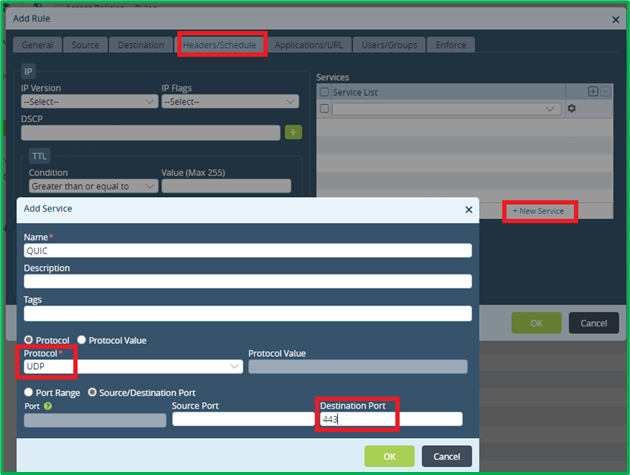
 On Headers/Schedule tab click to add New service “QUIC”, which will match udp/443:
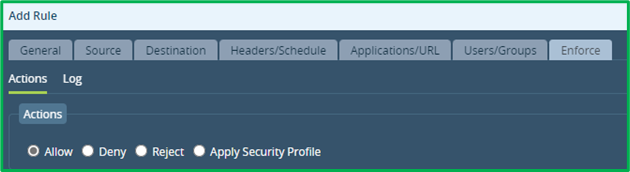
 On Enforce tab select either Deny or Reject action (‘Deny’ will silently drop session, while ‘Reject’ will also send ICMP port unreachable message):
 The rule to block QUIC protocol is created.
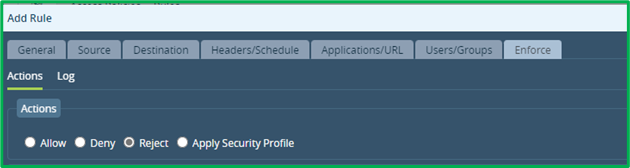
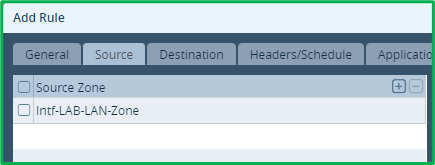
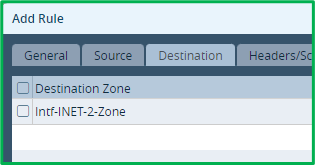
Optional DIA DNS Rule
If you use DNS via DIA, you need to add rule to permit DNS traffic, before adding granular DIA rules, relying also on user authentication: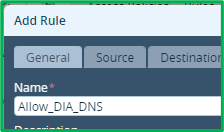 Source&Destination zones will be the same for all DIA rules:
Source – LAN zone:
Source&Destination zones will be the same for all DIA rules:
Source – LAN zone:
 Destination – INET intf zone (one used for DIA):
 Select “DNS” as application:
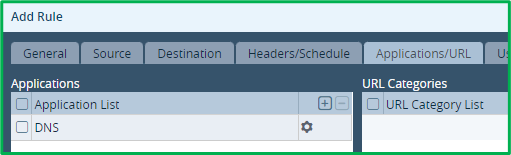 And Enforce action would be “Allow”:
 Now let’s create Access rules for Web DIA traffic as per scenario.
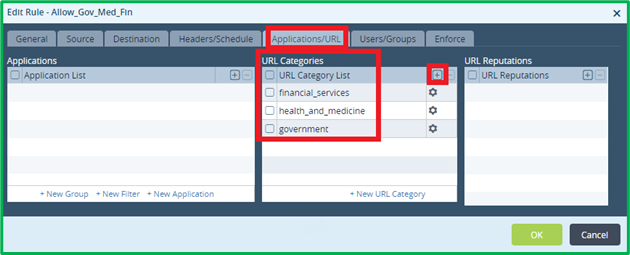
DIA Web Rule#1 – permit Governmental, Medical and Financial sites for all users in organization without authentication and logging:
Name: Allow_Gov_Med_FinSource&Destination: standard for DIA (see DNS rule)
Application/URL match criteria would include 3 desired URL categories:
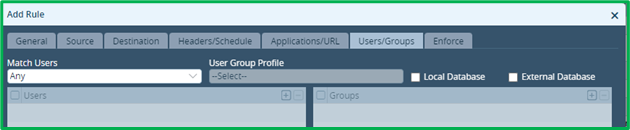
 Users/Groups – leave “Match Users”=Any (default value):
 Enforce Action = Allow, and Log Events = Never (as stated in initial scenario):

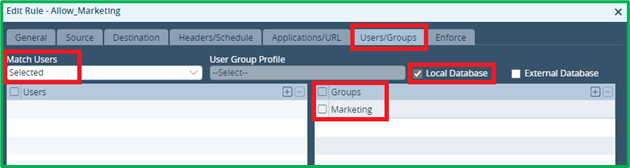
DIA Web Rule#2: Permit URLs from Social Media and Streaming categories with Trustworthy reputation for users from Marketing group, and log this to Versa Analytics:
Name: Allow_MarketingSource&Destination: standard for DIA (see DNS rule)
Application/URL match criteria would include 2 desired URL categories, and Trustworthy URL reputation:
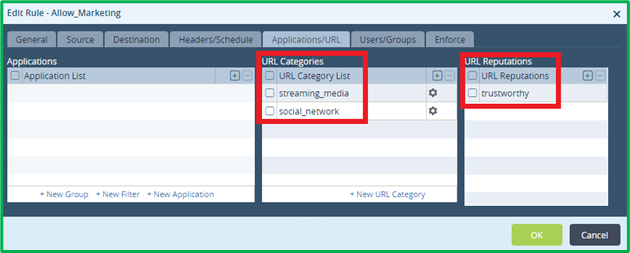 Users/Groups – set “Match Users”=Selected and select “Marketing” Group:
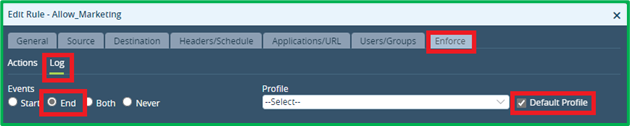
 Enforce Action = Allow, and Log Events = End and select Default Profile (normally you would have Default profile for Versa Analytics, however if you want to log those events to different collectors, you may select different LEF profile):
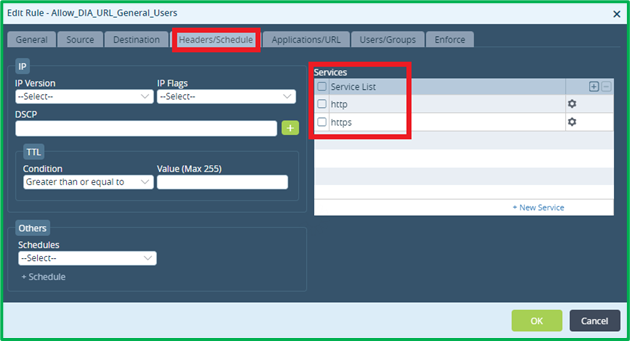
DIA Web Rule#3: Apply URL Filtering profile for all authenticated users, which will block gambling URLs, permit Social Media and Streaming URLs with justify action (except tiktok.com, which should be blocked), and permit all remaining URLs:
Name: Allow_DIA_URL_General_UsersSource&Destination: standard for DIA (see DNS rule)
Headers/Schedule match criteria would include HTTP and HTTPS as Services:
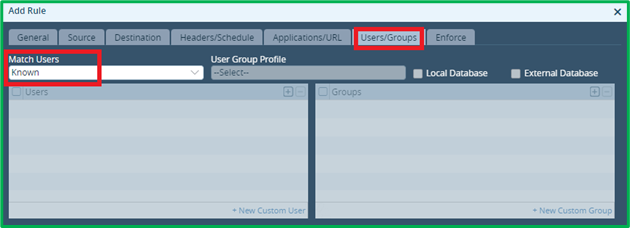
 Users/Groups – set “Match Users”=Known – this will match all authenticated users:
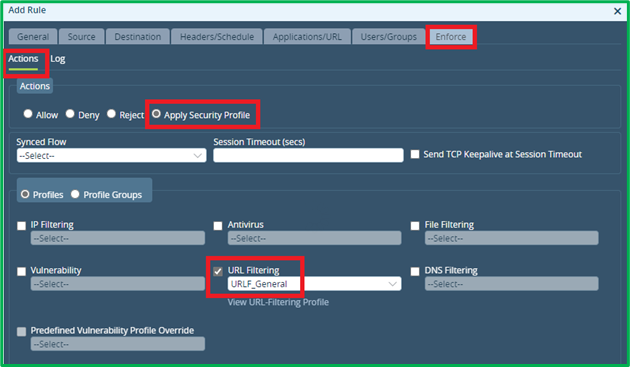
 Enforce Action = Apply Security Profile, and select URL Filtering profile, which was created upper in this section:
 Log Events = End and select Default Profile (the same as for previous rule for Marketing).
Template Configuration is complete. You can now commit to device and test.
Log Events = End and select Default Profile (the same as for previous rule for Marketing).
Template Configuration is complete. You can now commit to device and test.
Final scenario validation
Once completed all configuration steps you should observe following behavior: 1. Governmental, Medical and Financial URLs should open for all users in the organization without authentication. You should see their original SSL certificates in browser. 2. All other URLs should trigger Captive Portal redirection for Authentication: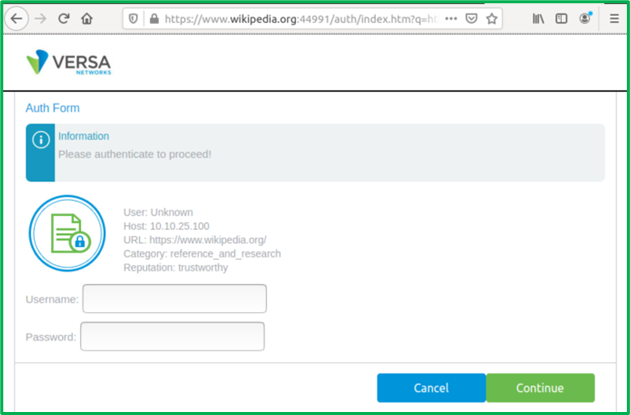 3. Once authenticated users should be able to:
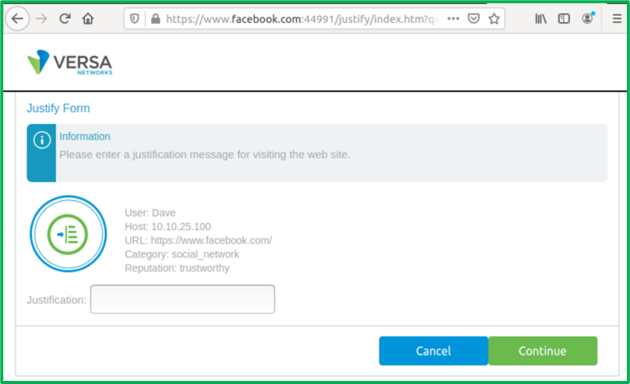
a. Access Social Media and Streaming URLs without additional actions, if they’re in Marketing group. b. Access Social Media and Streaming URLs after providing justification, if they’re not in Marketing group:
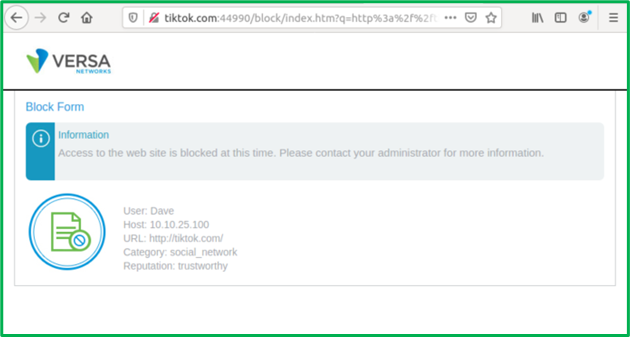
 c. TikTok would be unconditionally blocked for non-Marketing users:
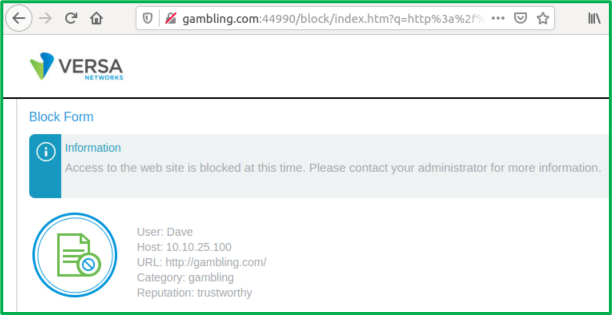
 d. All other URLs should be accessible, except those from Gambling category:
NGFW policy and URL Filtering verification
Current NGFW Access Policy statistics (counters by each Access Rule) can be seen on Device Monitor tab on Versa Director in Services->NGFW-> Polices section: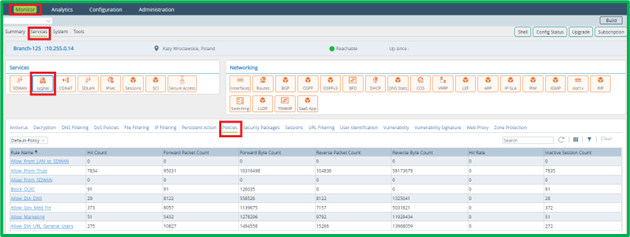 Current URL Filtering Profile statistics can be seen on Device Monitor tab on Versa Director in Services->NGFW-> URL Filtering section:
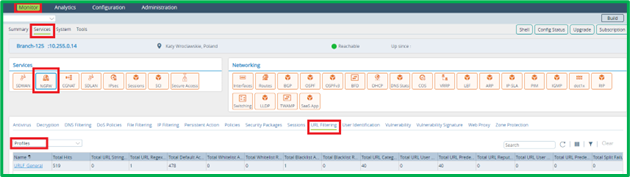
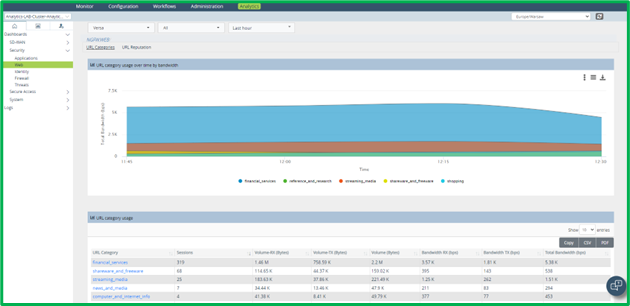
 There are also dedicated Dashboards in Versa Analytics:
1. Web (BW usage per URL Category and Reputation) – Dashboards->Security->Web:
There are also dedicated Dashboards in Versa Analytics:
1. Web (BW usage per URL Category and Reputation) – Dashboards->Security->Web:
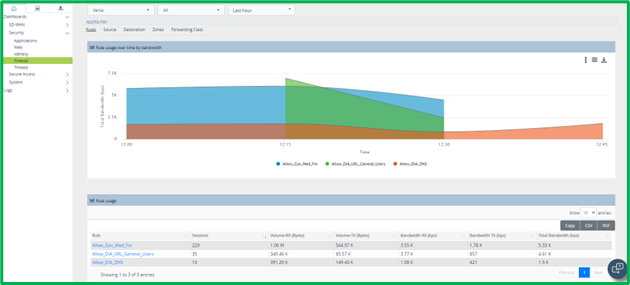
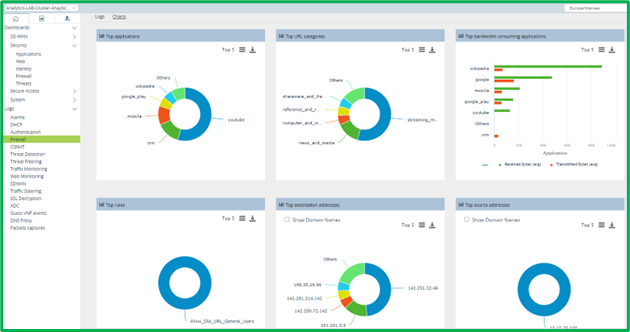
 2. Firewall (BW usage per Rules, Sources, Destinations, etc.) – Dashboards->Security-> Firewall:
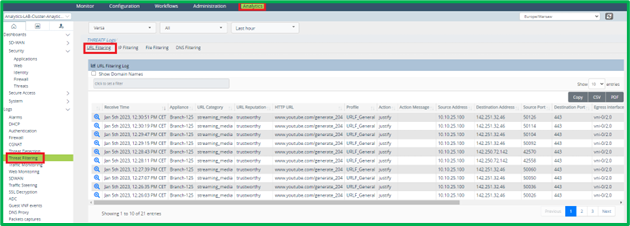
 Historical Logs for URL Filtering can be seen in Versa Analytics in Logs->Threat Filtering->URL Filtering section:
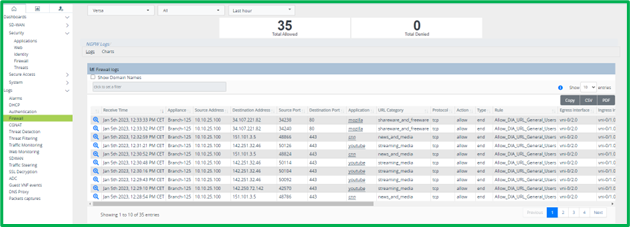
 Historical Logs for NGFW Access Policy can be seen in Versa Analytics in Logs->Firewall section:
 There are also charts available in this section, which may provide you diagrams with Top applications, URL categories, Access Rules, Sources, Destinations etc.:
Summary
In this article we’ve learnt different approaches for URL filtering: based on URL Category, URL Reputation, specific URL pattern, applied either directly in Access Policy or via URL Filtering profile.We’ve also configured components, needed for User-based policy application – Authentication policy with Captive portal and Decryption policy.
Configuration of additional components to extend URL database (Cloud URL lookup) and keep it up-to-date (SPacks auto-update) was also covered.

