
Configuring IEEE DOT1X VOS Local Authentication
In this article, we will understand what dot1x authentication control protocol is and how can a corporate network be protected from unauthorized access using Versa Secure SD-WAN VOS local authentication.Overview
EEE 802.1X is a port-based network access control (PNAC) protocol that authenticates devices before they can connect to the network and gain access to network resources. IEEE 802.1X can be configured to prevent unauthorized network devices from accessing the network and to allow known devices to connect to the network without requiring authentication. IEEE 802.1X has three required components:- Supplicant—A client that runs on the endpoint and submits credentials for authentication. A Versa Operating SystemTM (VOSTM) interface always acts as an authenticator. When a RADIUS server is the authenticating server, the VOS interface acts only as an authenticator and sends information about the supplicant to the authenticating server. With local authentication (that is, you do not use a RADIUS server or an identity provider server), the VOS interface acts as both the authenticator and the authenticating server. In this document, we are going to implement local authentication.
- Authenticator—A network access device that facilitates the authentication process by relaying the credentials of the supplicant to the authentication server. The authenticator enforces both the locally configured network access policy and the dynamically assigned network access policy returned by the authentication server.
- Authentication server—A server that validates the credentials sent by the supplicant and determines what level of network access the end user or device should receive. VOS supports a RADIUS server and a local authentication as the authentication server. This document focuses on VOS as local authentication server.
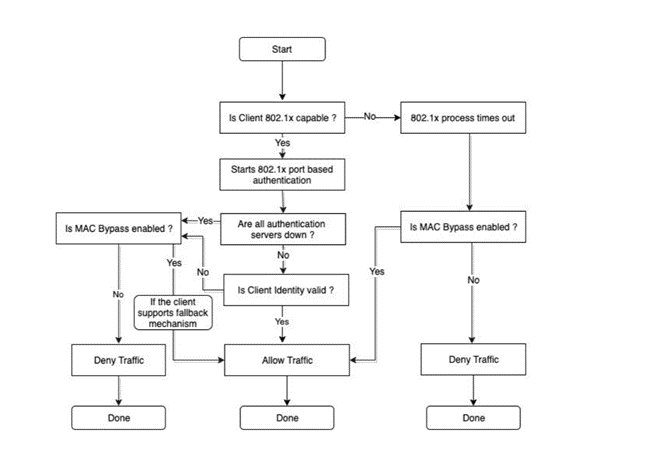
In Versa, the machine state of 802.1x is depicted below:
 Picture 1
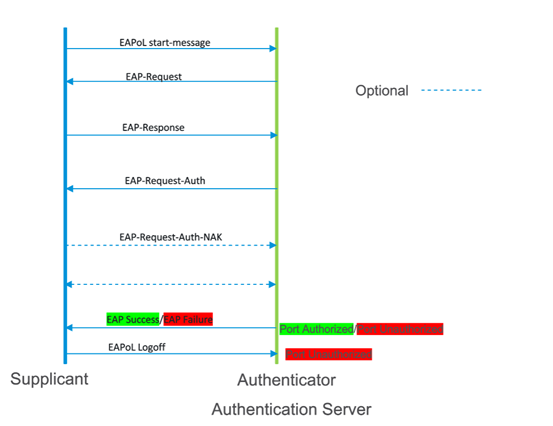
802.1x uses the Extensible Authentication Protocol [EAP] to exchange messages during the authentication process. Before authentication, the identity is unknown and all traffic is blocked except EAP messages in order to prevent unauthorized devices to gain access to network resources. EAP Over LAN (EAPoL) frames have ether type of 0x888e and use the destination multicast MAC address 01:80:c2:00:00:03. EAP messages are exchanged between Supplicant and authenticator and Radius messages are exchanged between Authenticator and Authentication server. Various EAP message types are: PEAP, EAP-TLS, PEAP-MSCHAPv2, EAP-MD5, etc… Below is the flowchart of EAP messages for local authentication:
 Picture 2
High-Level Topology
The topology is made of 01 dot1x-client and 01 non-dot1x-client to simulate a sd-wan network with DIA. The supplicant mode used is Single and VOS with IP 172.16.14.254/24 is used as both authenticator and authentication server.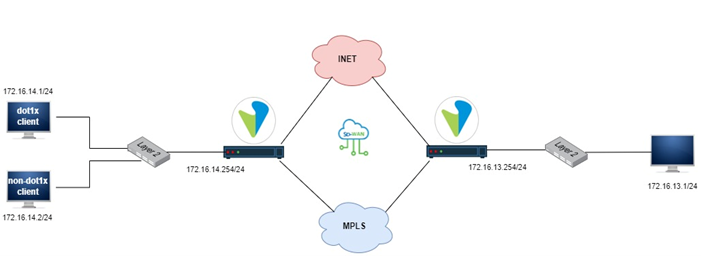 Picture 3
Configuration
VOS 802.1x local authentication supports certificate authentication based on EAP-TLS. To configure it, do follow the steps below:Step 1: Generate CA and EE Certificates Using OpenSSL
To generate CA and EE certificates on a VOS device, use OpenSSL on any Linux system to perform the procedures described in this section.Generate a CA Certificate
1. Create a file called versa-dot1x-ca.conf, and copy the following configuration text into the file, making the following changes: • Delete the first and last lines shown below. • For the name, surname, givenName, initials, and dnQualifiers fields, enter the desired values.-------------- start of versa-dot1x-ca.conf(do not copy this line) ------------ [ req ] prompt = no distinguished_name = my dn [ my dn ] # The bare minimum is probably a commonName commonName = RAS-CA countryName = US localityName = San Jose organizationName = Versa Networks Inc organizationalUnitName = VPN stateOrProvinceName = CA emailAddress = ras-ca@versa-networks.com name = <givenName> surname = <surname> givenName = <givenName> initials = <initials> dnQualifier = <dsQualifier> [ my server exts ] keyUsage = nonRepudiation, digitalSignature, keyEncipherment, keyCertSign, cRLSign extendedKeyUsage = serverAuth, clientAuth basicConstraints = CA:true subjectKeyIdentifier=hash authorityKeyIdentifier=keyid:always,issuer:always -------------- end of versa-ras-ca.conf(do not copy this line) ------------
2. Generate an RSA key-pair for the CA certificate:
~$ openssl genrsa -out versa-dot1x-ca.key 2048
Generating RSA private key, 2048 bit long modulus (2 primes)
....+++++
.................................................................................................+++++
e is 65537 (0x010001)
3. Create the CA certificate:
~$ openssl req -x509 -config versa-dot1x-ca.conf -extensions 'my server exts' -nodes -days 365 -newkey rsa:2048 -keyout versa-dot1x-ca.key -out versa-dot1x-ca.pemGenerating a RSA private key
..........+++++
.+++++
writing new private key to 'versa-dot1x-ca.key'
-----
4. Verify the newly generated CA certificate:
openssl x509 -in versa-dot1x-ca.pem -text -noout
gns3@gns3:~$ openssl x509 -in versa-dot1x-ca.pem -text -noout
Certificate:
Data:
Version: 3 (0x2)
Serial Number:
63:76:36:9d:53:73:27:32:b4:d3:8b:88:42:da:fb:9c:1e:6f:f1:88
Signature Algorithm: sha256WithRSAEncryption
Issuer: CN = pella, C = FR, L = xxx, O = Org, OU = PC-Org, ST = Paris, emailAddress = xxx@org.com, name = Ella, SN = Christian, GN = Paul, initials = PC
Validity
Not Before: Jul 25 14:10:42 2022 GMT
Not After : Jul 25 14:10:42 2023 GMT
Subject: CN = pella, C = FR, L = xxx, O = Org, OU = PC-Org, ST = Paris, emailAddress = xxx@org.com, name = Ella, SN = Christian, GN = Paul, initials = PC
Subject Public Key Info:
Public Key Algorithm: rsaEncryption
RSA Public-Key: (2048 bit)
Modulus:
00:d3:4a:52:d9:ad:ab:07:fa:13:61:da:67:0c:3d:
9e:16:dd:41:51:c2:b8:2b:03:29:93:45:e4:ce:93:
fe:12:b6:36:61:a1:76:67:89:39:0a:9e:48:2a:56:
15:85:93:b6:06:f6:93:7d:32:bd:db:fb:b7:97:84:
eb:49:41:72:4a:54:fa:f3:21:b0:3f:6f:04:ad:8d:
b0:81:0f:c5:fe:05:bb:86:8a:f4:cb:e5:8c:fb:bc:
c8:a1:05:32:22:76:0b:cc:9d:56:d3:76:35:d1:b7:
70:33:52:25:5a:b9:cf:f5:ba:98:39:f5:ab:c0:89:
bd:f5:61:06:4c:7c:de:18:db:50:98:6c:d1:59:f9:
81:c5:ff:0d:25:63:39:64:2a:94:12:e1:d6:56:6c:
85:a4:71:31:6c:04:c1:e6:25:03:07:20:23:cd:64:
90:01:9d:cb:bd:16:f6:75:f9:1d:39:b8:42:fa:ac:
04:ab:7c:c7:ce:74:b2:d9:7e:ca:8f:9d:b8:60:66:
ca:d6:89:79:6b:08:96:83:57:6e:02:34:5a:6d:50:
db:e1:19:27:04:3a:22:14:85:32:1d:1b:c5:95:e3:
1d:ac:b5:f9:72:c8:b9:f3:c6:d2:f0:08:db:be:e1:
d6:3d:7c:bc:4a:37:19:18:e5:a9:e1:1b:69:7d:c1:
98:27
Exponent: 65537 (0x10001)
X509v3 extensions:
X509v3 Key Usage:
Digital Signature, Non Repudiation, Key Encipherment, Certificate Sign, CRL Sign
X509v3 Extended Key Usage:
TLS Web Server Authentication, TLS Web Client Authentication
X509v3 Basic Constraints:
CA:TRUE
X509v3 Subject Key Identifier:
61:2F:1E:C3:05:4C:61:03:D3:90:13:47:C4:8E:DA:2C:FC:50:A3:D4
X509v3 Authority Key Identifier:
keyid:61:2F:1E:C3:05:4C:61:03:D3:90:13:47:C4:8E:DA:2C:FC:50:A3:D4
DirName:/CN=pella/C=FR/L=xxx/O=Org/OU=PC-Org/ST=Paris/emailAddress=xxx@org.com/name=Ella/SN=Christian/GN=Paul/initials=PC
serial:63:76:36:9D:53:73:27:32:B4:D3:8B:88:42:DA:FB:9C:1E:6F:F1:88

Signature Algorithm: sha256WithRSAEncryption
b1:4d:cb:54:0c:4c:e2:8e:57:c4:1f:31:3e:88:b6:24:d4:97:
ce:b0:38:b8:99:b5:1a:45:2c:b0:3c:4c:47:11:40:26:cf:dc:
a5:5e:1e:a6:76:32:54:d4:c4:1b:35:75:14:e3:58:6d:2e:28:
3a:8e:23:31:5e:32:c9:09:13:8f:fb:30:3a:9b:99:26:a0:37:
f5:a6:22:bb:6e:5b:77:b8:ed:ae:d6:f4:a0:9f:97:1d:d8:d7:
f2:74:11:20:d6:f6:8d:b7:a3:68:b9:26:60:61:89:6f:d5:f8:
a0:04:63:bf:84:0f:37:8e:f0:e4:92:32:cd:89:82:95:c3:39:
d1:b1:75:59:7a:0b:bc:d0:70:09:ba:75:25:76:50:11:1b:5d:
de:55:b2:ee:42:a5:9f:c2:1c:26:9d:9d:aa:22:0f:ac:64:64:
d4:df:0f:af:3e:cb:47:38:ad:d6:91:78:e2:43:5b:22:f6:68:
82:eb:94:7a:03:3d:32:ff:53:14:d0:a5:00:2a:4f:aa:03:2e:
a0:1d:a1:87:27:65:09:1f:dc:a8:5c:bc:18:0e:44:2f:15:55:
da:0c:59:aa:04:2c:2a:37:69:b8:08:2c:60:38:6d:71:bc:b0:
4b:c0:f9:b2:60:e0:9b:d8:c3:84:99:a2:94:58:58:3d:9f:ba:
84:c4:06:24
gns3@gns3:~$
Generate an EE Certificate
1. Create a file called client-ee.conf, and copy the following configuration text into the file, making the following changes: • Delete the first and last lines shown below. • Change req_distinguished_name to the desired distinguished name.-------------- start of client-ee.conf(do not copy this line) ------------ [req] default_bits = 2048 default_md = sha1 encrypt_key = no string_mask = utf8only distinguished_name = req_distinguished_name req_extensions = v3_req prompt = no [req_distinguished_name] countryName = US stateOrProvinceName = CA localityName = Fremont organizationName = Versa Networks Inc. commonName = client [ usr_cert ] subjectKeyIdentifier = hash authorityKeyIdentifier = keyid,issuer basicConstraints = CA:FALSE copy_extensions = copy subjectAltName = email:copy [v3_req] basicConstraints = CA:false keyUsage = nonRepudiation, digitalSignature, keyEncipherment extendedKeyUsage = clientAuth -------------- end of client-ee.conf (do not copy this line) ------------2. Create a file called versa-dot1x-ca.srl that contains the text string 1000 When the -CA option is used to sign a certificate it uses a serial number specified in a file. This file consist of one line containing an even number of hex digits with the serial number to use. After each use the serial number is incremented and written out to the file again. The default filename consists of the CA certificate file base name with “.srl” appended. For example if the CA certificate file is called “mycacert.pem” it expects to find a serial number file called “mycacert.srl”
~$ cat versa-dot1x-ca.srl
1000
3. Generate an RSA key-pair for the end-entity certificate:
~$ openssl genrsa -out client-ee.key 2048
Generating RSA private key, 2048 bit long modulus (2 primes)
....................................+++++
.................................+++++
e is 65537 (0x010001)
4. Generate a certificate request for the end-entity certificate:
~$ openssl req -new -out client-dot1x-ee.csr -newkey rsa:2048 -nodes -sha256 -keyout client-ee.key -config client-ee.conf -extensions v3_req
Generating a RSA private key
........................+++++
................+++++
writing new private key to 'client-ee.key'
5. Sign the end-entity certificate using the CA certificate: ~$ sudo openssl x509 -req -days 365 -in client-dot1x-ee.csr -out client-ee.pem -CA versa-dot1x-ca.pem -CAkey versa-dot1x-ca.key -extfile ./client-ee.conf -extensions v3_req [sudo] password for gns3: Signature ok subject=C = FR, ST = IDF, L = locality, O = PC-Org, emailAddress = xxx@org.com, CN = clients Getting CA Private Key 6. Check the end-entity certificate:
openssl x509 -in client-ee.pem -text -noout
gns3@gns3:~$ openssl x509 -in client-ee.pem -text -noout
Certificate:
Data:
Version: 3 (0x2)
Serial Number: 4097 (0x1001)
Signature Algorithm: sha256WithRSAEncryption
Issuer: CN = pella, C = FR, L = locality, O = Org, OU = PC-Org, ST = Paris, emailAddress = xxx@org.com, name = Ella, SN = Christian, GN = Paul, initials = PC
Validity
Not Before: Jul 25 14:22:38 2022 GMT
Not After : Jul 25 14:22:38 2023 GMT
Subject: C = FR, ST = IDF, L = locality, O = PC-Org, emailAddress = xxx@org.com, CN = clients
Subject Public Key Info:
Public Key Algorithm: rsaEncryption
RSA Public-Key: (2048 bit)
Modulus:
00:e1:1d:fd:e3:8e:07:9d:08:d3:39:f4:6c:f5:e8:
c0:8d:f4:80:42:7b:64:d1:d7:ad:54:82:ad:20:4a:
4b:4e:12:1b:0f:1a:c9:3e:fb:da:65:1c:2f:ba:7a:
a8:82:af:4e:cf:ea:27:60:1a:0a:80:a0:3c:9d:cc:
a5:93:9b:23:5b:ff:15:65:1c:3d:2b:6a:6b:41:22:
20:22:4e:d3:56:f0:bf:f0:21:58:bf:c1:04:93:ed:
6e:c0:96:d9:28:32:e4:e5:68:d5:75:e3:81:8e:77:
7f:66:ef:2f:96:96:e8:0b:ed:c2:97:3c:dd:09:2c:
78:8d:38:1e:aa:88:48:3c:48:f7:01:e3:41:88:99:
38:be:3e:86:6c:c9:ef:a2:c2:2e:ea:18:1a:c7:b9:
85:fc:25:cb:7c:3b:7d:4c:06:c8:90:86:32:04:42:
16:e4:26:50:67:1f:e3:61:d7:23:e3:5d:f7:52:3b:
45:52:72:d1:b6:a2:e4:4a:2e:f4:0c:5c:81:47:d9:
08:4a:e3:3f:92:91:e1:6c:5a:e9:fe:fd:00:a2:22:
d5:67:bc:0f:fb:4c:47:a7:0f:80:21:62:8d:1f:59:
73:53:86:f3:ff:e5:d0:7a:b2:56:27:4d:1d:01:26:
5b:98:96:58:b0:a4:f8:2f:4d:fe:ee:19:4f:4b:e2:
c4:53
Exponent: 65537 (0x10001)
X509v3 extensions:
X509v3 Basic Constraints:
CA:FALSE
X509v3 Key Usage:
Digital Signature, Non Repudiation, Key Encipherment
X509v3 Extended Key Usage:
TLS Web Client Authentication
Signature Algorithm: sha256WithRSAEncryption
72:28:6d:94:70:c6:18:e6:a6:df:ed:83:c7:4d:92:78:7e:af:
27:59:01:b2:3d:d5:d3:22:14:4d:6b:97:27:d8:f0:da:dd:e0:
7e:05:a6:fc:9b:05:ff:b4:82:a8:99:72:f1:99:0c:3e:a1:ca:
05:ba:26:ba:be:5a:af:f6:4e:b2:bf:8d:39:78:77:9d:b5:eb:
db:ef:78:08:f8:75:aa:fe:97:2e:12:ae:5b:08:fa:44:24:79:
e5:65:03:93:4a:38:88:37:fa:19:c7:45:06:c3:af:81:2b:55:
11:63:cf:e4:05:44:d5:7b:a1:30:ca:63:fc:1c:f2:08:b4:1a:
bf:e2:47:2a:65:e9:a8:a3:b6:c2:4a:37:06:a2:cf:09:d2:b7:
b8:ca:68:09:d6:c5:67:d2:7f:72:4e:f4:fe:e4:d5:6e:06:ad:
e2:7b:90:ef:bb:e1:35:5e:1b:03:4c:fa:87:2a:63:f1:cf:b2:
18:4d:84:f1:11:fd:35:18:47:cd:e2:aa:62:bd:75:00:09:89:
b9:c6:07:a2:e2:9a:95:df:11:49:05:65:68:87:e2:a4:f8:1f:
7e:91:02:c9:be:06:42:23:a1:d6:d9:90:d1:ee:41:ba:c0:d2:
28:a5:ad:1d:fc:24:6d:ec:32:58:2a:55:04:6a:42:1e:3a:81:
6a:52:5f:c2
7. Create a file called server-ee.conf, and copy the following configuration text into the file, making the following changes:
- Delete the first and last lines shown below.
- Change req_distinguished_name to the desired distinguished name.
-------------- start of server-ee.conf(do not copy this line) ------------
[req]
default_bits = 2048
default_md = sha1
encrypt_key = no
string_mask = utf8only
distinguished_name = req_distinguished_name
req_extensions = v3_req
prompt = no

[req_distinguished_name]
countryName = US
stateOrProvinceName = CA
localityName = Fremont
organizationName = Versa Networks Inc.
commonName = server

[ usr_cert ]
subjectKeyIdentifier = hash
authorityKeyIdentifier = keyid,issuer
basicConstraints = CA:FALSE
copy_extensions = copy
subjectAltName = email:copy
[v3_req]
basicConstraints = CA:false
keyUsage = nonRepudiation, digitalSignature, keyEncipherment
extendedKeyUsage = serverAuth
-------------- end of server-ee.conf(do not copy this line) ------------
8. Generate an RSA key-pair for the end-entity certificate:
~$ openssl genrsa -out server-ee.key 2048
Generating RSA private key, 2048 bit long modulus (2 primes)
....+++++
......+++++
e is 65537 (0x010001)


9. Generate a certificate request for the end-entity certificate:
~$ openssl req -new -out server-dot1x-ee.csr -newkey rsa:2048 -nodes -sha256 -keyout server-ee.key -config server-ee.conf -extensions v3_req
Generating a RSA private key
................................+++++
......................................................................................+++++
writing new private key to 'server-ee.key'
-----


10. Sign the end-entity certificate using the CA certificate:
~$ sudo openssl x509 -req -days 365 -in server-dot1x-ee.csr -out server-ee.pem -CA versa-dot1x-ca.pem -CAkey versa-dot1x-ca.key -extfile ./server-ee.conf -extensions v3_req
Signature ok
subject=C = FR, ST = IDF, L = locality, O = PC-Org, emailAddress = xxx@org.com, CN = servers
Getting CA Private Key


11. Check the end-entity certificate:
openssl x509 -in server-ee.pem -text -noout
gns3@gns3:~$ openssl x509 -in server-ee.pem -text -noout
Certificate:
Data:
Version: 3 (0x2)
Serial Number: 4100 (0x1004)
Signature Algorithm: sha256WithRSAEncryption
Issuer: CN = pella, C = FR, L = locality, O = Org, OU = PC-Org, ST = Paris, emailAddress = xxx@org.com, name = Ella, SN = Christian, GN = Paul, initials = PC
Validity
Not Before: Jul 25 14:34:46 2022 GMT
Not After : Jul 25 14:34:46 2023 GMT
Subject: C = FR, ST = IDF, L = locality, O = PC-Org, emailAddress = xxx@org.com, CN = servers
Subject Public Key Info:
Public Key Algorithm: rsaEncryption
RSA Public-Key: (2048 bit)
Modulus:
00:ce:f8:14:0e:c6:84:83:f3:8f:82:04:f2:f3:67:
c0:06:ab:c8:40:59:18:6a:a1:7c:04:fe:c1:5f:e1:
1a:7f:3b:1c:f4:93:97:78:ff:c1:6a:7c:62:ea:38:
e5:62:84:85:07:c0:68:b2:bf:c3:ce:5a:8d:1d:b8:
09:29:ef:de:d5:ec:6e:03:e1:cc:88:03:7e:51:3c:
e4:93:ab:f3:96:45:b8:bf:a0:10:c0:80:c1:d5:c7:
ab:c8:a0:53:73:2e:6d:9c:b3:29:9f:02:14:d6:5c:
02:2b:f1:83:f8:97:2c:7d:53:89:1f:aa:3e:ec:07:
de:0c:9a:37:42:cd:df:98:75:0c:6d:1e:24:9a:4e:
90:b7:21:8d:9d:b8:99:68:60:c4:0e:35:f9:ee:e5:
d6:ac:4f:6f:e9:a4:fb:48:1a:a5:7f:11:d4:36:4c:
3d:69:46:c8:0d:d5:a3:b8:3d:ad:65:99:71:c0:8d:
58:b5:9f:8c:67:56:ff:ed:b1:cd:63:ce:20:45:11:
47:44:e4:15:7d:21:60:d6:f3:70:9e:df:21:ff:29:
9b:e5:9b:e9:a6:d1:8a:05:6e:dd:12:25:33:5d:17:
9d:15:01:54:0f:54:a5:e4:8f:4e:3a:e4:7d:f5:9b:
a7:f0:07:f4:35:6a:23:24:1c:c0:25:69:b4:81:b9:
84:21
Exponent: 65537 (0x10001)
X509v3 extensions:
X509v3 Basic Constraints:
CA:FALSE
X509v3 Key Usage:
Digital Signature, Non Repudiation, Key Encipherment
X509v3 Extended Key Usage:
TLS Web Server Authentication
Signature Algorithm: sha256WithRSAEncryption
34:5c:38:1b:b0:b0:0a:3e:85:b8:cf:a5:81:4c:bc:97:ae:ec:
29:aa:2a:5b:1b:6f:e1:83:0a:c1:be:7b:9f:6a:29:34:52:28:
a3:17:73:8d:f9:ef:00:37:d9:b4:f6:3d:8e:de:c0:4e:99:16:
69:38:90:6b:8a:4a:01:4d:be:c5:86:43:36:58:c9:7c:fb:26:
29:2f:a2:a4:1b:58:87:d8:4e:13:75:15:68:a2:8f:c7:88:65:
02:7f:fd:32:f6:a0:99:cc:e5:a7:49:30:88:1f:32:60:0c:43:
40:d2:37:f8:f1:80:a7:0f:11:d2:5e:72:09:5d:a8:79:24:b0:
d5:ad:63:17:4a:a0:be:14:ac:de:01:b9:f5:a0:89:a6:04:98:
79:34:e9:7a:3c:73:02:eb:f4:31:fe:7b:f4:63:6b:22:c8:b1:
f0:c2:c7:ae:fe:bb:23:dd:02:27:11:7a:39:51:8a:97:b0:50:
91:45:74:be:d2:a4:ae:6a:31:3a:82:28:fa:d4:bc:87:8f:4f:
1a:f2:d2:d0:89:65:e1:20:33:34:aa:5e:41:c9:2c:97:1c:85:
6f:44:6a:55:26:a0:04:94:b6:ec:32:ee:11:78:37:24:6c:d4:
0f:48:8c:76:6a:b8:8d:07:01:99:fd:d6:91:93:5d:0f:c1:d4:
16:16:5f:f2
Step 2: Configure VOS for 802.1x
In this section, we configure the following: – CA and Self-Signed Server certificates upload in appliance via Versa Director – Authentication profile and dot1x settings for local authentication Certificates generated in previous section (versa-dot1x-ca.pem and server-ee.pem) are used along with associated keys.Upload CA Certificates to Versa Director
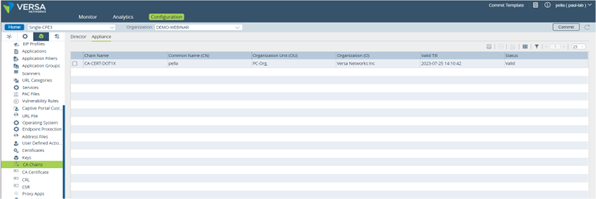
Go to Objects & Connectors -> Custom Objects -> CA Chains -> Director tab and click on Upload button Provide the certificate chain name and file as below: Picture 13
Once uploaded in Director, select the appliance tab and upload the CA certificate to the appliance as indicated below:
 Picture 14
The next step is to upload self-signed certificates used by the VOS to authenticate clients. We have generated this certificate using OpenSSL in previous section.
>> We upload keys in Appliance through Director (Objects & Connectors->Custom Objects-> Keys)
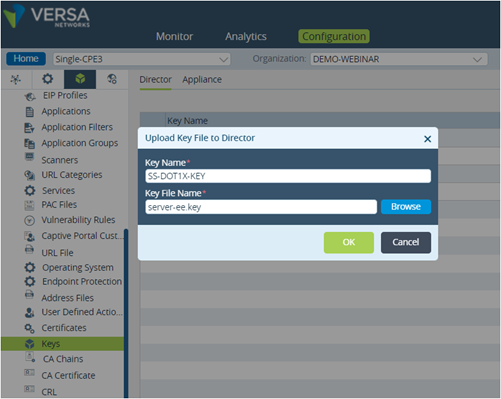 Picture 15
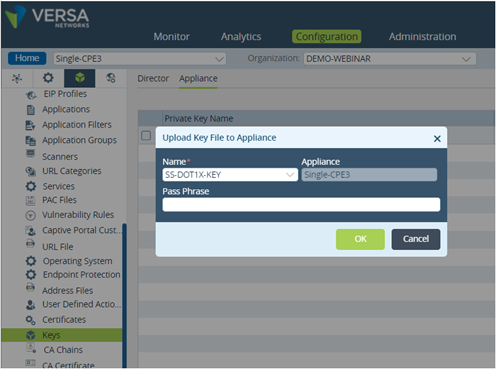 Picture 16
>> We upload certificate in Appliance through Director (Objects & Connectors->Custom Objects-> Certificates)
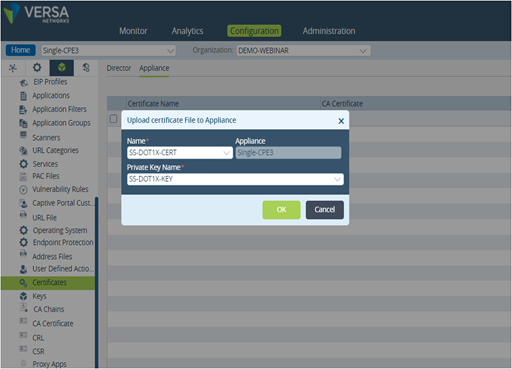 Picture 17
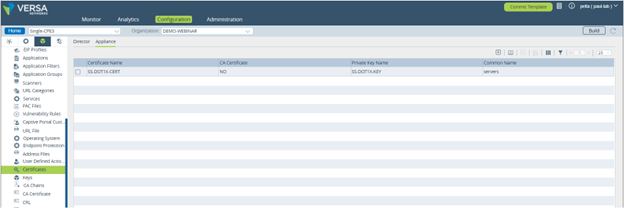 Picture 18
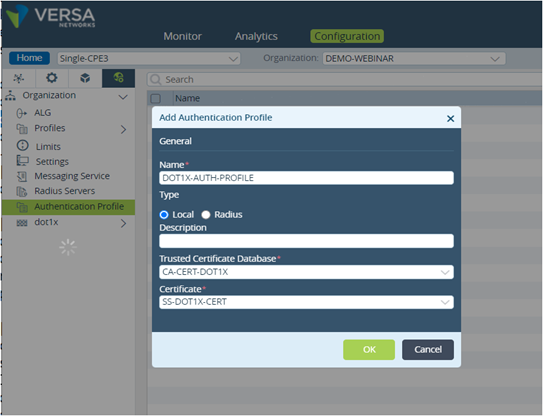
Configure Authentication Profile
Go to Others -> Organization-> Authentication Profile and click on Add button Select the CA certificate previously uploaded as Trusted Certificate Database and Self-Signed Certificate as Server Certificate. This later certificate is used to perform EAP-TLS authentication with the dot1x client.
 Picture 19
Configure dot1x Authentication Control
Go to Others -> dot1x -> Authentication Control and define Role and Supplicant.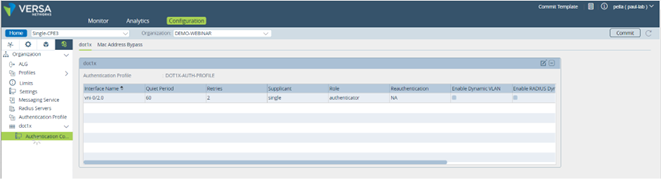 Picture 20
In this demo, we have selected single mode of Supplicant which means that authenticate only the first end device. All other end devices that connect to the port later are allowed access without any further authentication. The subsequent devices effectively piggyback on the first end device’s authentication.
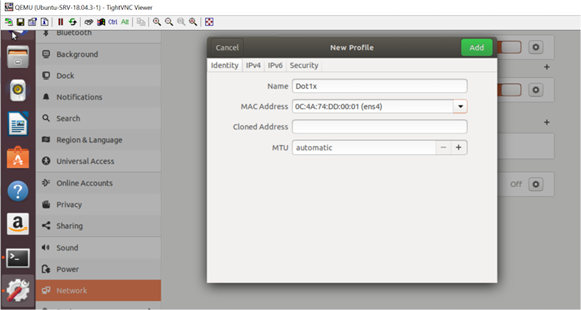
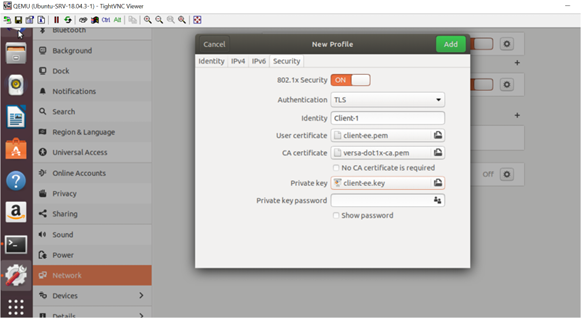
Step 3: Configure dot1x client (Ubuntu)
A new profile called Dot1x is configured with client and CA certificates that have been generated in previous section.
 Picture 21
 Picture 22
As soon as a new profile is added, the connection is established, and device is authenticated.
Verification
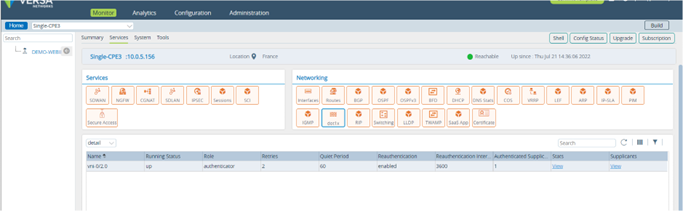
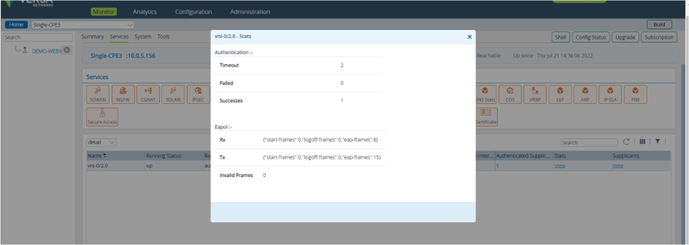
Under monitoring ->dot1x tab, we can see authenticated supplicant count along with various statistics.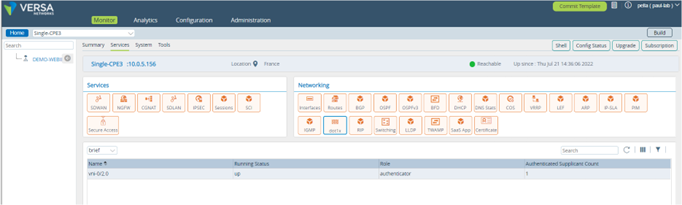 Picture 23
 Picture 24
 Picture 25
Using CLI, we can verify the service as below:
The screenshot below shows that user is dot1x is authenticated as indicated in authentication-state and authenticated-supplicant-count.
admin@Single-CPE3-cli> show orgs org-services DEMO-WEBINAR access authentication-control dot1x interfaces detail
access authentication-control dot1x interfaces detail vni-0/2.0
running-status up
role authenticator
retries 2
quiet-period 60
reauthentication enabled
reauthentication-interval 10
authenticated-supplicant-count 1
stats authentication timeout 0
stats authentication failed 0
stats authentication successes 474
stats eapol rx start-frames 0
stats eapol rx logoff-frames 0
stats eapol rx eap-frames 3792
stats eapol tx start-frames 0
stats eapol tx logoff-frames 0
stats eapol tx eap-frames 4266
stats eapol invalid-frames 0
supplicants supplicant 0c:4a:74:dd:00:01
state Authenticated
authentication-state authenticated
reauthentication-interval 10
reauthentication-due 8
retry-count 0
The command below shows the role (authenticator/supplicant) of VOS
admin@Single-CPE3-cli> show orgs org-services DEMO-WEBINAR access authentication-control dot1x interfaces brief
AUTHENTICATED
RUNNING SUPPLICANT SUPPLICANT
NAME STATUS ROLE STATE COUNT
--------------------------------------------------------------
vni-0/2.0 up authenticator - 1
To see interfaces statistics, issue the command below
admin@Single-CPE3-cli> show orgs org-services DEMO-WEBINAR access authentication-control dot1x interfaces statistics
access authentication-control dot1x interfaces statistics vni-0/2.0
control rx-pkts 4121
control tx-pkts 5717
data rx-pkts 1673
data rx-pkts-dropped 0
data rx-auth-failed-pkts-dropped 0
data rx-error-pkts-dropped 0
data rx-mab-pkts-allowed 0
data tx-pkts 1570
data tx-pkts-dropped 0
data tx-auth-failed-pkts-dropped 0
data tx-error-pkts-dropped 0
data tx-mab-pkts-allowed 0
It’s also possible to check the connection status on the client.
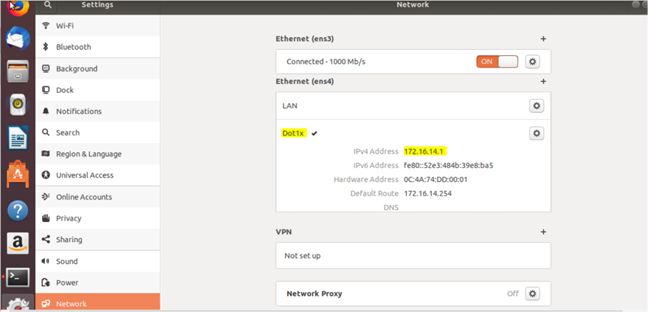
Picture 29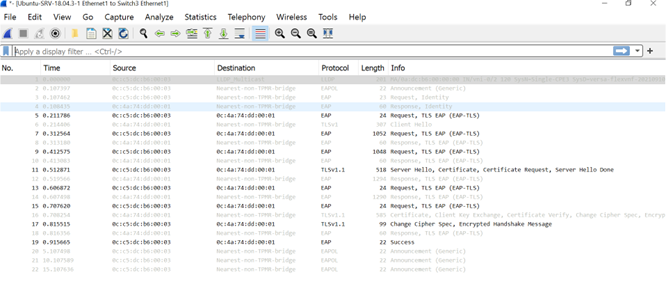 Picture 30
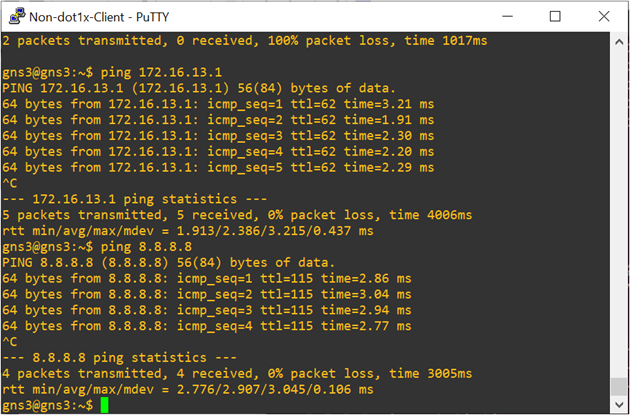
Screenshots below display the connectivity of both dot1x client and non dot1x client to internet and sd-wan remote client after dot1x client authentication.
 Picture 31
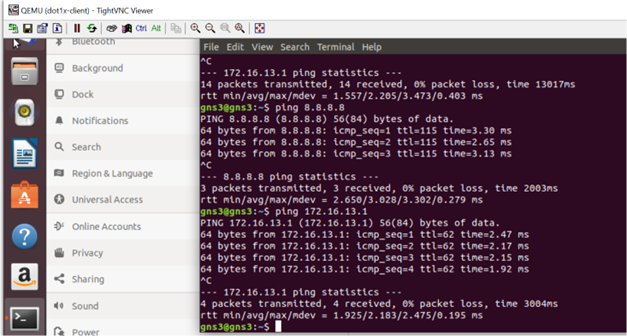 Picture 32
