Your first API Call in Concerto
Create an Internet Protection Rule via Swagger
by Sylvain Goze
1. Overview
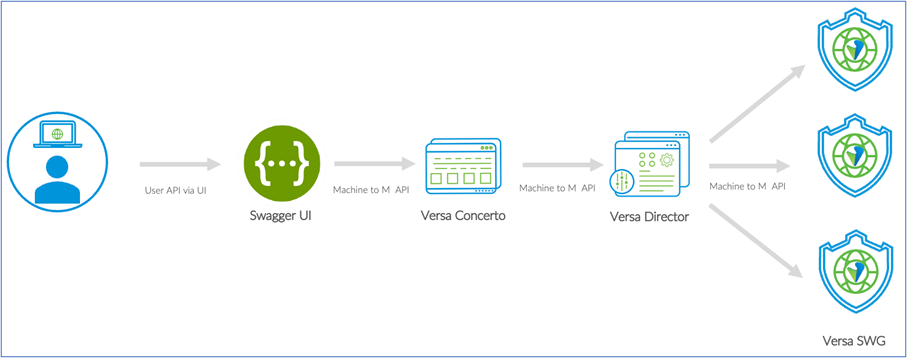
This document explains how to work with APIs in Concerto and create Internet Protection Rules. It relies on Swagger which is an API tool available in both: Concerto and Director. Before we get started, let’s get familiar with a few components.
API: API means Application Programming Interface. It allows a direct communication with the server backend software with limited human interaction. When dealing with Concerto or Director, it means you can configure, monitor & analyze everything in the Versa ecosystem in a programmatic way.
JSON: (JavaScript Object Notation) is a data format. It is easy for humans to read and write. It is easy for machines to parse and use. So, it makes it the perfect candidate for what we are trying to achieve here: Communicate with the Concerto backend in a programmatic way. You will see throughout the documentation that most data we are pushing to Concerto is formatted in JSON.
HTTP REQUEST: An HTTP request is made by a client, to a Web server. The aim of the request is to access a resource on the server. To make the request, the client uses a URL and a method. The primary or most used HTTP methods are POST, GET, PUT, and DELETE. These methods correspond to create, read, replace, and delete operations, respectively in Concerto. For instance, reading an Internet Protection rule is achieved via a GET operation and return a JSON formatted output (the rule).
SWAGGER : Because not everyone is a programmer and because dealing with API can be a bit overwhelming , there is sometimes a need for an extra layer of abstraction between humans and APIs. Swagger was built for this exact purpose. It is an OpenSource WebUI that makes API easier to work with.
2. Authentication
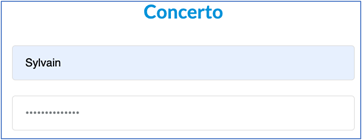
The API allows you do everything a normal user can do via Concerto so naturally you will have to authenticate yourself before you attempt anything. First, you must connect to Concerto with your credential as you usually do.
Once this is done, the Swagger API is reachable via the following URL:
https:///portalapi/swagger-ui.html
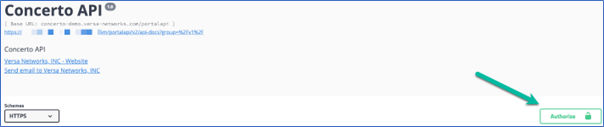
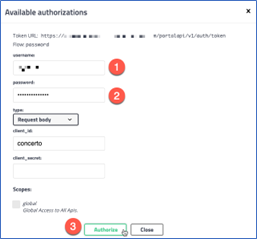
In Swagger, every action (HTTP request) must be approved before it is executed. Swagger will verify if the end-user requests are authenticated via an API key. Use the Authorize button on the right side of the screen to generate this key:
You must:
1) Provide your Concerto username
2) Provide your Concerto password
3) Click on Authorize
4) Click on Close.
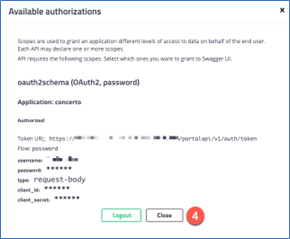
At this stage you are authenticated, well done! We can move on to the next step.
3. Finding your way in the Swagger UI
Let’s assume this is the first time you see the Swagger UI. You might feel overwhelmed with the list of menus.
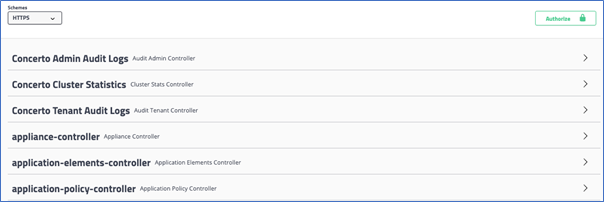
However, if you look closely, you will realize the Concerto UI & API use the same acronyms. So, for instance if you want to deal with Internet Protection rules just search for this string in Swagger.
• In Concerto the Menu is named “Internet Protection”
• In Swagger the menu is named “Internet-protection-controller”

Once you click on a section (internet-protection-controller in the example) you will see the possible actions for it. Such as:
1) Create a rule: Via an HTTP POST
2) See a rule: Via an HTTP GET
3) Update a rule: Via an HTTP PUT
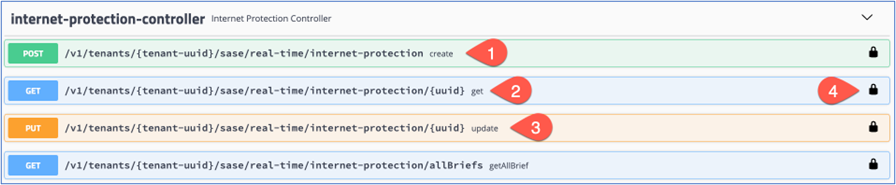
Note that in some cases the DELETE API calls are not in the same sections as the GET, POST and PUT for a specific function, but are in a dedicated DELETE section. In addition, a locker (4) should be displayed on the right side (lock position) when you are authenticated.
4. Getting your Tenant UUID
Your Tenant is your own little world in Concerto and the center of everything you do. As a matter of fact, it will be required for everything you do via the API as well. Now, the API uses a programmatic way to do things (compared to the UI) and instead of the tenant name , you will have to deal with the tenant ID ( aka Tenant UUID ). To get your Tenant UUID, do the following:
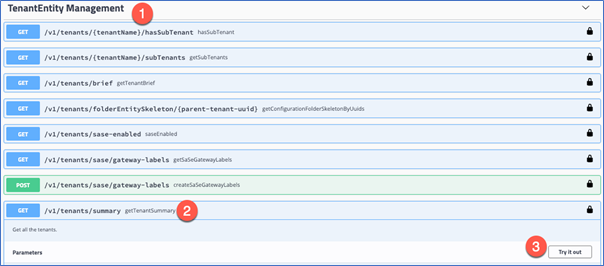
1) Get into the TenantEntity Management menu of Swagger
2) Click on /v1/tenants/summary
3) Click on the try it out button
4) Click on the execute button
![]()

In the response body menu, you will see the UUID value followed by your tenant’s name (Sylvain in the example with the UUID xxx- a2f181fd). This value is your Tenant UUID. Save it somewhere, we will need it later.
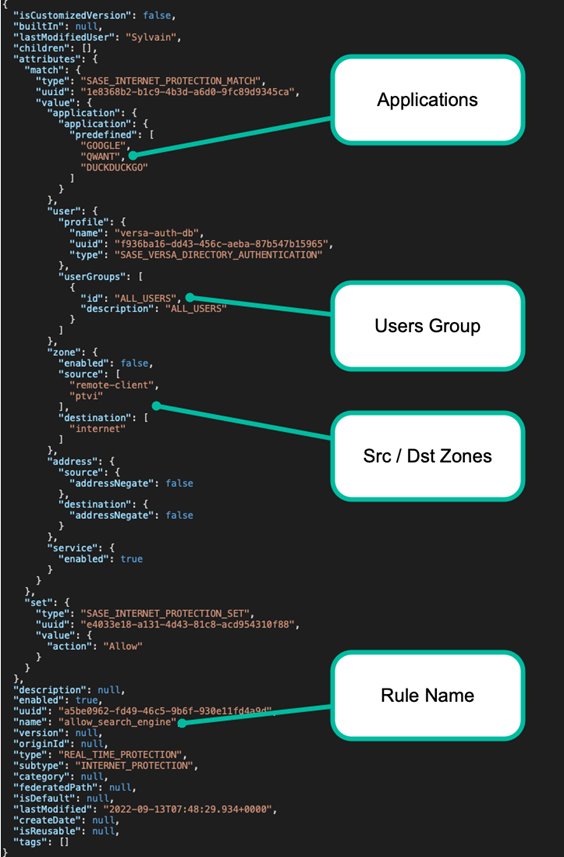
5. Getting a rule template
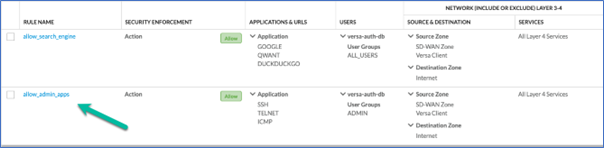
The easiest way to create your first internet protection rule is to get a JSON sample. This way you will only have to replace a couple of variables in your sample. We have below an existing rules that allows access to well-known search engine (GOOGLE, QWANT & DUCKDUCKGO ) to the group ALL_USERS.

So, let’s get the JSON template of this rule using Swagger.
In the internet-protection-controller section:
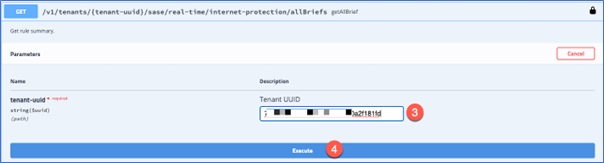
1) Click on GET/v1/tenants/{tenant-uuid}/sase/real-time/internet-protection/allBriefs
2) Click on Try it Out
3) Add you Tenant UUID in the textbox
4) Click on Execute
5) If things run normally, you should get a 201 code.
6) The UUID of the rule is visible in the black output, copy it somewhere.
![]()


Now that we have the UUID of this rule, we will go in a different section to get the rule in a JSON format.
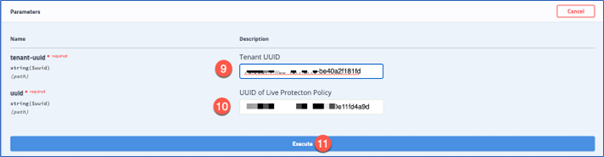
7) Click on GET/v1/tenants/{tenant-uuid}/sase/real-time/internet-protection/{uuid}
8) Click on Try it Out
9) Add you Tenant UUID in the textbox
10) Add the rule UUID you go earlier in the textbox
11) Click on Execute
12) Scroll down a bit and you ll see your rule formatted in JSON

The rule is formatted in JSON which helps a lot for it to be read. You can quickly spot the different areas that interest us to create another similar rule such as:
• The allowed applications
• The user group
• The source and destination zone
• The rule name
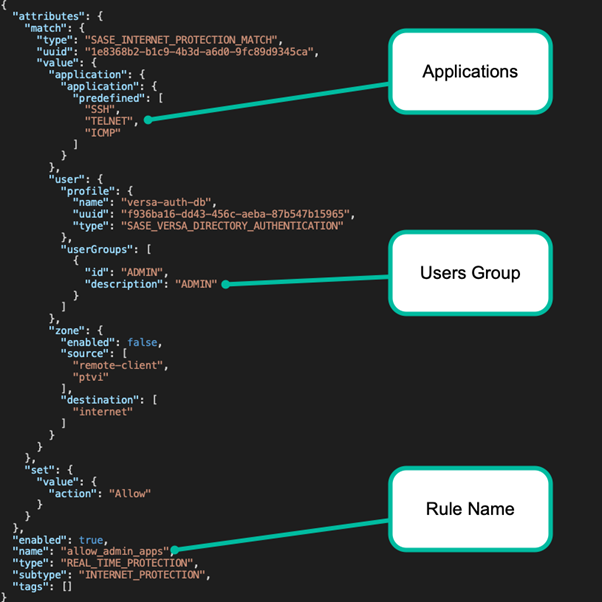
6. Creating your own rule
Using the template from the previous section, we will create our own rule. This new rule will allow members of the ADMIN group the usage of the application TELNET, SSH & ICMP over the INTERNET. For this, you only have to change the userGroup , application and name section to get the desired outcome. Also don’t forget to remove the UUID from the previous rules; a brand-new rule will be created here and Concerto will take care to attribute a new UUID for this rule on the fly.
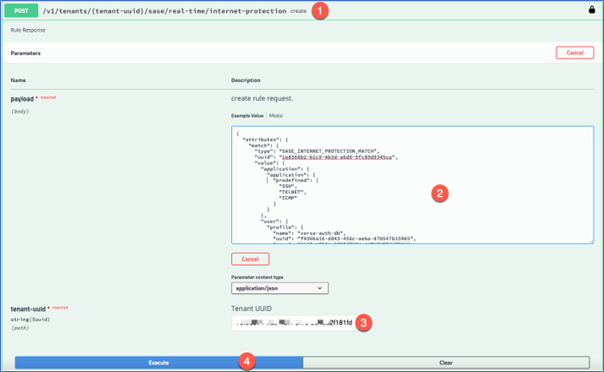
Now that the JSON based rule is ready, we can instruct Swagger to push it to the Concerto backend. In the internet-protection-controller section:
1) Click on POST /v1/tenants/{tenant-uuid}/sase/real-time/internet-protection
2) Paste your JSON based rule in the payload section
3) Add you Tenant UUID in the textbox
4) Click on Execute. Again, if things run normally, you should get a 201 code.
Go back in the Concerto UI in the Internet Protection Rules menu. Congratulation, you have created your first rule via Swagger using APIs 😊